Pages

Thursday, April 30, 2015

NEW LEICA M MONOCHROME


Maximum image quality in black and white

In a press release, Leica Camera AG made the following announcement:

Leica Camera AG, Wetzlar, is taking the next step forward in its successful digital black-and-white photography concept for the Leica M rangefinder camera system and presents the new Leica M Monochrom (Type 246). With improved performance and features and a newly developed black-and-white sensor, the camera by far exceeds the high standards set by its predecessor. At the same time, it keeps its core competence sharply in focus: black-and-white pictures with maximum quality in all respects.

The new components of the Leica M Monochrom (Typ 246) are a high-performance Leica Maestro image processor as installed in the current Leica M and a buffer memory with a capacity expanded to two gigabytes. This combination ensures higher speed and makes the Leica M Monochrom even more versatile. For example, as the processor enables extremely fast processing of the image data captured by the sensor, sequences can now be shot much faster and assessed almost instantaneously in review mode on the camera’s monitor. As a further benefit, the Leica Maestro image processor also takes less than two seconds to deliver high-quality JPEG files in addition to the RAW data files in DNG format.


Another highlight of the camera is a new 24-megapixel high-resolution black-and-white sensor in full-frame format without a low-cut filter. As the sensor of the Leica M Monochrom does without a color filter, which means that interpolation is no longer required for the calculation of luminance values, it enables exceptionally sharp pictures at all sensitivity settings up to ISO 25 000 with exceptional depth, clarity and resolution of details that by far exceed that of color exposures. Pictures captured with the M Monochrom are uniquely characterized by finely grained rendition of details with no disturbing artefacts. Another advantage of the new sensor is that, in addition to the M-Lens portfolio, almost all lenses of the Leica R series can now be used on the Leica M Monochrom to expand the creative capabilities of the Leica rangefinder system, as is also the case with the Leica M.

The design of the Leica M Monochrom reflects the established philosophy of the Leica rangefinder system and concentrates on particular robustness and discretion. The top deck and baseplate are machined from solid brass blanks and finished in black chrome, whereby the raw materials used are especially homogeneous and sourced only from selected suppliers. The camera body is manufactured from a high-strength magnesium alloy. The extremely scratch-resistant and almost unbreakable sapphire crystal cover glass of the LCD monitor is of equally high quality. It is treated with an anti-reflection protective coating that ensures that photographers can precisely assess and check their images in any lighting situation.

The Live View function of the Leica M Monochrom provides a viable alternative to looking through the viewfinder. The high-resolution 3″ monitor with 921,600 pixels ensures that photographers have complete control of composition, exposure, focusing and depth of field. Live View also offers two additional focusing methods: the up to tenfold magnification in Live View Zoom mode provides full control of the sharpness of details in the subject or the closest focusing distance. In Live View Focus Peaking mode, sharply focused edges in the image are automatically highlighted by colored lines. Depending on the situation or the photographer’s preferences, the Leica M Monochrom provides a choice of several options for capturing exceptionally sharp pictures.

Thanks to its 1080p full-HD video capability, the M Monochrom can also capture high-quality video in black and white. Video recording can be quickly and conveniently started and stopped with a separate release button. Video sequences can be recorded in Motion JPEG format – that is, in true, individual full frames – which brings enormous advantages for video editing. Thanks to a dedicated adapter, almost all Leica R-series lenses can now be used with all available functions both for shooting video and capturing still pictures. Optimum sound is ensured by the optional Leica microphone adapter set, comprising an adapter and a stereo microphone.

At the touch of a button, exposures captured by the M Monochrom can be converted from black and white to a series of characteristic toning effects traditionally used in analogue photography – for example, sepia, cold or selenium toning. All users need to do is save the image in JPEG format and select the desired toning effect – simply and conveniently, and with no need for post-processing. Leica M Monochrom customers can download a free copy of Adobe® Photoshop® Lightroom® from the Leica website for professional post-processing.

From August 2015, a series of specially calculated filters in the colors yellow, green and orange will be available as optional accessories for altering the grayscale conversion of particular colours in the subject when shooting with the Leica M Monochrom. These allow photographers to create unusual moods and effects in their subjects and further expand the creative capabilities of the camera – for instance in landscape or portrait photography.


The Leica M Monochrom (Typ 246) will be available from May 2015.

For more information go here.

A review of the performance of the new Leica Monochrom was published by Red Dot Forum.


-----------------------------------------------------------------------------------------------------------------------------------------------------------------------------------------------------------------


Upcoming shows in Tamarkin's Rangefinder Gallery


-----------------------------------------------------------------------------------------------------------------------------------------------------------------------------------------------------------------


Receive a FREE CAMERA BAG from Think Tank Photo

-----------------------------------------------------------------------------------------------------------------------------------------------------------------------------------------------------------------


Please make payment via PayPal to GMP Photography


Please make payment via PayPal to GMP Photography

Please make payment via PayPal to GMP Photography


Monday, April 27, 2015

AN IMPRESSIVE LEICA COMPETITOR – KODAK EKTRA


The following article relies largely on information obtained from Stephen Gandy's CameraQuest at: http://www.cameraquest.com/ektra.htm


It is a well-known fact that the Leica inspired quite a number of competitors to offer 35mm rangefinder cameras of their own.  Even today many of them are well known, like the Zeiss Contax, the Nikon and Canon rangefinder models and, of course, a whole number of blatant copies of the Leica.

A much lesser known competitor was the Kodak Ektra.  The Ektra was Kodak's only
attempt to produce the best 35 camera. It was amazingly innovative with features that actually outshined the Leica and Contax cameras at that time.  The camera was introduced in 1941, but there was no market when re-introduced in 1948.  The $700 price was astonishingly high for that time and it must be assumed that it contributed to the demise of the camera at the end of 1948.

The Ektra offered a lot of new features, not found on other rangefinder cameras.

1st 35 RF to have a parallax compensated finder!
1st 35 RF to offer lens coating on all lenses
1st 35 RF to offer interchangeable backs
1st 35 RF to offer built in zoom finder
1st 35 RF to offer lever advance
1st 35 RF to use a film rewind lever

Besides its impressive features, the Ektra also had an impressive line of lenses, all rangefinder coupled, fully rivaling the best from Leica or Contax in the late 1930's.  Offered were a 35mm f/3.3, 50mm f/3.5, 50mm f/1.9, 90mm f/3.5, 135mm f/3.5, and 153mm f/4.5.  A 254mm f/4.5 was planned but never put into production.  UNLIKE the best lenses from Leica and Zeiss, all Ektra lenses were coated -- a first for this large a lens lineup.  All lenses attached to the camera with a breech lock mount.


 mvc-003f.jpg (62805 bytes)
Focusing was done with a knurled knob at the lower left of the lenses.

 
The interchangeable back

 
Besides the standard interchangeable backs, the Ektra also offered another very unusual feature,
a ground glass focusing back.

The rangefinder is unusually long, 4 1/8", in fact making it difficult to hold the Ektra without blocking the RF windows.  The viewfinder is almost exactly above the lens to lesson parallax problems.   The Ektra viewfinder zooms from 50mm to 254mm, complete with built in diopter adjustment.   An attachment fits over the finder to show the 35mm field.

mvc-015f.jpg (57803 bytes)              mvc-013f.jpg (54443 bytes)               mvc-014f.jpg (55363 bytes)
Left: The shutter release is on the upper left edge.  The little lever on the right is the 12 second delay self timer.  The high speeds from 1/25 to 1/1000 are set in the window with the knurled knob. The low speeds 1/10th to 1 second are set on the nearby outer wheel. 
Center:  The automatic film counter.
Right: The larger wheel is the zoom setting for the finder, from 50 to 254.  The smaller wheel is the diopter adjustment for the rangefinder!

mvc-017f.jpg (46377 bytes)   mvc-018f.jpg (48520 bytes)
The rather large and robust rewind lever

mvc-030f.jpg (42792 bytes)      mvc-032f.jpg (37472 bytes)      mvc-033f.jpg (47363 bytes)
Other useful accessories included a Contax like close-up viewfinder for the 50/1.9, Left,
a Leica like right angle viewer,Center,
and a "High-Low Angle Finder" for waist level or above the head viewing, Right.

An improved version called Ektra II was planned and three of them are known to exist. They incorporated a built in lens for the 35mm focal length, and could mount a magazine back with a spring driven motor.

The Ektra’s premature demise unfortunately eliminated any further development and along with it any noticeable influence on other rangefinder cameras, including the Leica.  It is interesting to note that feature wise, even the market leader Leica did not catch up to the Ektra until the introduction of the Leica M3.  Even then some of the Ektra’s features were still an exclusive, like the interchangeable backs, the diopter correction of the viewfinder and the built-in zoom finder.  One can only wonder what the camera might look like if it had it survived in an updated version today.

------------------------------------------------------------------------------------------------------------------------------------------

DON'T FORGET TO SEND IN YOUR ENTRIES

LEICA Barnack Berek Blog PHOTOGRAPHY CONTEST


For more information click here

-----------------------------------------------------------------------------------------------------------------------------------------------------------------------------------------------------------------


Upcoming shows in Tamarkin's Rangefinder Gallery


-----------------------------------------------------------------------------------------------------------------------------------------------------------------------------------------------------------------


Receive a FREE CAMERA BAG from Think Tank Photo

-----------------------------------------------------------------------------------------------------------------------------------------------------------------------------------------------------------------


Please make payment via PayPal to GMP Photography


Please make payment via PayPal to GMP Photography
Please make payment via PayPal to GMP Photography


Saturday, April 25, 2015

HOW WAS THIS DONE?


With the advent of digital photography and computer manipulated photographs, we have come to expect the extraordinary, maybe even the seemingly impossible.  Unfortunately, this has also caused some of the older, conventional photographic methods to become relics of the past, soon to be forgotten.

There is no doubt that modern, computer methods have made it substantially easier and more productive to manipulate photographs, to show the unusual.  Yet we have seen similar things done, in the past, with just conventional photographic techniques.  In a modern studio operation, digital techniques are definitely necessary to maintain a competitive edge.  But for just plain, photographic fun, some of the old, conventional techniques have a lot to offer.


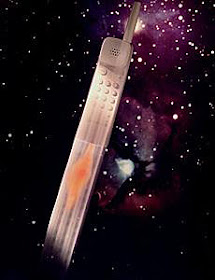
The photograph in this article has often been thought of as being computer generated or manipulated.  Yet it was done by standard, photographic methods and a bit of ingenuity.  It came about as an assignment for a local client.  The basic idea of the shot was specified, and it was up to the photographer to execute the idea in the studio and to put it on film.

The photograph is the result of multiple exposures on the same sheet of film.  Following is an account of how this was done…

As a camera, a 4x5 view camera was chosen, although any other camera could be used as well.  Initially, the phone was hung up with very thin, micro filament line.  It would be very difficult to hang the phone in an angle; instead, it was hung straight, with the antenna facing down.  Two lines, in an angle were used to prevent the phone from swinging sideways.  An additional two lines were fastened to the antenna to avoid the phone from swinging back and forth.  To allow the phone to be recorded in an angle, the camera was tilted.  The upside down image in a view camera actually made it easier to compose the set, because the upside down phone showed upright on the ground glass.  With cameras other than a view camera, it would be easier to have the phone hung upright.

Lighting was done all with hot lights, using a strong cross light on the key pad, with a softer light source, with the same angle, as fill.  A reflector was used to lighten the dark, opposite side.  The camera was supported on a studio stand with a geared head.  This allowed for an easy addition of the motion streaks.  The initial position of the camera was marked with white board marker directly on the ground glass.  With other cameras the position would need to be marked on the tripod.  Then the camera was tilted down for the position of the end of the motion streaks.  With the shutter open, the camera was slowly tilted upward, until it reached the initial position as marked on the ground glass.  This gave the phone an exact, fixed position for the next exposures, the first of which was the phone by itself, against a black background with the above described lighting.

The flame had to be done carefully, in order not to hurt the phone or set it on fire.  Clients really don’t like it if you burn their products.  A light stand was positioned right behind the phone.  Wrapped in a black cloth, the parts below the phone did not show against the black background.  On top of the light stand a small piece of sponge material was fastened.  The height of the light stand was carefully adjusted such that the sponge was just hidden behind the edge of the phone.  The sponge was soaked with lighter fluid, which burns with a bright, orange flame.  Thus, the exposure of the flame was no problem at all.  Of course, the lighting for the phone was shut off for this exposure.

The fourth and final exposure was for the background.  To allow for the space scene, rear projection was chosen.  A standard, 35mm slide of the scene was projected onto a rear projection screen.  This is a bit trickier, since the product, in this case the phone, must not be allowed to move at all.  The subject lighting must be off for this exposure to avoid any light from spilling onto the rear projection screen.  For the previous three exposures the screen was not in place.  The screen must be carefully put in place, as close as possible to the subject, to avoid any depth of field problems.  Neither a change of aperture or refocusing can be done since both will alter the size of the product in front of the screen.  The product is, what is called, self-masking.  With other words, it blocks out the areas of the background covered by the product.  It is also important to filter the projector lens.  Most projectors use a heat absorbing glass which is slightly green in color.  Without filtration, the rear projection image would have a green cast.  A gel filter of CC10M (10 Color Correction values of Magenta) in front of the projector lens assured the correct color balance.  Thus, the fourth exposure made the phone move through space.

Exposure readings were taken in the following manner:  For the exposure of the phone, the initial reading was an incident reading, facing toward the light source.  To make sure that the bright spot on the phone key pad would not be washed out, an additional spot reading of that area was taken to make sure that it was not over exposed by more than 2 ½ stops.  A three stop over exposure would have rendered the area white without detail.

Experience has shown that the motion streaks will show just fine with the same lighting and a slow tilting of the camera, lasting about two to three seconds.  This is really not that critical, since it doesn’t matter if the motion streaks are a bit lighter or darker, as long as they show up well.  Please note:  The exposure reading for the phone also determined the exposure settings for the motion streaks.  Moving the camera for the motion streaks was the first exposure.

For the flame, a spot reading of the flame, adjusted to a 1 stop over exposure assured that the reddish color of the flame would be maintained without being too dim.

The rear projection exposure was determined with a spot reading also.  Incident readings cannot be applied here at all.  Of the star field, an area with neutral brightness was chosen for the spot reading.  The resulting exposure time then rendered the correct exposure.

It is important to note, that for all four of the exposures the same aperture had to be used. As mentioned already, a change in aperture will slightly change the size of the subject on film.

Since all four exposures show the same subject, this must be avoided.  To select an aperture which gave enough depth of field to cover the subject and the rear projection image, the screen was put in place initially, but then was removed for the first three exposures.

I have found that many such photographs have more than just one solution.  I would be very much interested in hearing about some other ideas how this photograph could have been made.  Such a photograph is obviously beyond everyday shooting.  If anyone has any questions regarding how this was done or to clarify any of the techniques described, please let me know and I will gladly get back to you with an answer.


------------------------------------------------------------------------------------------------------------------------------------------

DON'T FORGET TO SEND IN YOUR ENTRIES

LEICA Barnack Berek Blog PHOTOGRAPHY CONTEST


For more information click here

-----------------------------------------------------------------------------------------------------------------------------------------------------------------------------------------------------------------


Upcoming shows in Tamarkin's Rangefinder Gallery


-----------------------------------------------------------------------------------------------------------------------------------------------------------------------------------------------------------------


Receive a FREE CAMERA BAG from Think Tank Photo

-----------------------------------------------------------------------------------------------------------------------------------------------------------------------------------------------------------------


Please make payment via PayPal to GMP Photography


Please make payment via PayPal to GMP Photography

Please make payment via PayPal to GMP Photography


Friday, April 24, 2015

LEICA AND COLOR PHOTOGRAPHY


Many are familiar with the history of the Leica and its influence on photography in general.  The photographic process Leica relied on essentially was no different from what we are using today.  Many of the early Leica photographs are well known.  Quite a few were taken by Oskar Barnack, the inventor of the Leica, himself.

Wetzlar Eisenmarkt
Photo: Oskar Barnack

All of these photographs are in black and white, which brings up the question of color.  Were there any color films in these early days of 35mm photography?  For an answer we need to go back to virtually the beginning of photography in general.

The earliest permanent photograph in existence was made in 1826 by Joseph Nicéphore Niepce, showing the roofs and chimneys visible from his workroom.  It required an exposure time of eight hours on a bright, sunny day.  He used a pewter plate with a light sensitive varnish of asphalt (bitumen if Judea) and then used oils as a fixing agent.  During the exposure, various areas of the asphalt would harden to different degrees.  The oils washed away the less hardened areas of the asphalt, resulting in a recognizable image.  The word snapshot doesn’t apply.

Joseph Nicéphore Niepce photograph from 1826

Niepce’s process proved to be a dead end.  Through the company of Chevalier, the major manufacturer of lenses at the time, he met Louis-Jacques-Mandé Daguerre.  They formed a company to research other means to take permanent photographs.  Unfortunately, Niepce died before they had any success.  A nephew of his continues to work with Daguerre, but when a viable process was developed, Daguerre took the credit all for himself.  This was the famous Daguerreotype, first introduced in 1839 to the French Académie des Sciences.  While a lot faster than Niepce’s first attempts, it still had the drawback of producing just a single picture at the time.  There were no negatives from which multiple copies could be made. 

"Boulevard du Temple", taken by Daguerre in 1838 in Paris, includes the earliest known candid photograph of a 
person. The image shows a street, but because of the over ten-minute exposure time the moving traffic does not 
appear. At the lower left, however, a man having his boots polished had both men motionless enough 
for their images to be captured.

The first successful negative process was developed by William Henry Fox Talbot in 1840.  He used sensitized strips of paper, which, when developed, allowed the contact printing of multiple images.  Thus the photographic process closest to what we use today, was born.

William Henry Fox Talbot, Laycock Abbey 1847

Virtually as soon as these processes became available, the quest for color photographs started.  The earliest color photographs were actually hand colored daguerreotypes.  Simultaneously, a number individuals experimented with a variety of processes to produce color images.  Some were met with limited success while others could not be repeated with any certainty.

The three color process of red-green-blue, RGB was first used by James Clerk Maxwell in 1861. His picture “Tartan Ribbon” is generally considered the first durable color photograph, and the very first made by the three-color method Maxwell first suggested in 1855. Maxwell had the photographer Thomas Sutton photograph a tartan ribbon three times, each time with a different color filter (red, green, and blue-violet) over the lens. The three photographs were developed, printed on glass, and then projected onto a screen with three different projectors, each equipped with the same color filter used to photograph it. When superimposed on the screen, the three images formed a full-color image. Maxwell's three-color approach underlies nearly all forms of color photography, whether film-based, analogue video, or digital. 

James Clerk Maxwell, "Tartan Ribbon" 1861

The credit for a valid color process goes to John Joly.  He was aware that a color image could be formed by mixing just three colors, red, green and blue, a process still used today in all types of color imaging.  He used a glass plate which contained a ruling of alternating RGB filters, about 200 per inch.  This was placed against the glass negative plate in the camera during exposure.  After developing, the same glass plate was put in register with the negative, resulting in a color transparency which could even be projected.

John Joly "Butterflies" 1893

The process worked, but was relatively cumbersome.  Obviously, it would be a lot easier to do away with the RGB plate and combine the RGB filters with the emulsion.  Such a process was developed by the Lumière brothers.  They patented their Autochrome process in 1903 and began marketing it in 1907.

Just like Joly’s process, Autochrome is an additive color process. The medium consists of a glass plate coated on one side with a random mosaic of microscopic grains of potato starch dyed red-orange, green, and blue-violet (an unusual but functional variant of the standard RGB additive colors) which act as color filters. Carbon particles fill the spaces between grains, and a black-and-white panchromatic silver halide emulsion is coated on top of the filter layer.  The glass plates were loaded with the filter layer facing the lens.  After developing, a color transparency was the result.  Autochrome was one of the most widely used color photography process in use before the advent of subtractive color film in the mid-1930s.

RGB colored starch particles function as a filter

Autochrome by the Lumiere brothers

Autochrome by Lumiere brothers

A similar process was developed by Agfa in the 1920s.  Instead of the dyed starch particles, they developed a very fine RGB screen with also was attached to the glass plate.  It too produced color transparencies.  In 1932 Agfa was the first company to offer a film-based version of their Agfa-Farbenplatte (Agfa color plate), enabling Leica owners for the first time to take color photographs.

Agfacolor

But there were still drawbacks.  The Autochrome and Agfa systems were notoriously slow.  The RGB filters absorbed a huge amount of light.  Anothr process was needed to solve that problem.

In 1912 Rudolph Fisher at Agfa discovered chemicals would react to the silver halides in the emulsion and convert other compounds into insoluble dyes.  These color forming ingredients, called dye couplers, could be included in the emulsion.  Fisher’s work resulted in researching three emulsion layers in films to form a color image.  Initial trials were unsuccessful because some of the color dyes migrated from one emulsion layer to the other during development.

This was the case with Leopold Mannes and Leopold Godowsky, who worked at the Kodak laboratories in Rochester, New York.  To solve the problem, they switched to including the dyes in the developer.  This resulted in a breakthrough, and in 1935 the first three emulsion layer color film became reality, the Kodachrome.  Because the dye couplers of this film were added during the developing stage, it was necessary to send the film to Kodak to have it processed.


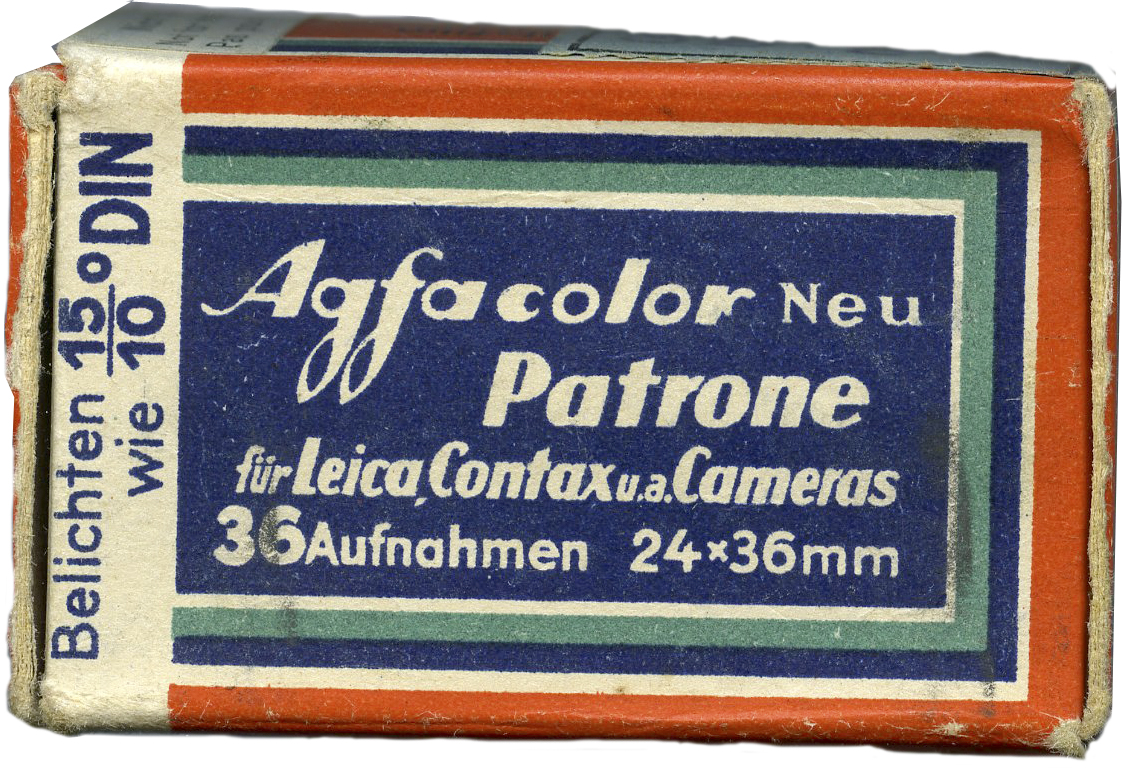
The first color film to incorporate the dye couplers in the emulsion was the Agfacolor Neu (new) in 1936.  It was the first time that photographers were able develop their own color film.  The Neu designation was used to distinguish these Agfacolor films from their previous Agfacolor films.  Both Kodachrome and Agfacolor very quickly spelled the end of Autochrome and other, similar films.


Both Kodachrome and Agfacolor were available as 35mm films giving Leica owners and owners of other 35mm cameras for the first time convenient and reliable means to take color photographs.  It is interesting to note that both companies initially marketed their films with the reference to Leica and other 35mm cameras.


------------------------------------------------------------------------------------------------------------------------------------------

DON'T FORGET TO SEND IN YOUR ENTRIES

LEICA Barnack Berek Blog PHOTOGRAPHY CONTEST


For more information click here

-----------------------------------------------------------------------------------------------------------------------------------------------------------------------------------------------------------------


Upcoming shows in Tamarkin's Rangefinder Gallery


-----------------------------------------------------------------------------------------------------------------------------------------------------------------------------------------------------------------


Receive a FREE CAMERA BAG from Think Tank Photo

-----------------------------------------------------------------------------------------------------------------------------------------------------------------------------------------------------------------


Please make payment via PayPal to GMP Photography


Please make payment via PayPal to GMP Photography

Please make payment via PayPal to GMP Photography