During a visit to Leica in Germany a while ago, I had the opportunity to get a personal tour of the facilities and to ask a lot of questions. At one point my contact person and guide introduced me to a gentleman who was working in the lens design department. I took the opportunity to ask a lot of questions about Leica lenses which also led me to ask about filters. My question was met with a very stern face with him saying,
“If we had intended our lenses to have flat pieces of glass in front, we would have designed them that way.”
Indeed there used to be a Leica lens that was designed to be utilized at times with a filter.
From the very beginning, Leica lenses have always had a very high reputation for their sharpness and their special tonal performance. This was a prerequisite, demanded by Oskar Barnck and realized by Max Berek with even his first lens designs for the Leica.
As a matter of fact, Leitz had been criticized from time to time for not having any good portrait lenses. Many Leica users thought that the Leica lenses were often too sharp for portrait work. That gave the impetus for Max Berek to design the Leitz Thambar at the beginning of the 1930s.
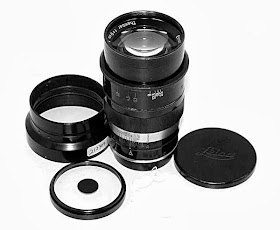
The Thambar was a soft focus lens, displaying some rather unique characteristics, which made it one of the premier portrait lenses of the time. The soft focus effect was the result of the lens having been purposely designed with a considerable amount of residual spherical aberration. The name Thambar was derived from Greek, meaning “something that inspires wonder”, or wonderful. The lens was comprised of four elements, with the two central elements cemented to form one group. A very similar formula was later chosen for the 125mm Hektor for use on the Visoflex.
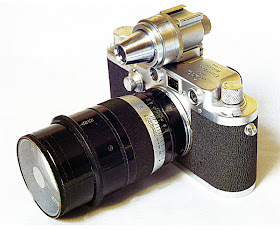
Leitz Thambar on a Leica IIIc with VIDOM viewfinder
The spherical aberration of the lens was produced primarily at the outer perimeter of the lens. Stopping it down to smaller apertures would reduce this effect and it was totally eliminated at f/9. To further enhance the soft focus effect, the lens came supplied with a special, clear filter that had a one centimeter mirrored spot in the center which eliminated the sharp image created by the center of the lens.
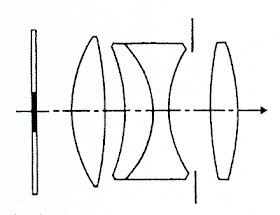
Element configuration of the Thambar with installed filter on left
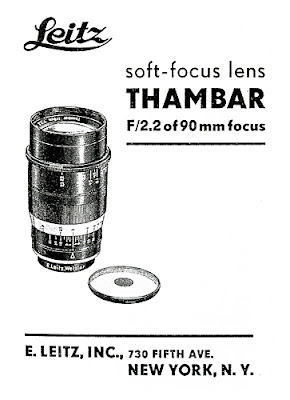
Leitz New York Thambar brochure
The maximum aperture of the lens was f/2.2. This was reduced to f/2.3 with the center spot filter in place. For that reason the Thambar had two aperture scales, one in white for the f/stops without the filter and one in red for the stops with the filter installed. The red scale went from f/2.3 to f/6.3 because above f/6.3 the filter became useless. The maximum soft focus effect was obtained with the lens wide open and with the filter installed. Stopping the lens down would diminish this effect, thus giving the photographer full control over the amount of soft focus. Photographing with back lighting or lighting that produced flare would further increase the soft focus effect. The distance of the subject also had a significant effect on the softness.
The Thambar actually was relatively difficult to use because the rangefinder of the camera did not allow the soft focus effect of the lens to be seen. Subsequently a fair amount of experience was necessary to use the lens effectively.
The production of the lens started on 1935 and ended in 1949. According to company records, about 3000 lenses were produced. Today the Thambar is one of the most sought after pieces by Leica collectors. Even though a production of 3000 lenses is not all that rare, it is difficult to find complete sets with the original filter, and sets complete with the filter and the original red boxes are quite rare. The Thambar is indeed a legendary piece of equipment among Leica enthusiasts.
Leica has reissued the Thambar. It is basically identical to the original with only a few changes. Leica stated:
A legend reborn: following the Leica Summaron-M 1:5.6/28, Leica Camera AG has further expanded its lens portfolio with the Thambar-M 1:2.2/90, the modern renaissance of another classic lens. Just like its namesake from 1935, the contemporary incarnation of the lens is distinguished by its characteristic soft-focus effect and unmistakable bokeh. Its focal length of 90 mm is suitable for photography in a multitude of scenarios and is as good as predestined for capturing portraits with a uniquely aesthetic atmosphere that cannot be reproduced in digital postprocessing. The new Thambar-M is thus an exciting addition to the existing Leica M lens portfolio and brings photographers entirely new possibilities for creative composition.
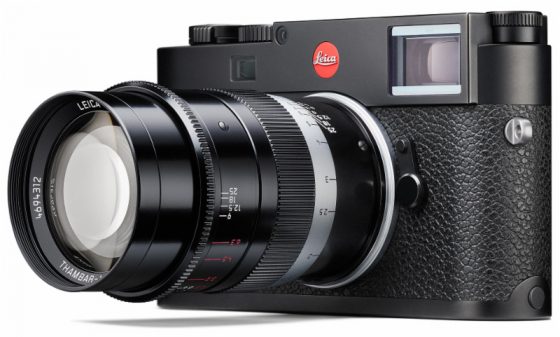
The optical design of its ancestor remains almost unchanged in the new Thambar-M 1:2.2/90. It has therefore also inherited the characteristic properties of its predecessor. The only difference is that the four elements in three groups that make up the design have now been single-coated to protect the glass against environmental influences and surface corrosion. The 20 blades of its iris deliver a unique bokeh with perfectly round rendition of point light sources.
But what about filters in general? The camera accessory market offers an abundance of filters that we can screw on, slide on or otherwise attach to our lenses. Along with it there is the never-ending discussion about their necessity. Filters certainly are not some frivolous item that sinister accessory manufacturers have dreamed up to get their hands onto more of our photography budgets.
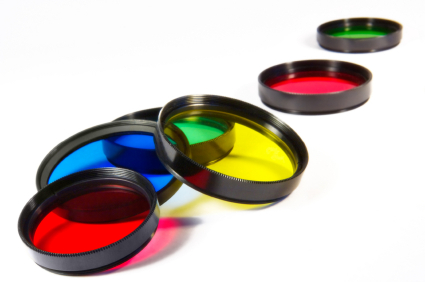
For instance, there are color correction filters. These have lost a lot of their importance with the advent of digital photography where white balancing has virtually eliminated their need. But especially among Leica users, film and film cameras are still widely used and so are color correction filters. Anyone who has ever shot under fluorescent lighting appreciates the FLD and FLB filters that get rid of the ugly green cast common under those lighting conditions. We have the choice of daylight and tungsten film, but have the wrong film in your camera, and you will appreciate a proper color balancing filter to be able to keep on shooting without ending up with overly red or blue images. Excessive amounts of blue also occur when shooting during winter with snow covered ground on bright, sunny days. The blue of the sky reflecting off the snow will generally cause an excess amount of blue, something easily corrected with a skylight filter.
Equally important, especially to film photographers, are filters that will change the tonality of the resulting photographs, for instance a yellow, orange or red filter to darken the sky. These certainly are helpful to assure better photographs. The same is the case with polarizing filter which can eliminate reflections of surfaces that are not electrically conductive. This can often also lead to more intense colors.
Equally important, especially to film photographers, are filters that will change the tonality of the resulting photographs, for instance a yellow, orange or red filter to darken the sky. These certainly are helpful to assure better photographs. The same is the case with polarizing filter which can eliminate reflections of surfaces that are not electrically conductive. This can often also lead to more intense colors.
Then there are a myriad of special effects filters. These do apply to equally to film as well as digital photography. The need or value of them can only be assessed by the individual photographer. It’s an eye of the beholder thing.
Finally, there is the issue of lens protection. Many photographers have UV filters permanently attached to their lenses as a means of protecting them in case of a mishap. They certainly offer a certain amount of protection and the argument that it is a lot less expensive to replace a filter than a lens does make sense at face value.
Hearing the “If we had intended our lenses to have flat pieces of glass in front, we would have designed them that way” comment caused me to research the topic once I had returned home. After all, how bad can a flat piece of glass in front of a lens be? Flat is the keyword here. Unfortunately, some filters are less flat than others. Ideally, a filter is made of high quality, optical glass and ground from a blank, just like any lens element. The only difference is that the two surfaces have no curvature. The same precision and tolerances should be applied as with lenses. Only that will give the assurance that the two glass surfaces are perfectly parallel to each other.
Unfortunately that is not always the case. For one thing, there are two distinctly different production methods. One is the grinding process. This is an expensive process that is only applied by the top filter manufacturers. Unfortunately, the majority of filters are made in a much cheaper way. Here large, flat, narrowly rimmed surfaces are filled with glass granules and then heated to melt the glass into a large sheet. To make the actual filters, these glass sheets are again heated to the point where they become pliable and the filters are stamped in a process not unlike a cookie cutter. Cheap but not very precise. For one thing, the two glass surfaces are not nearly as parallel as can be assured with the grinding process. Secondly, the stamping does add a considerable amount of physical distortion to the edges of the filter which in turn does adversely affect lens performance.
Spectral transmission is another, important issue. Many filters need to be made with certain colorations to assure their proper effects. Here too we find considerable differences in accuracy. High quality filters are always dyed in the mass, meaning the glasses which the filters are made from receive the correct coloration during the process of making the glass. Unfortunately this process too is subject to considerable differences in accuracy.
A much less desirable approach is to sandwich dyed gels between two pieces of clear glass to achieve the proper coloration. Not only are there differences in accuracy regarding the spectral accuracy of the gels, but the problems of parallelism of the filter surfaces are doubled. This is actually an old, outdated approach and hardly any filter manufacturer still uses this process.
The worst of all filters are the ones made of acrylic rather than glass. By nature these need to be a lot thicker to assure the desired effects. In addition, even the best acrylics are not nearly as clear as good, optical glass, thus adding to the undesirable effects of these less expensive alternatives.
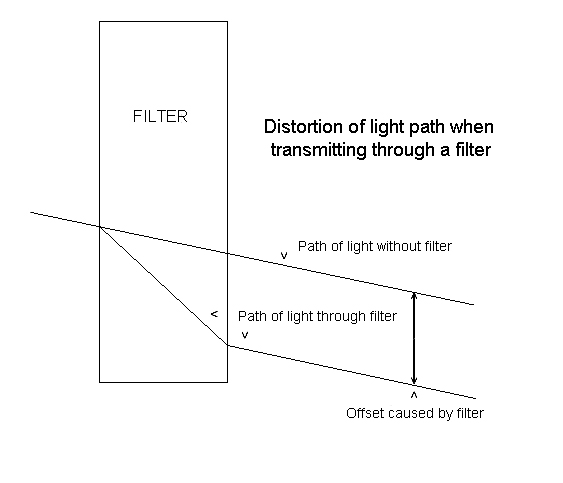
The problem lies in the fact that when light hits the filter, it does not transmit straight through unless the light hits the filter in a 90 degree angle. There will always be a certain offset of the light path. The steeper the angle and the thicker the filter, the more pronounced this is. The only filters ever made to prevent this are curved filters. These are designed for certain focal lengths where the curvature is such that the light path through the glass is always reaching the filter in 90 degree angles. These filters are prohibitively expensive.
Machining of filter mounts and
finished mount, ready for anodizing
Finally, there are the filter mounts. Needless to say, we should stay away from plastic ones. They simply don’t offer enough precision to be worth any consideration. Most filter mounts are made of aluminum. However, most high quality lenses also use aluminum for the lens barrels. Aluminum against aluminum unfortunately has a huge amount of friction. This quite easily leads to filters being very difficult to remove. The best filter mounts are the ones made of brass. Brass against aluminum has a very low coefficient of friction and therefore brass mount filters are always quite easy to remove.
This brings us back to UV filters, permanently attached for protection. Do we really want this, do we really need this? Based on the flat glass comment at Leica, I never use any filters unless absolutely necessary and I have done so for years. None of my lenses have ever been hurt because I take other safety precautions. The main one being that I always use a solid lens shade. That gives any lens a considerable amount of protection because the glass surface of the lens is recessed by a certain amount. This greatly eliminates the possibility of physical harm. Of course accidents can happen. I look at my insurance as a measure to protect my lenses in those cases.
Of course when shooting under condition where these measures are inadequate, a UV filter is definitely a good idea. For instance when shooting under extremely dusty conditions, or when wind whips up a lot of dust and fine sand, we should not subject our lenses to such ill treatment. That is where a high quality UV filter is definitely helpful. But personally, I leave it at that.
Should we all use just Leica filters? The simple answer is no. Leica is not a filter manufacturer. To my knowledge most of their filters are made by Schneider through their B+W division. B+W have proven to make some of the highest quality filters money can buy. Equal in performance are the Heliopan filters. Heliopan is owned by Zeiss. Staying with those two manufacturers will always give you the assurance of keeping the ill side effects of filters to a minimum. The top quality filters from Hoya could be added to that category as well.
Considering the overall performance of Leica and other high quality lenses it just doesn’t seem right to put flat pieces of glass in front of them except unless absolutely necessary. It especially doesn’t make any sense at all to have the light pass through a cheaply made, low quality filter before it even reaches the lens just to save a few bucks. That approach has served me well over the years and will continue to do so.
______________________________________________________________________
______________________________________________________________________
 Buy vintage Leica cameras from
America's premier Leica specialist
http://www.tamarkinauctions.com/ http://www.tamarkin.com/leicagallery/upcoming-show
Buy vintage Leica cameras from
America's premier Leica specialist
http://www.tamarkinauctions.com/ http://www.tamarkin.com/leicagallery/upcoming-show
Click on image to enlarge
Order: info@gmpphoto.com
Please make payment via PayPal to GMP Photography
Click on image to enlarge
Order: info@gmpphoto.com
Click on image to enlarge
Order: info@gmpphoto.com
Click on image to enlarge
Order: info@gmpphoto.com
Please make payment via PayPal to GMP Photography
Click on image to enlarge
Order: info@gmpphoto.com
Please make payment via PayPal to GMP Photography
Click on image to enlarge
Order: info@gmpphoto.com
Please make payment via PayPal to GMP Photography


No comments:
Post a Comment