Thursday, May 8, 2014

GET MORE ACCURATE EXPOSURES WITH A HAND HELD LIGHT METER


Since the advent of the early selenium cell light meters in the 30s, light meters have come a long way.  Built-in, automatic exposure control has made exposure settings so effortless that a lot of camera users hardly give it a thought anymore.  On the other hand, especially in professional applications, full manual control over exposure settings is often an absolute must.  A portrait for instance might call for a white background.  Obviously, a white background material, like seamless paper, is the correct choice here.  Yet, just because we use a material which we consider white, this does not necessarily turn into a white background in a photograph.  As a matter of fact, given the right control, a photograph taken of a subject against a white background can actually result in a photograph which shows a very dark or even black background, just as a black background can be rendered white in a photograph.  All that is necessary is a good understanding of exposure and a good hand-held light meter.

Most hand-held light meters are basically designed as incident light meters, yet for full control over our exposure settings a reflective light meter is absolutely necessary also.  Let’s look at the differences:  A reflective light meter, like all of the light meters built into our cameras, reads the intensity of the light which is reflected off the subject.  An incident light meter on the other hand will read the intensity of the light which illuminates the subject.  Let’s look at both types and their inherent differences.

If we take a reflective light meter and aim it at a subject of average brightness, it will give an accurate reading.  For easier understanding, let’s aim the light meter at a square which is painted an average gray.  Such a surface will reflect an average amount of the light which illuminates it and the meter will react accordingly, giving a certain exposure setting.  Without change in illumination, if the gray square is replaced by a pure white one, what will happen?  The white surface obviously will reflect a lot more light which the light meter will register.  Replacing the square with a black one, will result in just the opposite.  Without any change in relative brightness, our meter has now come up with three distinctively different exposure settings.

Reflective light meters are all calibrated to register (or assume) an average level of reflectance, as with the gray square.  Subsequently, the exposure reading obtained from the gray square is the correct one.  The white surface will actually fool the meter into registering a higher light intensity, just as the black one will result in registering a lower light intensity.  Both of those exposure settings will be wrong.  The end result is actually that the meter will render exposure settings which make all three surfaces in the photograph grey.  This is the very reason why photographs of a snow scene will usually be underexposed, while photographs at dusk or at night often come out much lighter than the actual scene.

This is where an incident light meter has tremendous advantages.  It only registers the relative brightness of illumination.  The resulting exposure settings will make an object of average brightness average in the photograph also.  Subsequently, a lighter surface will be lighter in the photograph just as a darker one will show up darker..

So it may seem that for accurate camera settings an incident light meter is the way to go.  In most situations this actually is indeed the case.  But what about the white background?  The exposure setting we choose has to be such that not only the subject is exposed properly, but also the background, which in our example is to be white.

A three stop overexposure will generally result in white, just as a four stop underexposure will result in black.  This is easily verified by taking an evenly illuminated white back ground and taking a reflective reading.  We then open the lens by three stops and take an exposure.  Then subsequent exposures are taken in 1/3 stop increments until a four stop underexposure has been reached.  The results will then show the various shades of gray (white and black are also considered shades of gray here) which can be achieved with various degrees of over and under exposure.  Please note that these are average settings.  Digital sensors vary in their response to over and underexposure.  However, a simple test like the one above will easily show the amount of overexposure and underexposure necessary to render white or black without detail.

For the example , if for a white background it is necessary to see if it is three stops overexposed, we must do the following:

We determine the correct exposure for the subject with the light meter in the incident mode.  This will be very accurate and therefore establish the actual camera settings.  These settings also need to overexpose the background by three stops in order to render it white.  To check this, all we need to do is switch the meter to the reflective mode.  Now the meter will register the amount of light which is actually reflected by the background.  If this indeed shows an overexposure of three stops, the background will be white, as would a four or 5 stop overexposure.  But that is not advisable at all since otherwise the background will reflect such a strong amount of light that it very likely will result in flare or loss of detail at the edges of the subject.  If the reflective reading of the background registers less than a three stop overexposure, it is ultimately a simple interpretation of what the background will look like.  A two stop overexposure for instance would render a very light gray background, a one stop overexposure would still render a noticeably darker grey.  The same exposure would render an average or neutral grey, while underexposure would render progressively darker shades of grey until the background is rendered black.

For example:  The basic exposure for the subject is 1/60 sec @ f/5.6.  For the background to be three stops over, the meter would have to read 1/60 @ f/16.  If we were to expose at f/16, the background would be medium gray, but since the actual camera setting for the subject calls for f/5.6, that is indeed a three stop overexposure compared to f/16.  Does it matter if the background material is actually white?  No it does not!  Regardless of color or brightens, if the background is illuminated such that it registers a three stop overexposure, it will be white.  On the other hand, if the overexposure is less than three stops, the background will show various degrees of light grey, red, green or whatever other color the background may be, but with an underexposure of four stops, all will be black.


The above photograph is a good example of predicting the outcome of the photograph with the help of a good, hand-held light meter.  The bright light, outlining the profile of the face and the hands was purposely chosen at +2 1/2 (2 1/2 stops over).  This was determined with an incident light reading of just the main light source and then opening the lens by 2 1/2 stops.  The rest of the face  needed to be quite dark, but also needed to show detail.  For that an underexposure of 2 1/2 stops was chosen.  This again was done with an incident reading by adjusting the intensity of the light source until it registered –2 1/2.  This photograph was actually shot in a studio with all white walls and no black background material was used.  The subject was approximately 30 feet from the background.  With that distance, so little light reached the background that the reflective meter did register an underexposure of 3 ½ stops.  In the original enlargement one can actually see a slight separation between the dark part of the hands and the background which is ever so slightly lighter.  This kind of control would not be possible without a good, handheld light meter offering both incident and reflective reading capability, and certainly no automatic metering system, however sophisticated, would allow this to be done.


A similar technique was applied for the above color photograph.  Via incident reading the correct exposure for the subject and subsequent camera settings were determined.  A spot with blue gel was used on the background.  For the relatively intense blue an overexposure of one stop was chosen.  With a reflective reading the background light was adjusted until this exposure was reached.

Could the same background exposure be achieved with an incident reading?  Not at all.  While an incident reading can determine the relative brightness of the light source, it cannot give any information about how much of that light is actually reflected by the background material.  A reflective meter on the other hand will read exactly that.  Therefore, to have the total control described above, both incident and reflective meters are absolutely essential.

It must also be mentioned here that a lot of light meters require the removal of the incident sphere and replacement with a reflective reading attachment.  In situations as described above, those meters have proven to be very cumbersome.  Light meters which allow the incident sphere to slide aside and thus changing to a reflective reading have proven to be much more practical.

Could the subject exposure be determined with a reflective meter?  Yes, but it is much more difficult.  Especially with portraits, we have to deal with a large variety of skin tones.  Most Caucasian skin tones are too light and would lead to a slight underexposure with a reflective reading, just as very dark skin tones would lead to overexposure.  An incident meter on the other hand will automatically render exposure settings which will render the skin tones accurately, regardless of how bright or dark they might be.  An incident meter will render true tonality in both color and black and white.

A good example is the photograph below.  A simple, diffused light source (umbrella) was used as the only form of illumination.  This, of course, rendered a mostly black photograph.  The incident meter, aimed at the light source easily gave the correct camera setting.  Most reflective light meters would have failed with the possible exception of a spot meter.  Any automatic exposure control would have been fooled by the mostly black scene, including any of the computer controlled matrix metering systems, regardless of manufacturer.


The question is often asked about where to aim the incident meter when multiple light sources are used.  That ultimately depends on the approach to lighting.  I know that a lot of photographers set up lighting, especially for portraits, by establishing certain lighting ratios, which then are set up with the help of a light meter.  I prefer to exercise full visual control.  It is my philosophy that no meter “knows” what lighting is right for an individual.  Further, I strongly feel that the lighting should be set to accent the individual.  Preconceived lighting ratios can’t always do that.  Therefore, I set up lighting to best accent the task at hand.  Once I decide on a certain lighting, as in the above examples, I start with the main light and then use fill as necessary.  With other words, I adjust the lights until they look good.  Then, for the reading, I aim the incident meter toward the main light source, may it be a soft box, umbrella, scrim, window or any other.  That will give the correct camera settings, and everything else will literally fall into place.

A word of caution about measuring range of the light meter.  Using large format cameras often necessitates very small apertures like f/32 or f/45.  To apply the same control as described above to get a true white background would subsequently require a light meter capable of reading apertures of f/90 or f/128.  While some light meters are capable of doing this for continuous light, few are able to do the same for electronic flash.  The same also applies to maximum exposure time.  While very long exposure times usually are not necessary, it is however, a good idea to have ample reserve in this respect in order to be able to handle all photographic situations.  For my own use the longest exposure time has been one hour.
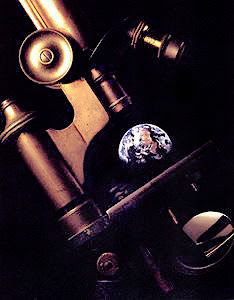
 

The above photograph is not computer manipulated.  It is a double exposure of the microscope and a carefully positioned rear projection screen with the image of the earth projected onto it.
The exposure for the microscope, once lighting was set up, was determined with an incident reading and the first exposure was done accordingly with just a black background.  After carefully positioning the rear projection screen, a reflective reading of the projected image was taken.  An incident reading will not work in this situation since there is no illuminating light source.  Instead an actual reading of the true brightness of the projected image had to be taken, which can only be done with a reflective meter.  The meter was placed flat against the rear projection screen over the area showing the brown area visible in the center.  No adjustments to the reading were necessary because this color of the earth is of neutral density.  This reading was then used to expose the background.

A common practice among professional photographers is to use Polaroid film or to use the viewing screen of digital cameras to verify exposure.  While there is nothing inherently wrong with that, it is still beneficial to be able to take an accurate and reliable exposure reading since some photographic situations simply don’t allow for enough time to do so.  The photograph below is such an example.


The front elevation of this building is facing west.  Therefore late afternoon / early evening setting sun lighting was chosen.  I also decided to use tungsten film to accentuate the blue sky (a tungsten setting for the white light adjustment on a digital camera would do the same).  As it became darker, spot readings of the entry way and main stair case of the building were taken.  The interior was very much neutral in density; subsequently the reflective spot readings established the actual exposure settings.  These were checked periodically to make sure that no changes took place.  For the intensely blue sky exposures of neutral to +1 are necessary.  At that time of day lighting changes very fast.  To get the correct exposure, spot readings were taken of the sky right above the building.  As soon as the sky density had reached the +1 level, exposures were taken in short intervals until the sky darkened to neutral.  These changes take place so quickly that no Polaroid test exposure would have rendered usable exposure settings.

None of the above examples were exposed with the help of Polaroid film or the almost instant feedback of the viewing screen on a digital camera.  But they do show how a good hand held light meter can be an invaluable tool for total exposure control.  Yet there is more.

Many photographers use seamless paper to achieve different colored backgrounds, and at times this is indeed a good choice.  However, colored gels can in a lot of cases do very much the same, again with absolute control.  In general, a white background material will usually lead to relatively light, pastel colors since it does reflect a large amount of the ambient light in addition to the background lighting.  Gray surfaces are helpful in this respect.  If, however, really intense, pure colors are needed, this is best done with a flat black background material like black seamless.  The same test, as described above for backgrounds from white to black, can be done here.  Regardless of the color of the gel, the three stop over exposure will render white as a four stop underexposure will render black.  Exposure changes in 1/3 stop increments will reveal the various color densities which can be achieved.  This incidentally is repeatable with virtually absolute accuracy if the same gels and background materials are used.


Photography inevitably requires exposure settings.  The more control we are able to exercise over these exposure settings, the better the outcome of our photographs.  Besides the camera, the most important tool here is the photographer, his or her knowledge about exposure control and the help of a good reflective/incident light meter.


Tuesday, May 6, 2014

100 JAHRE LEICA FOTOGRAFIE


We received the following article from PROFIFOTO in Germany:


CAFÉ LEITZ


“CafÄ— Leitz.” has opened

Wetzlar has a new café.  It is located at Leitz Park and is appropriately called “CafÄ— Leitz.”  It is greeting its guests all in white.  It offers 52 tables inside and 46 outside with a view of the fountain and the administrative building of the Leica Camera AG.  Manager Matthias Emmer of the firm Aramark and his team are looking out for the guests.  They offer home made cakes and baked goods, chocolates and truffles as well as soups and salads.  In addition there are freshly made sandwiches in the design of a camera.  Café Leitz is open Monday through Friday from 10 to 7.  It can be hired for private parties.  Also open to the public is the “Casino” in the main building of Leica.  There you can order Breakfast starting at 7:30 and lunch from 11:45 to 1:30, Monday through Friday.  Closing time is 3:30.  (Phone 06441-2080113)


Thursday, May 1, 2014

HOW DID THEY DO THIS?


With the advent of digital photography and computer manipulated photographs, we have come to expect the extraordinary, maybe even the seemingly impossible.  Unfortunately, this has also caused some of the older, conventional photographic methods to become relics of the past, soon to be forgotten.

There is no doubt that modern, computer methods have made it substantially easier and more productive to manipulate photographs, to show the unusual.  Yet we have seen similar things done, in the past, with just conventional photographic techniques.  In a modern studio operation, digital techniques are definitely necessary to maintain a competitive edge.  But for just plain, photographic fun, some of the old, conventional techniques have a lot to offer.


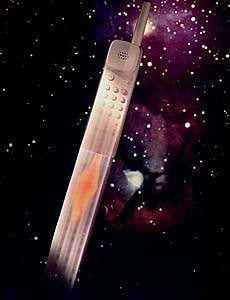
The photograph in this article has often been thought of as being computer generated or manipulated.  Yet it was done by standard, photographic methods and a bit of ingenuity.  It came about as an assignment for a local client.  The basic idea of the shot was specified, and it was up to the photographer to execute the idea in the studio and to put it on film.

The photograph is the result of multiple exposures on the same sheet of film.  Following is an account of how this was done…

As a camera, a 4x5 view camera was chosen, although any other camera could be used as well.  Initially, the phone was hung up with very thin, micro filament line.  It would be very difficult to hang the phone in an angle; instead, it was hung straight, with the antenna facing down.  Two lines, in an angle were used to prevent the phone from swinging sideways.  An additional two lines were fastened to the antenna to avoid the phone from swinging back and forth.  To allow the phone to be recorded in an angle, the camera was tilted.  The upside down image in a view camera actually made it easier to compose the set, because the upside down phone showed upright on the ground glass.  With cameras other than a view camera, it would be easier to have the phone hung upright.

Lighting was done all with hot lights, using a strong cross light on the key pad, with a softer light source, with the same angle, as fill.  A reflector was used to lighten the dark, opposite side.  The camera was supported on a studio stand with a geared head.  This allowed for an easy addition of the motion streaks.  The initial position of the camera was marked with white board marker directly on the ground glass.  With other cameras the position would need to be marked on the tripod.  Then the camera was tilted down for the position of the end of the motion streaks.  With the shutter open, the camera was slowly tilted upward, until it reached the initial position as marked on the ground glass.  This gave the phone an exact, fixed position for the next exposures, the first of which was the phone by itself, against a black background with the above described lighting.

The flame had to be done carefully, in order not to hurt the phone or set it on fire.  Clients really don’t like it if you burn their products.  A light stand was positioned right behind the phone.  Wrapped in a black cloth, the parts below the phone did not show against the black background.  On top of the light stand a small piece of sponge material was fastened.  The height of the light stand was carefully adjusted such that the sponge was just hidden behind the edge of the phone.  The sponge was soaked with lighter fluid, which burns with a bright, orange flame.  Thus, the exposure of the flame was no problem at all.  Of course, the lighting for the phone was shut off for this exposure.

The fourth and final exposure was for the background.  To allow for the space scene, rear projection was chosen.  A standard, 35mm slide of the scene was projected onto a rear projection screen.  This is a bit trickier, since the product, in this case the phone, must not be allowed to move at all.  The subject lighting must be off for this exposure to avoid any light from spilling onto the rear projection screen.  For the previous three exposures the screen was not in place.  The screen must be carefully put in place, as close as possible to the subject, to avoid any depth of field problems.  Neither a change of aperture or refocusing can be done since both will alter the size of the product in front of the screen.  The product is, what is called, self-masking.  With other words, it blocks out the areas of the background covered by the product.  It is also important to filter the projector lens.  Most projectors use a heat absorbing glass which is slightly green in color.  Without filtration, the rear projection image would have a green cast.  A gel filter of CC10M (10 Color Correction values of Magenta) in front of the projector lens assured the correct color balance.  Thus, the fourth exposure made the phone move through space.

Exposure readings were taken in the following manner:  For the exposure of the phone, the initial reading was an incident reading, facing toward the light source.  To make sure that the bright spot on the phone key pad would not be washed out, an additional spot reading of that area was taken to make sure that it was not over exposed by more than 2 ½ stops.  A three stop over exposure would have rendered the area white without detail.

Experience has shown that the motion streaks will show just fine with the same lighting and a slow tilting of the camera, lasting about two to three seconds.  This is really not that critical, since it doesn’t matter if the motion streaks are a bit lighter or darker, as long as they show up well.  Please note:  The exposure reading for the phone also determined the exposure settings for the motion streaks.  Moving the camera for the motion streaks was the first exposure.

For the flame, a spot reading of the flame, adjusted to a 1 stop over exposure assured that the reddish color of the flame would be maintained without being too dim.

The rear projection exposure was determined with a spot reading also.  Incident readings cannot be applied here at all.  Of the star field, an area with neutral brightness was chosen for the spot reading.  The resulting exposure time then rendered the correct exposure.

It is important to note, that for all four of the exposures the same aperture had to be used. As mentioned already, a change in aperture will slightly change the size of the subject on film.

Since all four exposures show the same subject, this must be avoided.  To select an aperture which gave enough depth of field to cover the subject and the rear projection image, the screen was put in place initially, but then was removed for the first three exposures.


I have found that many such photographs have more than just one solution.  I would be very much interested in hearing about some other ideas how this photograph could have been made.  Such a photograph is obviously beyond everyday shooting.  If anyone has any questions regarding how this was done or to clarify any of the techniques described, please let me know and I will gladly get back to you with an answer.


Tuesday, April 29, 2014

LEICA T: LIST OF REVIEWS AND VIDEOS


The following list was obtained, with permission, from the L-Camera Forum, the world's largest Leica community.

You can find the L-Camera-Forum at www.l-camera-forum.com

  • David Farkas from Red Dot Forum published a comprehensive LEICA T review, even including a demonstration of the App. (Update 4-29-2014)
  • Camera West could also take a closer look on the camera and shared some DNG files already. In addition you can pre-order the LEICA T in their online shop. (Update 4-29-2014)
  • Jonathan Slack: Forum member Jono had the opportunity to test the new camera as well. He shares his thoughts in this interesting review – Testing Taifun . . . The new Leica T
  • Leica Camera offers a lot interesting information around the new camera and comes up with a new website design and content.
  • Ming Thein was allowed to test the LEICA T as one of the first user and describes his experience in this interesting review.
  • Steve Huff: As usual Steve has created a complete review about the new camera with great images and a 34 min. video review.
  • The Photoblographer also contributes a first impression article on the LEICA T.
  • The Luminous Landscape shared a review, too.
  • Kristian Dowling published a complexe and informative review with information about the camera, practical use and facts about the accessories
  • Reviewed.com shared a complex test of the Taifun.
  • ePHOTOzine offers a number of product images and a short hands-on about the LEICA T (Type 701).
  • dpreview was allowed to check the camera and shared a short article.
  • photography blog: Mark Goldstein shows some sample images.
  • TechRadar presents a short review of the LEICA T (Type 701).


Monday, April 28, 2014

USING FLASH ON LEICAS WITHOUT FLASH SYNCH

THE LEITZ VACU

A little known accessory for Leica screw mount cameras is the VACU.  It was made in a variety of versions.  It offered the use of flash equipment with Leica cameras up to the Leica IIIc.  Its replacement, the Leica IIIf was the first model with built-in flash synch.

Leitz made several versions, all with their own catalog designation. Ranging from CAVOO-A to CAVOO-F.
The CAVOO-A was to be used with the Leica III, the CAVOO-B was for the Leica IIIa and IIIb and several versions for the "c" model Leicas, from CAVOO-C to CAVOO-F.

The unit consisted of a small trigger device that screwed onto the shutter release of the camera.  It worked in conjunction with a small cam that attached to the shutter release dial.  When releasing the shutter, the rotating shutter speed dial would activate a small switch via the cam to fire the flash.  This in turn was connected to the VACU via a short cord with a PC fitting.

 
Leitz Vacu

The cam attachment came in four different versions depending what model Leica it was for.  A word of caution; I have seen versions of the VACU offered for sale from time to time, but in each case the cam was missing, therefore rendering the unit incomplete and useless.

 
Cam attached to shutter speed dial

 
Trigger Switch

The position of the cam on the shutter speed dial is critical because it determines the position of the shutter curtains at the moment the flash is triggered.  Rotating it back or forth will allow for exact positioning.

That, of course, requires a means to see if the flash is fired at the correct moment.  For this there is a very simple solution as explained in the article “TESTING LEICA SM CAMERAS FOR PROPER FLASH SYNCH” from March 8, 2012 on this blog.

 
VACU on Leica III  Front View

 
VACU on Leica III  Rear View

The first Leica I ever owned, a Leica III, was equipped with a VACU.  I still consider it one of my prized possessions and I fondly remember leaning to take pictures with this camera, including flash pictures.  It is a great camera to learn with because everything is manual.  It created useful habits that I still practice today.  For instance, after getting many severely blurred pictures, in spite of careful focusing, I learned that it is advisable to pull out the collapsible Summar f/2 before shooting.

 
Leica III with VACU


But that is ultimately a different story.  I don’t use the Leica III very often anymore in these days of digital photography.  But it does take up a prominent spot in my Leica collection, together with the VACU attachment in place on the camera.


IN PRAISE OF PHOTOSHOP


A while ago I got into a discussion with a colleague about digital photography and Photoshop.  He still prefers to use film and argued that all pictures should be shown “the way the camera saw them, the way they come out of the camera” and he went on to say that Photoshop should not be used.

I definitely disagree with that and answered: “Why?  Digital photography and Photoshop have considerably lowered my overhead (no film to buy, no processing costs) and I have full control over the final looks of my images instead of having to rely on some lab’s idea about what my images should look like.  Film is a thing of the past.  Just because Photoshop is available doesn't mean that the photographer doesn’t need the same skills as in the film days.  Composition, lighting etc. are still as important as ever.  Shooting digital is essentially nothing more than using a different means to record the image.  The addition of Photoshop has enabled us to control the final outcome of our photographs to a greater degree than ever before which, when used correctly, will ultimately deliver the best quality images possible.”

He answered: “However, when you change that image to some other image, then it is a second image.  I know what you are saying but I also know that you change some of your images to make them into something else.....and so do others.  I just happen to think that the original image is what the end result should be.”

I answered: “I understand what you are saying.  However, just because Photoshop has the ability to substantially alter an original image doesn’t mean that its use will always lead to that.  Photoshop offers the ability to ‘tweak’ our photographs to ultimately end up with better results.  We have the ability to alter contrast and color saturation, both of which are much easier to do with Photoshop than during the film days.  In the past photographers routinely retouched their photographs to reduce blemishes, for instance.  Photographers used changes in exposure and development to reduce or increase contrast.  Are these accepted methods really any different than using Photoshop to obtain the same results?  Isn’t either approach effectively altering the image from what the camera saw?  Then, of course, there is the question of what the ultimate purpose of taking a photograph is.  Isn’t the final image, as envisioned by the photographer, what counts?  In the past we used methods like solarization, for instance.  That certainly is a considerable departure from what the initial photograph looked like, the same goes for posterization or bas relief images, all of which were routinely used to create photographic art beyond the original image as it came out of the camera.  If those methods were okay in the past, then why isn’t the use of Photoshop acceptable as a means to create pieces of art derived from otherwise ordinary photographs.  Even simple cropping is altering an image beyond what originally came out of the camera.  Since none of us is perfect, we naturally get often useless photographs because of a variety of reasons.  In many cases Photoshop has enabled me to save such photographs with the help of Photoshop.  I see that as a benefit.

I have come across similar opinions fairly often and I wonder if it is really a conviction or if it is more a resistance to change, combined with an underlying fear of learning a new method of working with our photographs.

To which extend Photoshop or similar programs are going to be used ultimately is a personal preference and opinion.  However, it is a tool that should not be rejected off hand.  If we are honest about our own work, most of us probably reject or throw away more of our photographs than we save and with digital photography that ratio has most likely increased.  But with Photoshop we also have the possibility to save an otherwise useless picture and make it into something worth keeping.


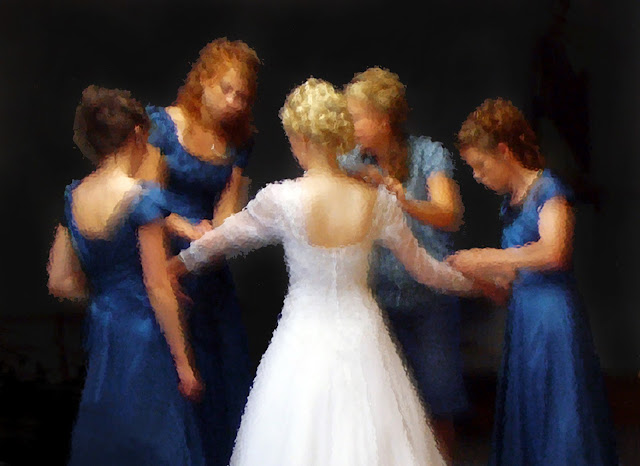
This is a picture my wife took at a wedding.  The original was nothing special and it was almost deleted.  However, after taking a closer look, she asked me to apply my Photoshop skills.  I tightly cropped the group to remove as much as possible of the clutter in the room which was further eliminated with various Photoshop tools.  I then modified the image to give it a painting like appearance.  The final result certainly is not at all what came out of the camera, but it is a photograph worth keeping.  As it turned out, it is one of the favorites of the bride.


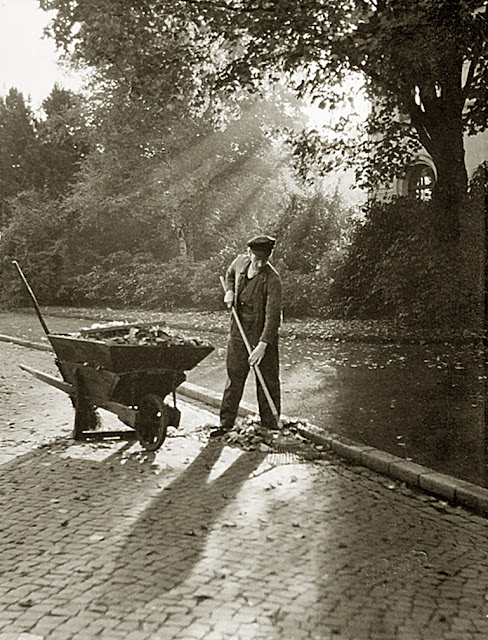
The above photograph was taken by my father with a Leica III in Hamburg in 1949.  He enhanced the sunrays in the background by carefully applying graphite dust to the rays on the negative to lighten them and thus make them stand out more.


Two photographs, both manipulated to allow for a better end-result.  Both photographs that would have less impact, which would be visually less pleasing, had they not been enhanced.  There should be no question that Photoshop or conventional retouching are means that enable us to make our photographs better than what our cameras are capable of doing by themselves.  I consider that something very worthwhile.


Thursday, April 24, 2014

HAND POLISHING OF THE LEICA T – VIDEO


It is a known fact that Leica goes to quite an extend to assure the quality of their equipment.  With introduction of the new Leica T we learned that the camera body is not only milled from a solid block of aluminum, as a finished touch the camera is then polished for 45 minutes – by hand.  Here is a video that shows the entire process.  To be honest, it is a little bit like watching paint dry, but it clearly shows that Leica is not taking any shortcuts with this camera.  Just skip ahead from time to time and you will see the many painstaking steps involved with this process.


TECHNICAL DATA LEICA T - LEICA T LENSES


Technical Data LEICA T

Camera type              Leica T

Lens connection        Leica T bayonet fitting with contact strip for communication between lens and camera

Lens system              Leica T lenses

Sensor            CMOS sensor, size APS-C (23.6 x 15.7 mm) with 16.5/16.3 million pixels (total/effective), format aspect ratio 3:2

Resolution     JPEG: 4928 x 3264 (16 megapixels), 4272 x 2856 (12.2 megapixels), 3264 x 2160 (7 megapixels), 2144 x 1424 (3 megapixels), 1632 x 1080 (1.8 megapixel), DNG: 4944 x 3278 pixels

Picture data file formats / compression rates     Selectable: JPG Superfine, JPG Fine, DNG + JPG Superfine, DNG + JPG Fine

Video recording format       MP4

Video resolution / frame rate        Selectable: 1920 x 1080 p, 30 fps or 1280 x 720 p, 30 fps

Storage media           16 GB internal memory; SD/SDHC/SDXC memory cards, multimedia cards

ISO range       Automatic, ISO 100 to ISO 12500

White balance           Automatic, presets for daylight, cloud, halogen lighting, shadow, electronic flash, two manual settings, manual color temperature setting

Autofocus system     Contrast based

Autofocus metering methods        Single point, multiple point, spot, face detection, touch AF

Exposure modes       Automatic program, aperture priority, shutter speed priority, manual setting, scene exposure modes: Fully automatic, sport, portrait, landscape, night portrait, snow/beach, fireworks, candlelight, sunset

Exposure metering               Multiple field, center weighted, spot

Exposure compensation      ±3 EV in 1/3 EV increments

Automatic bracketing          Three pictures in graduations up to ±3 EV, adjustable in 1/3 EV increments

Shutter speed range            30 s to 1/4000 s

Picture series            Approx. 5 fps, 12 pictures with constant picture frequency, then depending on memory card properties

Flash modes              Automatic, automatic / red eye reduction, always on, always on / red eye reduction, slow sync, slow sync / red eye reduction

Flash exposure compensation        ±3 EV in 1/3 EV increments

Flash synchronization          Sync time: 1/180 s

Guide number of built-in flash unit           for ISO 100: 4.5

Recovery time of built-in flash unit           Approx. 5 s with fully charged battery
Monitor          3.7″ TFT LCD , 1.3 million pixels, 854×480 per color channel

Self timer       Selectable delay time 2 or 12 s

WLAN             Complies with IEEE 802.11b/g/n standard (standard WLAN protocol), channel 1-11, encryption method: WiFicompatible WPA™ / WPA2™, access method: Infrastructur operation

Power supply            Leica BP-DC13 lithium ion battery, rated voltage 7.4V, capacity 1040mAh (based on CIPA standard): approx. 400 pictures, charging time (after total discharge): approx. 160 min

Connections              Micro USB port (2.0 High Speed), Leica flash interface with integrated connection for optional accessories; battery charging via USB connection possible with max. 1A

Charger          Leica BC-DC13, input: AC 100-240V, 50/60Hz, automatic reversing, Output: DC 8,4V 0,65A, Weight: approx. 90 g, Dimensions: approx. 96x68x28 mm

Body   Leica unibody solid aluminum design, two removable dummy plugs for carrying strap and other accessories, ISO flash shoe with center and control contacts for connection of more powerful external flash units, e.g. Leica SF 26, or for attaching the Leica Visoflex electronic viewfinder

Tripod thread            A 1/4 DIN 4503 (1/4″)

Dimensions (WxHxD)           134 x 69 x 33 mm

Weight           Approx. 384 g / 339 g (with / without battery)

Items supplied          Camera body, carrying strap, 2 carrying strap release pins for detaching the carrying strap, battery (Leica BP-DC13), charger (Leica BC-DC13) with 6 adapter plugs, USB cable


Software        Adobe® Photoshop® Lightroom® (free download after registration of camera), Leica T app for iOS® (remote control and image transfer, free download from Apple® App-Store®)


Technical Data LEICA VARIO-ELMAR-T 18–56 mm f/3.5–5.6 ASPH.

Compatible cameras            All Leica T models

Field angle (diagonal, horizontal, vertical)            At 18 mm: Approx. 75°, 62°, 41°, At 56 mm: Approx. 28°, 23°, 15°, corresponding to around 27-84 mm focal length in 35 mm format

Optical design:

Number of lenses / groups 10/7

Aspherical surfaces  4

Position of entrance pupil (at infinity / at close up limit)           At 18 mm: -37.8/19.9 mm, at 56 mm: -28/49.7 mm (in direction of light incidence behind / in front of bayonet mount)

Distance setting:

Setting / Function     Electronically controlled, mode selectable using camera menu: Automatic (AF) or manual (M), in AF mode manual override possible at any times with setting dial

Focusing range          0.3/0.45 m (at 18/56 mm) to ∞

Smallest object field / Largest scale          At 18 mm: Approx. 312 x 207 mm / 1:13.2, at 56 mm: Approx. 110 x 73 mm / 1:7.5

Aperture:
Setting / Function     Electronically controlled, adjustment using dial on camera, third values also available
Lowest value  16

Bayonet fitting          Leica T quick-change bayonet with contact strip for Leica T models
Filter mount / Lens hood     External bayonet fitting for lens hood (included), internal thread for E52 filters, filter mount does not rotate

Finish  Black anodized

Dimensions and weight:

Length to bayonet mount   Approx. 60/99 mm (without/with lens hood)

Largest diameter      Approx. 63/73 mm (without/with lens hood)

Weight           Approx. 256/287 g (without/with lens hood)


Technical Data LEICA SUMMICRON-T 23mm f/2 ASPH.

Compatible cameras            All Leica T models

Field angle (diagonal, horizontal, vertical)            Approx. 64°, 53°, 35°, corresponding to around 35 mm focal length in 35 mm format

Optical design:

Number of lenses / groups 9/6

Aspherical surfaces  2

Position of entrance pupil (at infinity / at close up limit)           -22,7/10,5 mm (in direction of light incidence behind /in front of bayonet mount)

Distance setting:

Setting / Function     Electronically controlled, mode selectable using camera menu: Automatic (AF) or manual (M), in AF mode manual override possible at any times with setting dial

Focusing range          0.3 m to ∞

Smallest object field / Largest scale          Approx.: 295 x 196 mm / 1:12.6

Aperture:

Setting / Function     Electronically controlled, adjustment using dial on camera, third values also available
Lowest value  16

Bayonet fitting          Leica T quick-change bayonet with contact strip for Leica T models
Filter mount / Lens hood     External bayonet fitting for lens hood (included), internal thread for E52 filters, filter mount does not rotate

Finish  Black anodized

Dimensions and weight:

Length to bayonet mount   Approx. 37/69 mm (without/with lens hood)

Largest diameter      Approx. 63/73 mm (without/with lens hood)

Weight           Approx. 154/186 g (without/with lens hood)


For information on the Leica T and Leica T Lenses go to: