
Every time we take a
photograph, it is necessary to use accurate exposure settings, regardless if we
use film or digital cameras. Automatic
exposure control has advanced to the point that in most cases we can rely on
our camera equipment to come up with the correct camera settings. However, there will be times when this won’t
work, when the light meters in our cameras will be fooled. Take a bright, sunlit winter scene, for
instance. The snow will reflect a huge
amount of light which will fool our built in light meters into registering a
larger amount of light than what is actually available. The result will be an underexposed picture
with the snow being rather dingy. Not at
all what the scene looked like.
Many people will set their
cameras to automatically overexpose by a stop or two, but that is nothing more
than guess work. Ideally, a handheld
light meter is the most accurate instrument to determine the correct exposure
setting.
Since the advent of the early
selenium cell light meters in the 30s, light meters have come a long way. Built-in, automatic exposure control has made
exposure settings so effortless that a lot of camera users hardly give it a
thought anymore. On the other hand,
especially in professional applications, full manual control over exposure
settings is often an absolute must. A
portrait for instance might call for a white background. Obviously, a white background material, like
seamless paper, is the correct choice here.
Yet, just because we use a material which we consider white, this does
not necessarily turn into a white background in a photograph. As a matter of fact, given the right control,
a photograph taken of a subject against a white background can actually result
in a photograph which shows a very dark or even black background, just as a
black background can be rendered white in a photograph. All that is necessary is a good understanding
of exposure and a good hand-held light meter.
Most hand-held light meters
are basically designed as incident light meters, yet for full control over our
exposure settings a reflective light meter is absolutely necessary also. Let’s look at the differences: A reflective light meter, like all of the
light meters built into our cameras, reads the intensity of the light which is
reflected off the subject. An incident
light meter on the other hand will read the intensity of the light which
illuminates the subject. Let’s look at
both types and their inherent differences.

Gossen Sixtomat F2
The meter is in the incident reading position.
To switch to a reflected reading, all that is necessary
is to slide the incident sphere off to the side.
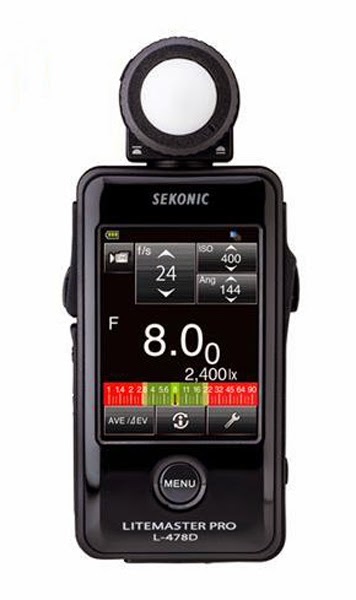
Sekonic L-478D
The meter as shown is for incident readings.
In order to switch to reflective reading,
a separate reflective reading attachment needs
to be purchased. To take a reflected reading,
it is necessary to remove the incident sphere
and replace it with the reflective reading attachment
If we take a reflective light
meter and aim it at a subject of average brightness, it will give an accurate
reading. For easier understanding, let’s
aim the light meter at an area which is painted an average gray. Such a surface will reflect an average amount
of the light which illuminates it and the meter will react accordingly, giving
a certain exposure setting. Without
change in illumination, if the gray area is replaced by a pure white one, what
will happen? The white surface obviously
will reflect a lot more light which the light meter will register. Replacing that area with a black one, will
result in just the opposite. Without any
change in relative brightness, our meter has now come up with three
distinctively different exposure settings.
Reflective light meters are
all calibrated to register (or assume) an average level of reflectance, as with
the gray square. Subsequently, the
exposure reading obtained from the gray square is the correct one. The white surface will actually fool the
meter into registering a higher light intensity, just as the black one will
result in registering a lower light intensity.
Both of those exposure settings will be wrong. The end result is actually that the meter
will render exposure settings which make all three surfaces in the photograph
grey. This is the very reason why
photographs of a snow scene will usually be underexposed, while photographs at
dusk or at night often come out much lighter than the actual scene.
This is where an incident
light meter has tremendous advantages.
It only registers the relative brightness of illumination. The resulting exposure settings will make an
object of average brightness average in the photograph also. Subsequently, a lighter surface will be
lighter in the photograph just as a darker one will show up darker.
So it may seem that for
accurate camera settings an incident light meter is the way to go. In most situations this actually is indeed
the case. But what about the white
background? The exposure setting we
choose has to be such that not only the subject is exposed properly, but also
the background, which in our example is to be white.
A three stop overexposure
will generally result in white, just as a four stop underexposure will result
in black. This is easily verified by
taking an evenly illuminated white back ground and taking a reflective
reading. We then open the lens by three
stops and take an exposure. Then
subsequent exposures are taken in 1/3 stop increments until a four stop
underexposure has been reached. The
results will then show the various shades of gray (white and black are also
considered shades of gray here) which can be achieved with various degrees of
over and under exposure. Please note
that these are average settings. Digital
sensors vary in their response to over and underexposure. However, a simple test like the one above
will easily show the amount of overexposure and underexposure necessary to
render white or black without detail.
For example , if for a white
background it is necessary to see if it is three stops overexposed, we must do
the following:
We determine the correct
exposure for the subject with the light meter in the incident mode. This will be very accurate and therefore
establish the actual camera settings.
These settings also need to overexpose the background by three stops in
order to render it white. To check this,
all we need to do is switch the meter to the reflective mode. Now the meter will register the amount of
light which is actually reflected by the background. If this indeed shows an overexposure of three
stops, the background will be white, as would a four or 5 stop
overexposure. But that is not advisable
at all since otherwise the background will reflect such a strong amount of
light that it very likely will result in flare or loss of detail at the edges
of the subject. If the reflective
reading of the background registers less than a three stop overexposure, it is
ultimately a simple interpretation of what the background will look like. A two stop overexposure for instance would
render a very light gray background; a one stop overexposure would still render
a noticeably lighter grey. The same
exposure would render an average or neutral grey, while underexposure would
render progressively darker shades of grey until the background is rendered
black.
For example: The basic exposure for the subject is 1/60
sec @ f/5.6. For the background to be
three stops over, the meter would have to read 1/60 @ f/16. If we were to expose at f/16, the background
would be medium gray, but since the actual camera setting for the subject calls
for f/5.6, that is indeed a three stop overexposure compared to f/16. Does it matter if the background material is
actually white? No it does not! Regardless of color or brightens, if the
background is illuminated such that it registers a three stop overexposure, it
will be white. On the other hand, if the
overexposure is less than three stops, the background will show various degrees
of light grey, red, green or whatever other color the background may be, but
with an underexposure of four stops, all will be black.

The above photograph is a
good example of predicting the outcome of the photograph with the help of a
good, hand-held light meter. The bright
light, outlining the profile of the face and the hands was purposely chosen at
+2 1/2 (2 1/2 stops over). This was
determined with an incident light reading of just the main light source and
then opening the lens by 2 1/2 stops.
The rest of the face needed to be quite dark, but also needed to show
detail. For that an underexposure of -2
1/2 stops was chosen. This again was
done with an incident reading by adjusting the intensity of the light source
until it registered –2 1/2. This
photograph was actually shot in a studio with all white walls and no black
background material was used. The
subject was approximately 30 feet from the background. With that distance, so little light reached
the background that the reflective meter did register an underexposure of 3 ½
stops. In the original enlargement one
can actually see a slight separation between the dark part of the hands and the
background which is ever so slightly lighter.
This kind of control would not be possible without a good, handheld
light meter offering both incident and reflective reading capability, and
certainly no automatic metering system, however sophisticated, would allow this
to be done.

A similar technique was
applied for the above color photograph.
Via incident reading the correct exposure for the subject and subsequent
camera settings were determined. A spot
with blue gel was used on the background.
For the relatively intense blue an overexposure of one stop was
chosen. With a reflective reading the
background light was adjusted until this exposure was reached.
Could the same background
exposure be achieved with an incident reading?
Not at all. While an incident
reading can determine the relative brightness of the light source, it cannot
give any information about how much of that light is actually reflected by the
background material. A reflective meter
on the other hand will read exactly that.
Therefore, to have the total control described above, both incident and
reflective meters are absolutely essential.
It must also be mentioned
here that a lot of light meters require the removal of the incident sphere and
replacement with a reflective reading attachment. In situations as described above, those
meters have proven to be very cumbersome.
Light meters which allow the incident sphere to slide aside and thus
changing to a reflective reading have proven to be much more practical.
Could the subject exposure be
determined with a reflective meter? Yes,
but it is much more difficult.
Especially with portraits, we have to deal with a large variety of skin
tones. Most Caucasian skin tones are too
light and would lead to a slight underexposure with a reflective reading, just
as very dark skin tones would lead to overexposure. An incident meter on the other hand will
automatically render exposure settings which will render the skin tones
accurately, regardless of how bright or dark they might be. An incident meter will render true tonality
in both color and black and white.
A good example is the
photograph below. A simple, diffused
light source (umbrella) was used as the only form of illumination. This, of course, rendered a mostly black
photograph. The incident meter, aimed at
the light source easily gave the correct camera setting. Most reflective light meters would have
failed with the possible exception of a spot meter. Any automatic exposure control would have
been fooled by the mostly black scene, including any of the computer controlled
matrix metering systems, regardless of manufacturer.

The question is often asked
about where to aim the incident meter when multiple light sources are
used. That ultimately depends on the
approach to lighting. I know that a lot
of photographers set up lighting, especially for portraits, by establishing
certain lighting ratios, which then are set up with the help of a light
meter. I prefer to exercise full visual
control. It is my philosophy that no
meter “knows” what lighting is right for an individual. Further, I strongly feel that the lighting
should be set to accent the individual.
Preconceived lighting ratios can’t always do that. Therefore, I set up lighting to best accent
the task at hand. Once I decide on a
certain lighting, as in the above examples, I start with the main light and
then use fill as necessary. With other
words, I adjust the lights until they look good. Then, for the reading, I aim the incident
meter toward the main light source, may it be a soft box, umbrella, scrim,
window or any other. That will give the
correct camera settings, and everything else will literally fall into place.
A word of caution about the measuring
range of the light meter. Using large
format cameras often necessitates very small apertures like f/32 or f/45. To apply the same control as described above
to get a true white background would subsequently require a light meter capable
of reading apertures of f/90 or f/128.
While some light meters are capable of doing this for continuous light,
few are able to do the same for electronic flash. The same also applies to maximum exposure
time. While very long exposure times
usually are not necessary, it is however, a good idea to have ample reserve in
this respect in order to be able to handle all photographic situations. The longest exposure time I ever needed to
use was one hour.
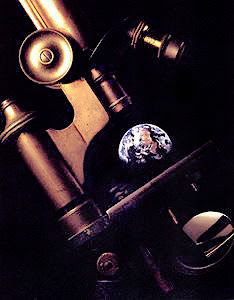
The above photograph is not
computer manipulated. It is a double
exposure of the microscope and a carefully positioned rear projection screen
with the image of the earth projected onto it.
The exposure for the microscope, once lighting was set up, was
determined with an incident reading and the first exposure was done accordingly
with just a black background. After
carefully positioning the rear projection screen, a reflective reading of the
projected image was taken. An incident
reading will not work in this situation since there is no illuminating light
source. Instead an actual reading of the
true brightness of the projected image had to be taken, which can only be done
with a reflective meter. The meter was
placed flat against the rear projection screen over the area showing the brown
area visible in the center. No
adjustments to the reading were necessary because this color of the earth is of
neutral density. This reading was then
used to expose the background.
A common practice among
professional photographers is to use Polaroid film or to use the viewing screen
of digital cameras to verify exposure.
While there is nothing inherently wrong with that, it is still
beneficial to be able to take an accurate and reliable exposure reading since
some photographic situations simply don’t allow for enough time to do so. The photograph below is such an example.
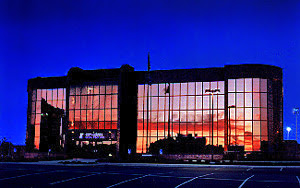
The front elevation of this
building was facing west. Therefore late
afternoon / early evening setting sun lighting was chosen. I also decided to use tungsten film to
accentuate the blue sky (a tungsten setting for the white light adjustment on a
digital camera would do the same). As it
became darker, spot readings of the entry way and main stair case of the
building were taken. The interior was
very much neutral in density; subsequently the reflective spot readings
established the actual exposure settings.
These were checked periodically to make sure that no changes took
place. For the intensely blue sky
exposures of neutral to +1 are necessary.
At that time of day lighting changes very fast. To get the correct exposure, spot readings
were taken of the sky right above the building.
As soon as the sky density had reached the +1 level, exposures were
taken in short intervals until the sky darkened to neutral. These changes take place so quickly that no
Polaroid test exposure would have rendered usable exposure settings.
None of the above examples
were exposed with the help of Polaroid film or the almost instant feedback of
the viewing screen on a digital camera.
But they do show how a good hand held light meter can be an invaluable
tool for total exposure control. Yet there
is more.
Many photographers use
seamless paper to achieve different colored backgrounds, and at times this is
indeed a good choice. However, colored
gels can in a lot of cases do very much the same, again with absolute control. In general, a white background material will
usually lead to relatively light, pastel colors since it does reflect a large
amount of the ambient light in addition to the background lighting. Gray surfaces are helpful in this respect. If, however, really intense, pure colors are
needed, this is best done with a flat black background material like black
seamless. The same test, as described
above for backgrounds from white to black, can be done here. Regardless of the color of the gel, the three
stop over exposure will render white as a four stop underexposure will render
black. Exposure changes in 1/3 stop
increments will reveal the various color densities which can be achieved. This incidentally is repeatable with
virtually absolute accuracy if the same gels and background materials are used.
Photography inevitably
requires exposure settings. The more
control we are able to exercise over these exposure settings, the better the
outcome of our photographs. Besides the
camera, the most important tool here is the photographer, his or her knowledge
about exposure control and the help of a good reflective/incident light meter.
-----------------------------------------------------------------------------------------------------------------------------------------------------------------------------------------------------------------


Upcoming shows in Tamarkin's Rangefinder Gallery
-----------------------------------------------------------------------------------------------------------------------------------------------------------------------------------------------------------------

-----------------------------------------------------------------------------------------------------------------------------------------------------------------------------------------------------------------

Order: info@gmpphoto.com
Please make payment via PayPal to GMP Photography

Order: info@gmpphoto.com
Please make payment via PayPal to GMP Photography

Order: info@gmpphoto.com
Please make payment via PayPal to GMP Photography


