Monday, March 30, 2015

RANGEFINDER FOCUSING IN AN AUTOFOCUS WORLD


The late models of the Leica M camera line are often criticized for not offering autofocusing.  It is certainly correct that a line of autofocus lenses would eliminate any of those criticisms.  But is the lack of autofocus really such a hindrance?

With the advent of autofocus one little trick to speed up focusing of our cameras has all but been forgotten.  I am talking about hyperfocal  lens settings with the help of a depth of field scale.  Most lenses available today no longer have depth of field scales and thus make focusing via hyperfocal settings impossible.  Fortunately, most Leica lenses till offer this advantage and its application can overcome the lack of autofocus to quite an extend.

A lens can only be accurately focused at one certain distance.  Everything before and after that point of focus is effectively out of focus.  Yet we all know that the pictures we take show scenes and subjects to be sharply in focus over a considerable distance.  Are our books of physics wrong?  Not at all.  The reason for this apparent contradiction is our eyes.  Fortunately they aren't good enough to recognize out of focus areas in our pictures unless they reach a certain level.

Imagine photographing a small point.  When not properly in focus, this point will become larger and show up as a fuzzy disc.  This disc has to be of a certain size before our eyes recognize it as out of focus.  This representation of a point is referred to as the circle of confusion.

In these days of virtually everything being auto focus we rarely pay any attention to focusing anymore.  As a matter of fact, many outsiders consider the Leica M rangefinder cameras with their manually focusing lenses an anachronism.  Yet in quite a variety of situations these lenses can be focused as fast or faster than any auto focus system.

That is because the vast majority of the Leica M lenses are non-zoom lenses.  That is the reason why to this day all of them have a depth of field scale.  Many photographers and picture takers have no idea what a depth of field scale is, and if they do, they rarely know what to with one.

It is a known fact that the aperture setting on our lenses, the f-stop used to take a picture, determines how much of what we photograph will be in focus, how much depth of field there will be.  The smaller the aperture, the more depth of field.  That is what a depth of field scale is all about.  It will show the distance from the point closest to the camera to the point furthest from the camera that will be in focus.

 
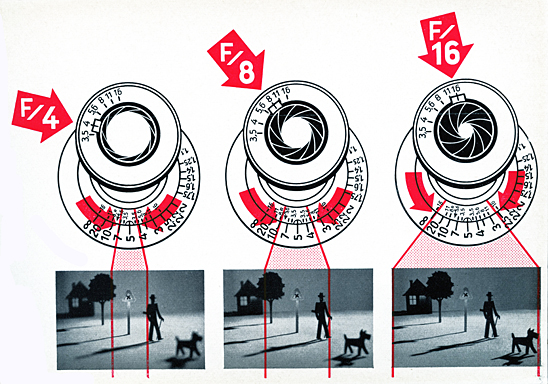
Increase of depth of field by decreasing aperture size

Effectively one third of the total depth of field will be in front of the point of focus and two thirds will be beyond it.  If applied correctly, this can actually greatly improve the sharpness of our photographs.  Imagine taking a picture of a mountain scene.  The mountains are obviously far enough away to constitute infinity as far as the focus settings on our lenses are concerned.  Subsequently it seems to make sense to set our lenses to infinity to make sure the mountains are in focus.  As a matter of fact, if we use the rangefinder on a Leica, this is exactly what will happen.

However, let’s remember the above rule which states that two third of the depth of field is beyond the point of focus.  That means in our mountain scene, two thirds of the depth of field will be wasted.  The depth of field scale will help to prevent that, if properly applied.

Our exposure settings will always be a combination of shutter speed and aperture.  Once we or the camera determine the correct exposure settings, we will know what aperture the picture will be taken with.  Back to our mountain scene.  Instead of setting the infinity mark opposite the focus mark on the lens, all that needs to be done is to set the infinity mark opposite the marking of the aperture we are using.  That will still give proper focus to infinity, but it will greatly increase sharpness in the areas closer to the camera as indicated by the other aperture mark on the depth of field scale.

 
Above focused on the background
Below focused on the foreground

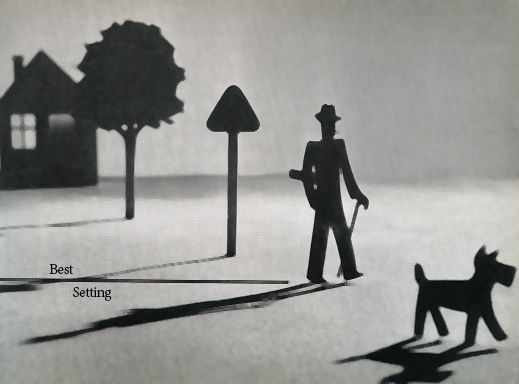
Focused at hyperfocal setting with one third in focus in front of the point of focusand two thirds behind the point of focus
Picture examples form "Kleines Leica Buch (Little Leica Book), 1952 edition

 In this example, the boy flying his kite is obviously the main subject and therefore
should be in focus. However, focusing on him would most likely render the
background out of focus. Utilizing the depth of field scale assured that all is in focus.

It is a fact that the smaller the aperture, the more depth of field we will have.  But we shouldn’t indiscriminately use the smallest aperture all the time, because this can easily lead to the necessity of too slow a shutter speed which in turn can lead to blurry pictures because of camera movement.

As I explained above, the circle of confusion determines what detail in our pictures appears in focus and which not.  Unfortunately, the size of the circle of confusion must also be based on a certain picture size.  In most cases that is an approximate enlargement of five times or a 5 x 7 inch enlargement from a 35mm negative or full frame digital sensor.  With other words, up to a 5 x 7 inch size enlargement our pictures will display maximum sharpness and maximum depth of field.

But what about enlargement greater than a 5 x 7 or if considerable cropping is necessary?  Does that mean the depth of field scale on our lenses is useless?  Not at all.  All we need to do is use the depth of field settings on the lens with an aperture one or two stops smaller than the aperture in actual use.  With enlargements of 8 x 10 or 11 x 14, the next larger aperture will usually be sufficient.  If the enlargement size is greater than that, use a two stop larger aperture.

Why do all of this instead of just using the rangefinder and focus on our main subject?  Because you can greatly increase your speed of operating the camera.  Using the depth of field scale and setting the lens as explained above, this is called hyperfocal setting, will eliminate the need to focus altogether and thus make the operational speed of your camera that much greater.

The above figures are based on 35mm size negatives or so called full frame digital sensors.  Larger or smaller negative and sensor sizes will lead to different depth of field.  Different focal lengths of our lenses will do the same.  In general, the shorter the focal length the more depth of field there will be.  This, however, is nothing to worry about because the depth of field scales will reflect that.


Give it a try.  You might very well find that your pictures in some cases will display a greater range of sharpness and you will be able to use your camera a lot quicker.  It might very well be the difference of being able to catch a great moment on film or memory card instead of losing it to your camera being too slow.

------------------------------------------------------------------------------------------------------------------------------------------

DON'T FORGET TO SEND IN YOUR ENTRIES

LEICA Barnack Berek Blog PHOTOGRAPHY CONTEST


For more information click here

-----------------------------------------------------------------------------------------------------------------------------------------------------------------------------------------------------------------


-----------------------------------------------------------------------------------------------------------------------------------------------------------------------------------------------------------------


Receive a FREE CAMERA BAG from Think Tank Photo
Current Specials:

-----------------------------------------------------------------------------------------------------------------------------------------------------------------------------------------------------------------


Sunday, March 29, 2015

LIGHT MODIFIERS


An add-on flash can certainly be quite helpful in low lite situations where high ISO settings are not an option.  Unfortunately, virtually all of these do give off a rather harsh light with very hard shadows.  Thus it should come as no surprise that photographers are often looking for means to get a softer light.

Hard shadows are inevitably the result of a light source that is too small.  The smaller the area from where the light emanates, the harsher the shadows.  Thus it follows that it is necessary to enlarge the light source to soften the shadows.  This can easily be done by reflecting the flash off a white umbrella, a large white reflector or a so-called soft box.  But all of these are relatively large and bulky.

On the other end of the spectrum are small diffusers of a large variety that are supposed to solve the problem.  Unfortunately, almost without exception, these don’t work very well, the reason being that most of them are too small.  While they are certainly convenient, just diffusing the light source without effectively enlarging it will not make much of a difference.  The shadows will still almost be just as harsh, accompanied by a certain loss of light intensity.


Enter the Aurora Light Bank Speed Bounce.  These are available in two sizes with a diameter of 12 inches and 16 inches.  This enlarges the effective size of the light source to make a noticeable difference.  Shadows will definitely be less harsh.  In addition, the round shape of the Aurora Light Banks will result in very natural highlights in the eyes.

The Speed Bounce light modifiers will fold up to rather small sizes of 4 and 5 inches respectively for transportation.  Once unfolded, they can be attached to virtually all top mount flash attachments via their Velcro strips.

Cost for the Aurora light Banks is 39 euros ($43.00) for the Speed bounce 30 and 49 euros ($54.00) for the Speed Bounce 40.


For more information go to: www.auroralitebank.de


------------------------------------------------------------------------------------------------------------------------------------------

DON'T FORGET TO SEND IN YOUR ENTRIES

LEICA Barnack Berek Blog PHOTOGRAPHY CONTEST


For more information click here

-----------------------------------------------------------------------------------------------------------------------------------------------------------------------------------------------------------------


-----------------------------------------------------------------------------------------------------------------------------------------------------------------------------------------------------------------


Receive a FREE CAMERA BAG from Think Tank Photo
Current Specials:

-----------------------------------------------------------------------------------------------------------------------------------------------------------------------------------------------------------------


Friday, March 27, 2015

LEICA PHOTO CHALLENGE


Leica Camera announced:


Leica Fotopark  #LeicaSpring

LEICA FOTOPARK

Leica Fotopark begins the season when everything comes to life with a photo challenge that comes with a spring feeling. Send in your photo and amaze other photographers in the Fotopark community with bright, lively or idyllic spring pictures! All you have to do is upload your pictures on the theme of spring to the Leica Fotopark between 30 March and 12 April, 2015 under the title #LeicaSpring. After the closing deadline, the pictures will be rated and three winning photos will be chosen and displayed in the Leica Store in Wetzlar. In addition, the photographer of the picture awarded first place will be sent their photo mounted on acrylic glass in the format 90×60. Should you be one of the lucky prizewinners, you automatically consent to your name and picture being published and used for media distribution purposes.

You could be one of three lucky winners to see their photos exhibited and you might even win the first prize and see your photo mounted behind acrylic glass! We are looking forward to receiving your entries and wish you the best of luck!


------------------------------------------------------------------------------------------------------------------------------------------

DON'T FORGET TO SEND IN YOUR ENTRIES

LEICA Barnack Berek Blog PHOTOGRAPHY CONTEST


For more information click here

-----------------------------------------------------------------------------------------------------------------------------------------------------------------------------------------------------------------


-----------------------------------------------------------------------------------------------------------------------------------------------------------------------------------------------------------------


Receive a FREE CAMERA BAG from Think Tank Photo
Current Specials:

-----------------------------------------------------------------------------------------------------------------------------------------------------------------------------------------------------------------


Tuesday, March 24, 2015

NEW LEICA T LENSES


Leica T

Leica announced two more additions to the lenses for the Leica T, thus substantially increasing the versatility of the camera.

SEE MORE OF THE SCENE

The new Leica wide-angle zoom

Leica Super Vario Elmar T

The Leica Super-Vario-Elmar-T 11-23 mm f/3.5-4.5 ASPH., equivalent to 17 to 35 mm in 35 mm format, offers excellent sharpness for particularly broad scenes. The great advantage of wide-angle lenses is that you can pack so much more subject into your picture, even when you move in closer.


GET CLOSER TO THE ACTION

The new Leica telephoto zoom

Leica APO Vario Elmar T

The high-performance Leica APO-Vario-Elmar-T 55-135 mm f/3.5-4.5 ASPH. brings faraway subjects to your fingertips. Its versatile range of focal lengths, equivalent to 80 to 200 mm in 35 mm format, makes it a lens you should never leave at home.


In addition, Leica published an article about the Leica T by Australian Photographer Nick Rains

TRAVELLING WITH AUSTRALIAN PHOTOGRAPHER NICK RAINS

An experience report

Nick-Rains_teaser-1200x800_5 Â© Nick Rains Â© Nick Rains Â© Nick Rains

Nick Rains was extended by the Leica T camera system on the go and he shares his views on the two new lenses with us on the Leica Camera Blog.

Nick Rains has been a full-time professional photographer since 1985 when he left the United Kingdom in search of adventure. He ended up in Australia, where is currently based, and has worked in commercial, landscape and travel photography. Since 1997 he has written and photographed six books. He has worked as a contributing photographer for Australian Geographic magazine and served as editor of Better Digital Camera magazine. In 2013 Nick was appointed Principal Instructor for the Leica Akademie in Australia. Below, he shares this thoughts and opinions on the Leica T Camera System lenses APO-Vario-Elmar-T 55-135 mm f/3.5-4.5 ASPH. and Super-Vario-Elmar-T 11-23 mm f/3.5-4.5 ASPH.

Q: Most of the images in your previous Leica blog appearances were shot on medium format with the Leica S-System. What was it like shooting with the Leica T, and what are some of the advantages of shooting with a more compact system for the kind of work you do?

A: Working with a small camera can just be pure fun – photography can be too serious sometimes! The T is a fun camera to use but luckily it’s not compromised on quality so I can have my cake and eat it too, in a manner of speaking. I love the tiny size and I particularly like the Visoflex viewer and the touch interface – it’s a camera that I can be casual with, but still know that I can get publishable quality images if needs be. It’s also a discrete camera that people tend not to notice, which can be an advantage shooting out in public places.

Q: All the images that you shot with the Vario-Elmar 55-135 mm lens are of outstanding technical quality, exhibiting impressive sharpness and detail. Which ISOs did you use to achieve such high quality images, and what are your general impressions of the handling characteristics and overall quality of this lens?

A: I try to use all cameras at their base ISO whenever possible – this minimizes any possible image artifacts (like noise) and maximizes the dynamic range of the sensor. The T has an excellent sensor and I was very pleased with the results from the Vario-Elmar 55-135 mm lens – it’s light, compact in size and bitingly sharp even at its widest apertures. I also try to use a tripod as much as possible to make sure I am getting the most out of the camera and lens combination.


Q: What makes this image so engaging is not only the subject – motorized rickshaws and scooters moving lazily down a narrow paved pathway lined by huge old trees with monkeys playing on the side of the road – but the wonderfully diffuse hazy backlight that lends the image a kind of serene and timeless quality. Do you agree, and how do you think the Leica T and Vario-Elmar 55-135 mm lens handled the task of capturing this image in such challenging light?

A: The perspective compressing properties of a long lens are ideal for this type of shot because they accentuate the aerial perspective generated by the natural haze. At the 135 mm setting, the lens is the equivalent of 200 mm on a full frame camera so it’s a genuine telephoto lens. The haze is typical of this time of day – dawn – and the only real challenge for this shot was to make sure my point of focus was where the deer warning sign is. I think I used manual focus here so the camera didn’t try to refocus every time I touched the shutter button. Then it was just a case of waiting for the right sequence of people and vehicles, avoiding the occasional ugly tour bus!


Q: This image shot with the Super-Vario-Elmar-T 11-23 mm wide-angle zoom shows a bridge over the Rhine with the Cologne Cathedral in the background was evidently shot at or near twilight. Because of the leading line of the bridge, it conveys a feeling of spaciousness and timelessness. What aperture, focal length, and ISO did you use to capture this image, and what do you think of the low-light and high ISO performance of the Leica T?

A: Thinking back, I’m pretty sure it was shot at dawn. That, and dusk, are my favorite times to shoot cityscapes – when the lights are still on but there is colour and texture in the sky as well. As I write this, I have just finished a series of courses on this exact subject for Leica Akademie Australia.

It was taken on a tripod, using base ISO and long exposures – up to 30 seconds – with apertures around 5.6 or 8. (For shots like this I don’t use high ISO, but when the T first came out I did a series of tests and was very impressed with the IQ up to ISO 3200.)


Q: The detail in this of an ancient Buddhist frieze is pretty spectacular and the performance of the Super-Vario-Elmar-T 11-23 mm lens is impressive. Do you agree, and can you give us the tech data for this image, and also tell us something about the lighting, which greatly enhances the effect of this image?

A: The Super-Vario-Elmar-T 11-23 mm is a stunning lens; I had been dying to shoot with it ever since I saw it at photokina. I was blown away by the pure quality of such a small zoom lens because it’s sharp right into the corners, even wide open. Not only that, but it’s incredibly sharp all over the frame and has very well controlled flare characteristics when shooting into the light – a tricky situation for a zoom lens.

These types of wall carvings are best shot with raking light to bring out the textures so it’s a timing thing rather than any photography trick. I simply shot them when the light was it its best, usually at dawn.

Q: What is your overall impression of the handling characteristics and imaging performance of the Super-Vario-Elmar-T 11-23 mm lens and do you think it effectively complements the Vario-Elmar 55-135 mm to provide a versatile compact system?

A: I think I have made it clear in the preceding comments that I am hugely impressed with the 11-23 mm. It’s a lens that is genuinely wide – not just a bit wide, but seriously wide! Yes, it definitely compliments the 55-135 mm and, in fact, I suspect that you could shoot just about anything with the two lenses. I’d take those two lenses along with a M-System 35 mm Summicron or Summilux (and the M-Adapter) to have a fast standard lens to fit between the two.

Q: Do you plan to continue using the Leica T in your work going forward, and how would you decide on whether to shoot with the Leica T, the Leica S, or the Leica M? If you decided to include both the Leica S and the Leica T in your outfit, what kind of subjects do you think would be the most suitable for each format?

A: Ahh! Hard question. They all have their merits and each system is capable of shooting any subject really. The T Camera System is a great way to get into interchangeable lens Leica systems. If I wasn’t already working with the M and S-Systems I almost certainly use the T: as it is, having three systems would mean I’d have to decide which one to use and with them all being so capable I’d be pushed to decide. The part of me that likes things to be easy would go for the T, the purist in me would plump for the M but the ‘quality at all costs’ side of me would go with the S.

If I was allowed two systems I’d probably go T and S; if I had to choose only one then I’d go for the M. But that’s my personal opinion; everyone has their own needs and the important thing is that any of these systems will deliver uncompromising image quality.

Thank you for your time, Nick!

- Leica Internet Team

Connect with Nick on his website.


------------------------------------------------------------------------------------------------------------------------------------------

DON'T FORGET TO SEND IN YOUR ENTRIES

LEICA Barnack Berek Blog PHOTOGRAPHY CONTEST


For more information click here

-----------------------------------------------------------------------------------------------------------------------------------------------------------------------------------------------------------------


-----------------------------------------------------------------------------------------------------------------------------------------------------------------------------------------------------------------


Receive a FREE CAMERA BAG from Think Tank Photo
Current Specials:

-----------------------------------------------------------------------------------------------------------------------------------------------------------------------------------------------------------------


Monday, March 23, 2015

COMPARISON OF SENSOR VS FILM RESOLUTION


In a television advertisement a while ago the statement was made that, if it is on the internet, it must be true.  I was reminded of that a couple of days ago when I read an article comparing film to sensor resolution.  The writer boldly stated that most films have a resolution of at least 300 l/mm (lines per millimeter).  Of course that was overstating things by a huge margin.  I don’t mean to say that there aren't films that can attain such high resolution figures, but all films?

Resolution is generally tested by taking photographs of test targets which show a pattern of black lines in an ever decreasing size against a white background.  Eventually the lines will become so small that the film, or the lens, can no longer distinguish the black lines from the white spaces in between.  One black line and the adjacent white space are referred to as 2 l/mm or 1 lp/mm (line pair per millimeter).


Typical test target

It is a known fact, however, that evaluating resolution with test targets does not render very conclusive information.  The black lines and white spaces in between constitute a very high contrast.  This makes it substantially easier for the film (or a lens) to separate the two.  Reducing contrast by using grey lines on a white background would render substantially different results.

Another major factor influencing resolution is the grain structure of the film.  A film image is made up of silver halide clumps which show up in form of grain.  The smaller the silver halide clumps or the grain, the finer the detail that can be shown.  Faster films simply do display coarser grain which in turn lowers the resolution of a film. 


These three images are from a fine grain negative (Agfapan APX 25).
The first was scanned from an 8x enlargement, showing the entire negative area.
The second image was scanned from a 16x enlargement.
The third shows a cropped section of the same 16x enlargement 


File:2014 Ziarno na fotografii analogowej.jpg
Grainy film image.  The grain is so large that small detail simply cannot be shown
Photo: Góry Bialskie

      
For comparison:  Full image and cropped section from a 5 megapixel digital camera (Leica Digilux 2)

Finally, the structure of the emulsion or emulsion layers influences film resolution because in any case, light traveling through the emulsion, will scatter and thus reduce resolution as well.

Subsequently, to say that most films have a resolution of 300 l/mm is patently false.  As a matter of fact, only few commercially available films even have that high a resolution.

Researching this topic, I came across a report written by Joseph A. Schantz, Assistant Head of Research and Development Department at the Navel Photographic Center in Washington, DC.  He wrote that since 1963 the Navel Photographic Center and the Navel Air Systems Command as a matter of continuous policy have expanded efforts to upgrade 35mmphotography on a systematic basis.  The aim of this work was not only to improve the quality of documentary and reportage photography but also to improve intelligence collection capabilities of the Navy’s cameras.

According to the research done by Mr. Schantz, the best resolution obtainable with conventional, slow speed films, like the old Agfapan APX 25, is 250 – 300 l/mm compared to 550 l/mm with the Agfa High Contrast Copy Film and 600 l/mm with Kodak 5069 and 3414 film.

Kodak High Contrast Copy Film when processed in the POTA developer of Marilyn Levy (Levy, M., “Wide Latitude Photography,” Science and Eng. Vol. II Number I, January, February 1967) yield excellent high resolution negatives with adequate film speed.  The Agfa High Contrast Copy film gives a practical combination of good resolution and emulsion speed.

In addition, C. B. Neblette in his book “Photographic Lenses” clearly states: The resolving power of a lens-film combination is not fixed by the film alone, but by both the lens and the film (or sensor). Resolution is determined principally by the sharpness of the image (lens resolution).  But it is profoundly influenced by the tone producing properties of the receptor (film or sensor) and its ability to reproduce steep gradients.  For that reason resolution cannot be regarded as an exclusive property of the lens.

For the average films available today, a more modest resolution of 100 to 200 l/mm is a realistic figure, based on film speed and general properties of the film.  Black and white films generally have a higher resolution than color films.  The former Agfapan APX 25, for instance, had a resolution close to 300 l/mm while Fuji Velvia 50 is rated to resolve 160 l/mm. 

To make film resolution more understandable in this comparison, let’s refer to the smallest detail a film can show as pixels.  On a standard 24 x 36mm 35mm frame, a film with a resolution of 100 l/mm would render a total of over 8,6 million pixels.  That increases to over 19,4 million pixels with a film resolution of 150 l/mm and over 34,5 million pixels with a 200 l/mm resolution.

Of course a 35mm negative or transparency is of little use just by itself.  Today transparencies generally are scanned and then further processed digitally.  Does anyone still use a slide projector?  Many film users still make their own enlargements, mostly from black and white negatives, or the negatives are scanned for further processing.  Regardless how films are used, any further processing will have an image degrading effect, based on the slide projector, enlarger or scanner used and by their respective quality.

For more details on this topic go to LEICA Barnack Berek Blog article “LEICA LENSES – WHAT GIVES THEM THEIR OUTSTANDING QUALITY.” 

How does this compare to digital sensors?  Top level full frame (24 x 35mm) cameras currently have resolution levels of approximately 25 to 35 megapixels, with higher pixel counts to be expected in the near future.  The general belief is that the higher the pixel count, the better the image quality.  However, there is a lot more to that than meets the eye.  The new CMOS sensor in the Leica M (Typ 240) has definite advantages over conventional CMOS sensors.  For a more detailed description of digital sensors and some of the major differences, got to LEICA Barnack and Berek Blog article “THE PIXEL RACE - DOES IT REALLY MAKE SENSE?” 


pixel diagram
Section of a typical sensor
 Image courtesy of  Red Dot Forum

CMOS sensor
Conventional CMOS sensor with deep pixel wells and flat microlenses

MAX CMOS sensor
Leica CMOS sensor with very shallow pixel wells and tall micro lenses, allowing for larger pixel area

Unlike film, digital sensors will render the same contrast level up to the finest detail.  This has the result that the finest detail becomes less visible. A color image is made up out of RGB (red, green, blue) image elements.  With the exception of the hardly ever used Foveon sensors, digital sensors can record only in black and white.  In order to obtain a color image, the light passes through an array of red, green and blue filters, the Bayer filter grid.  This means that the total number of pixels in a sensor are exposed to either red, green or blue light only.  To form a color image, the information obtained from the sensor is then processed by interpolation in the camera or by raw conversion software.  It takes the pixels of each color, and assigns all colors to each pixel.  With other words, the software will take a red pixel, for instance, and assign theoretical green and blue values as well to form a complete color image.  As good as these types of software have become, there are certain losses involved.

With lower quality cameras these losses can be as much as 50 percent of the resolution.  The only exception to this is the Leica M Monochrome.  Here the Bayer filter and interpolation software is eliminated to record just black and white images.  See LEICA Barnack and Berek Blog article “MONOCHROME SENSOR - WHAT IS THE DIFFERENCE.”  The result is an unsurpassed image quality and tonal range. 


In the final analysis, just as there are definite performance differences among films, there are also considerable differences among sensors.  CCD sensors used to be the choice of most camera manufacturers.  These have been widely replaced by CMOS sensors.  In this respect, Leica is no different.  Many people are under the mistaken impression that the CCD sensor in the Leica M9 delivers superior results than the current CMOS sensor in the Leica M (Typ 240)  A recent comparison test by David Farkas of the Leica Store Miami thoroughly debunked that.  He took this very subject to task in a three part series in the Red Dot Forum (www.reddotforum.com).  See LEICA Barnack Berek Blog article “LEICA M (TYP 240) VS LEICA M9”.

The debate of which is better, film or digital sensors, cannot be answered with any certainty because the large differences among films and sensors.  What can be said is that both film and sensors are capable of delivering very high quality images.  In many cases they do exceed the requirements of the photographer since extreme cropping or enlarging is necessary to even reveal the limits of their capabilities.  Thus it is more a matter of personal choice than effective differences pointing to one or the other medium as being superior.

As for myself, I used to spend many hours in my lab developing films and printing with a Leitz Focomat V35 as well as medium and large format enlargers.  Having switched to digital, I don’t miss analog photography at all, and I can say with certainty that I am not compromising the overall quality of my work by having done so.

------------------------------------------------------------------------------------------------------------------------------------------

DON'T FORGET TO SEND IN YOUR ENTRIES

LEICA Barnack Berek Blog PHOTOGRAPHY CONTEST


For more information click here

-----------------------------------------------------------------------------------------------------------------------------------------------------------------------------------------------------------------


-----------------------------------------------------------------------------------------------------------------------------------------------------------------------------------------------------------------

Receive a FREE CAMERA BAG from Think Tank Photo
Current Specials:

-----------------------------------------------------------------------------------------------------------------------------------------------------------------------------------------------------------------


Sunday, March 22, 2015

Short Leica Story


During a visit to Leica in Germany a while ago, I had the opportunity to get a personal tour of the facilities and to ask a lot of questions.  At one point my contact person and guide introduced me to a gentleman who was working in the lens design department.  I took the opportunity to ask a lot of questions about Leica lenses which also led me to ask about filters.  My question was met with a very stern face with him saying,

     “If we had intended our lenses to have flat pieces of glass in front, we would have designed them that way.”

Do I use filters in my Leica lenses?  No!

 
 The legendary Leitz Thambar, a lens that was indeed designed to have a "flat piece of glass" in front.
The filter was designed to cancel out the sharp center rays to allow controlled amount of soft focus by varying the aperture.

For more on the Thambar, click here

For more on the topic of filters click here

------------------------------------------------------------------------------------------------------------------------------------------

DON'T FORGET TO SEND IN YOUR ENTRIES

LEICA Barnack Berek Blog PHOTOGRAPHY CONTEST


For more information click here

-----------------------------------------------------------------------------------------------------------------------------------------------------------------------------------------------------------------


-----------------------------------------------------------------------------------------------------------------------------------------------------------------------------------------------------------------

Receive a FREE CAMERA BAG from Think Tank Photo
Current Specials:

-----------------------------------------------------------------------------------------------------------------------------------------------------------------------------------------------------------------