Tuesday, October 30, 2018

HOW TO OBTAIN THE MOST ACCURATE EXPOSURE SETTINGS


Every time we take a photograph, it is necessary to use accurate exposure settings, regardless if we use film or digital cameras.  Automatic exposure control has advanced to the point that in most cases we can rely on our camera equipment to come up with the correct camera settings.  However, there will be times when this won’t work, when the light meters in our cameras will be fooled.  Take a bright, sunlit winter scene, for instance.  The snow will reflect a huge amount of light which will fool our built in light meters into registering a larger amount of light than what is actually available.  The result will be an underexposed picture with the snow being rather dingy.  Not at all what the scene looked like.

In cases like this, many people will set their cameras to automatically overexpose by a stop or two, but that is nothing more than guess work.  Ideally, a handheld light meter is the most accurate instrument to determine the correct exposure setting.

Since the advent of the early selenium cell light meters in the 30s, light meters have come a long way.  Built-in, automatic exposure control has made exposure settings so effortless that a lot of camera users hardly give it a thought anymore.  On the other hand, especially in professional applications, full manual control over exposure settings is often an absolute must.  A portrait for instance might call for a white background.  Obviously, a white background material, like seamless paper, is the correct choice here.  Yet, just because we use a material which we consider white, this does not necessarily turn into a white background in a photograph.  As a matter of fact, given the right control, a photograph taken of a subject against a white background can actually result in a photograph which shows a very dark or even black background, just as a black background can be rendered white in a photograph.  All that is necessary is a good understanding of exposure and a good hand-held light meter.

Most hand-held light meters are basically designed as incident light meters, yet for full control over our exposure settings a reflective light meter is absolutely necessary also.  Let’s look at the differences:  A reflective light meter, like all of the light meters built into our cameras, reads the intensity of the light which is reflected off the subject.  An incident light meter on the other hand will read the intensity of the light which illuminates the subject.  A closer look at both types will reveal their inherent differences.
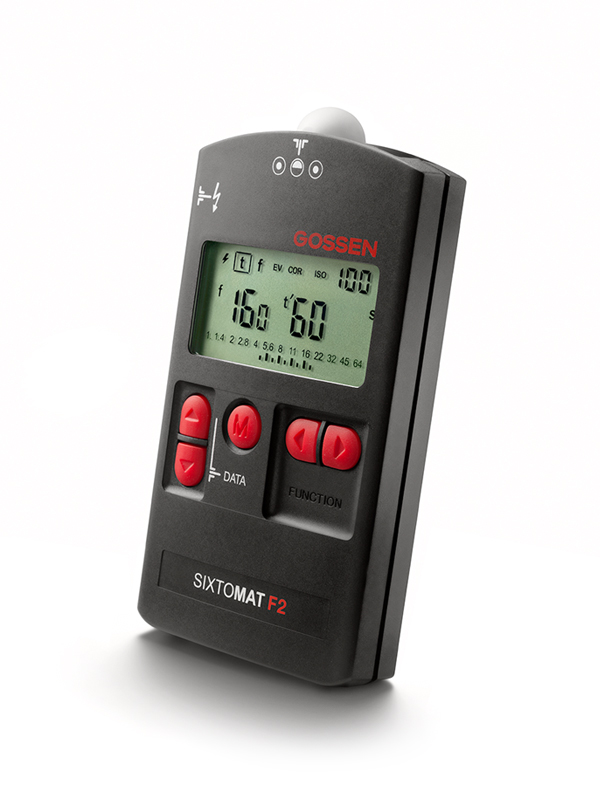
 
Gossen Sixtomat F2
The meter is in the incident reading position.
To switch to a reflected reading, all that is necessary
is to slide the incident sphere off to the side.
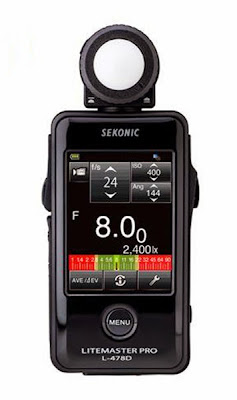
 
Sekonic L-478D
The meter as shown is for incident readings.
In order to switch to reflective reading,
a separate reflective reading attachment needs
to be purchased. To take a reflected reading,
it is necessary to remove the incident sphere
and replace it with the reflective reading attachment

If we take a reflective light meter and aim it at a subject of average brightness, it will give an accurate reading.  For easier understanding, let’s aim the light meter at an area which is painted an average gray.  Such a surface will reflect an average amount of the light which illuminates it and the meter will react accordingly, giving a certain exposure setting.  Without change in illumination, if the gray area is replaced by a pure white one, what will happen?  The white surface obviously will reflect a lot more light which the light meter will register.  Replacing that area with a black one will result in just the opposite.  Without any change in relative brightness, our meter has now come up with three distinctively different exposure settings.

Reflective light meters are all calibrated to register (or assume) an average level of reflectance, as with the gray surface.  Subsequently, the exposure reading obtained from the gray surface is the correct one.  The white surface will actually fool the meter into registering a higher light intensity, just as the black one will result in registering a lower light intensity.  Both of those exposure settings will be wrong.  The end result is actually that the meter will render exposure settings which make all three surfaces in the photograph grey.  This is the very reason why photographs of a snow scene will usually be underexposed, while photographs at dusk or at night often come out much lighter than the actual scene.

This is where an incident light meter has tremendous advantages.  It only registers the relative brightness of illumination.  The resulting exposure settings will make an object of average brightness average in the photograph also.  Subsequently, a lighter surface will be lighter in the photograph just as a darker one will show up darker.

So it may seem that for accurate camera settings an incident light meter is the way to go.  In most situations this actually is indeed the case.  But what about a white background?  The exposure setting we choose has to be such that not only the subject is exposed properly, but also the background, which in our example is to be white.

A three stop overexposure will generally result in white, just as a four stop underexposure will result in black.  This is easily verified by taking an evenly illuminated white back ground and taking a reflective reading.  We then open the lens by three stops and take an exposure.  Then subsequent exposures are taken in 1/3 stop increments until a four stop underexposure has been reached.  The results will then show the various shades of gray (white and black are also considered shades of gray here) which can be achieved with various degrees of over and under exposure.  Please note that these are average settings.  Digital sensors vary in their response to over and underexposure.  However, a simple test like the one above will easily show the amount of overexposure and underexposure necessary to render white or black without detail.

For example, if for a white background it is necessary to see if it is three stops overexposed, we must do the following:

We determine the correct exposure for the subject with the light meter in the incident mode.  This will be very accurate and therefore establish the actual camera settings.  These settings also need to overexpose the background by three stops in order to render it white.  To check this, all we need to do is switch the meter to the reflective mode.  Now the meter will register the amount of light which is actually reflected by the background.  If this indeed shows an overexposure of three stops, the background will be white, as would a four or 5 stop overexposure.  But that is not advisable at all since otherwise the background will reflect such a strong amount of light that it very likely will result in flare or loss of detail at the edges of the subject.  If the reflective reading of the background registers less than a three stop overexposure, it is ultimately a simple interpretation of what the background will look like.  A two stop overexposure for instance would render a very light gray background; a one stop overexposure would still render a noticeably lighter grey.  The same exposure as the one for the subject would render an average or neutral grey, while underexposure would render progressively darker shades of grey until the background is rendered black.

For example:  The basic exposure for the subject is 1/60 sec @ f/5.6.  For the background to be three stops over, the meter would have to read 1/60 @ f/16.  If we were to expose at f/16, the background would be medium gray, but since the actual camera setting for the subject calls for f/5.6, that is indeed a three stop overexposure compared to f/16.  Does it matter if the background material is actually white?  No it does not!  Regardless of color or brightness, if the background is illuminated such that it registers a three stop overexposure, it will be white.  On the other hand, if the overexposure is less than three stops, the background will show various degrees of light grey, red, green or whatever other color the background may be, but with an underexposure of four stops, all will be black.


The above photograph is a good example of predicting the outcome of the photograph with the help of a good, hand-held light meter.  The bright light, outlining the profile of the face and the hands was purposely chosen at +2 1/2 (2 1/2 stops over).  This was determined with an incident light reading of just the main light source and then opening the lens by 2 1/2 stops.  The rest of the face needed to be quite dark, but also needed to show detail.  For that an underexposure of -2 1/2 stops was chosen.  This again was done with an incident reading by adjusting the intensity of the light source until it registered –2 1/2.  This photograph was actually shot in a studio with all white walls and a white floor.  No black background material was used.  The subject was approximately 30 feet from the background.  With that distance, so little light reached the background that the reflective meter did register an underexposure of almost 3 stops.  In the original enlargement one can actually see a slight separation between the dark part of the hands and the background which is ever so slightly lighter.  This kind of control would not be possible without a good, handheld light meter offering both incident and reflective reading capability, and certainly no automatic metering system, however sophisticated, would allow this to be done.



These two examples are much less complicated.  Only one soft light source, an umbrella, was chosen to illuminate the subject.  For an almost white background, its lighting was set to render an almost three stop overexposure in the first example while a reflective reading of the background rendered a neutral density background in the second photograph.
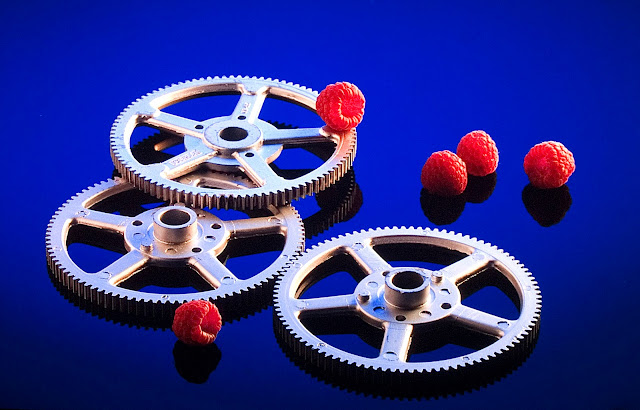
 

A similar technique was applied for the above color photograph.  Via incident reading the correct exposure for the subject and subsequent camera settings were determined.  A spot with blue gel was used on the background which was positioned such that it would reflect off a piece of black plexiglass on which the subject was positioned.  For the relatively intense blue an overexposure of one stop was chosen.  With a reflective reading of the reflection off the plexiglass the background light was adjusted until this exposure was reached.

Could the same background exposure be achieved with an incident reading?  Not at all.  While an incident reading can determine the relative brightness of the light source, it cannot give any information about how much of that light is actually reflected by the background material.  A reflective meter on the other hand will read exactly that.  Therefore, to have the total control described above, both incident and reflective meters are essential.

It must also be mentioned here that a lot of light meters require the removal of the incident sphere and replacement with a reflective reading attachment.  In situations as described above, those meters have proven to be very cumbersome.  Light meters which allow the incident sphere to slide aside and thus changing to a reflective reading have proven to be much more practical.

Could the subject exposure be determined with a reflective meter?  Yes, but it is much more difficult.  Especially with portraits, we have to deal with a large variety of skin tones.  Most Caucasian skin tones are too light and would lead to a slight underexposure with a reflective reading, just as very dark skin tones would lead to overexposure.  An incident meter on the other hand will automatically render exposure settings which will render the skin tones accurately, regardless of how bright or dark they might be.  An incident meter will render true tonality in both color and black and white.

A good example is the photograph below.  A simple, diffused light source (umbrella) was used as the only form of illumination.  This, of course, rendered a mostly black photograph.  The incident meter, aimed at the light source easily gave the correct camera setting.  Most reflective light meters would have failed with the possible exception of a spot meter.  Any automatic exposure control would have been fooled by the mostly black scene, including any of the computer controlled matrix metering systems, regardless of manufacturer.

 

The question is often asked about where to aim the incident meter when multiple light sources are used.  That ultimately depends on the approach to lighting.  I know that a lot of photographers set up lighting, especially for portraits, by establishing certain lighting ratios, which then are set up with the help of a light meter.  I prefer to exercise full visual control.  It is my philosophy that no meter “knows” what lighting is right for an individual.  Further, I strongly feel that the lighting should be set to accent the individual.  Preconceived lighting ratios can’t always do that.  Therefore, I set up lighting to best accent the task at hand.  Once I decide on a certain lighting, as in the above examples, I start with the main light and then use fill as necessary.  With other words, I adjust the lights until they look good.  Then, for the reading, I aim the incident meter toward the main light source, may it be a soft box, umbrella, scrim, window or any other.  That will give the correct camera settings, and everything else will literally fall into place.

A word of caution about the measuring range of the light meter.  Using large format cameras often necessitates very small apertures like f/32 or f/45.  To apply the same control as described above to get a true white background would subsequently require a light meter capable of reading apertures of f/90 or f/128.  While some light meters are capable of doing this for continuous light, few are able to do the same for electronic flash.  The same also applies to maximum exposure time.  While very long exposure times usually are not necessary, it is however, a good idea to have ample reserve in this respect in order to be able to handle all photographic situations.  The longest exposure time I ever needed to use was one hour.
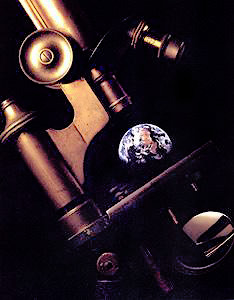
 

The above photograph is not computer manipulated.  It is a double exposure of the microscope and a carefully positioned rear projection screen with the image of the earth projected onto it.  The exposure for the microscope, once lighting was set up, was determined with an incident reading and the first exposure was done accordingly with just a black background.  After carefully positioning the rear projection screen, a reflective reading of the projected image was taken.  An incident reading will not work in this situation since there is no illuminating light source.  Instead an actual reading of the true brightness of the projected image had to be taken, which can only be done with a reflective meter.  The meter was placed flat against the rear projection screen over the area showing the brown area visible in the center.  No adjustments to the reading were necessary because this color of the earth is of neutral density.  This reading was then used to expose the background.

A common practice among professional photographers is to use Polaroid film or to use the viewing screen of digital cameras to verify exposure.  While there is nothing inherently wrong with that, it is still beneficial to be able to take an accurate and reliable exposure reading since some photographic situations simply don’t allow for enough time to do so.  The photograph below is such an example.
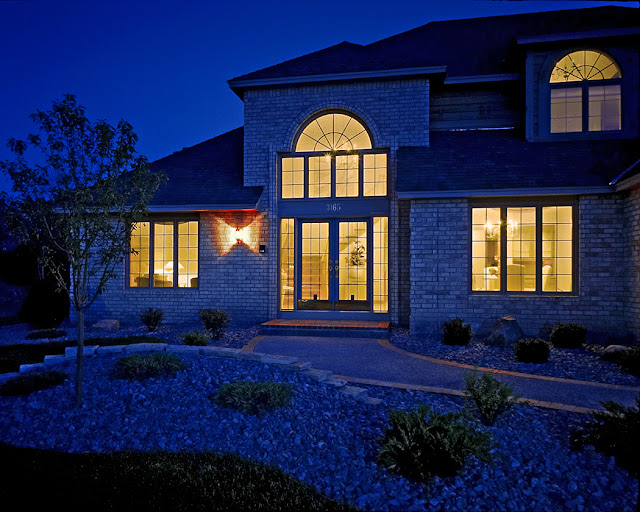
 

I decided to use tungsten film to accentuate the blue sky (a tungsten setting for the white light adjustment on a digital camera would do the same).  A careful reading of the interior was used to determine the camera setting.  This had to be taken via a reflected reading since no access to the interior was available.  For that an area of average brightness was chosen.   For an intensely blue sky exposures of neutral to +1 are necessary.  At that time of day lighting changes very fast.  To get the correct exposure, spot readings were taken of the sky right above the building.  As soon as the sky density had reached the +1 level, exposures were taken in short intervals until the sky darkened to neutral.  These changes take place so quickly that no Polaroid test exposure would have rendered usable exposure settings.  Subsequently, none of this was done with the help of Polaroid film or the almost instant feedback of the viewing screen on a digital camera.  But it does show how a good hand held light meter can be an invaluable tool for total exposure control.  Yet there is more.

Many photographers use seamless paper to achieve different colored backgrounds, and at times this is indeed a good choice.  However, colored gels can in a lot of cases do very much the same, again with absolute control.  In general, a white background material will usually lead to relatively light, pastel colors since it does reflect a large amount of the ambient light in addition to the background lighting.  Gray surfaces are helpful in this respect.  If, however, really intense, pure colors are needed, this is best done with a flat black background material like black seamless.  The same test, as described above for backgrounds from white to black, can be done here.  Regardless of the color of the gel, the three stop over exposure will render white as a four stop underexposure will render black.  Exposure changes in 1/3 stop increments will reveal the various color densities which can be achieved.  This incidentally is repeatable with virtually absolute accuracy if the same gels and background materials are used.

Photography inevitably requires accurate exposure settings.  The more control we are able to exercise over these exposure settings, the better the outcome of our photographs.  Besides the camera, the most important tool here is the photographer, his or her knowledge about exposure control and the help of a good reflective/incident light meter.


For other articles on this blog please click on Blog Archive in the column to the right

To comment or to read comments please scroll past the ads below.

All ads present items of interest to Leica owners.


_________________________________________________________________________


      www.eddycam.com        


Buy vintage Leica cameras from 
America's premier Leica specialist 

                          
           http://www.tamarkinauctions.com/               http://www.tamarkin.com/leicagallery/upcoming-show


Click on image to enlarge

Please make payment via PayPal to GMP Photography

Click on image to enlarge
Please make payment via PayPal to GMP Photography

Click on image to enlarge
Please make payment via PayPal to GMP Photography


Monday, October 29, 2018

APO-SUMMICRON-SL 35mm f/2 ASPH: SIMPLY STRATOSPHERIC


By José Manuel Serrano Esparza

There isn´t and there won´t ever be a perfect lens. Because however good an objective may be, it is always a balance between a myriad of variables.

Dietmar Stuible, optical designer at Leica Camera A.G, 
holding an Apo-Summicron-SL 35 mm f/2 ASPH.
© jmse 

Anyway, a lot of expectation has been raised regarding the new Apo-Summicron-SL 35 mm f/2 ASPH lens, whose MTF curves could be seen in the LHSA Annual Meeting held in Wetzlar (Germany) between October 4 and 7 of 2018.

It is highly probably a f/5.6 diffraction limited lens, having been optimized for f/2, f/2.8 and f/4 diaphragms, with an optical potential able to generate incredible image quality not only with 24 megapixel sensors like the one featured by the Leica SL mirrorless full frame, but with future sensors sporting between 40 and 120 megapixels.

Front area of the Apo-Summicron-SL 35 mm f/2 ASPH being held by Dietmar Stuible.
© jmse 

All hints clearly suggest that the Apo-Summicron-SL 35 mm f/2 ASPH is a truly stratospheric lens delivering exceptional image quality and boasting the reference-class mechanic construction typical in the German photographic firm.

Obviously, the 35 mm focal length is one of the most important ones, particularly in genres like photojournalism, travel photography, fashion, landscape, street photography and others, so this is a great piece of news.

But those exceedingly meaningful MTF charts of the Apo-Summicron-SL 35 mm f/2 ASPH are really amazing and distinctly show that the performance of this wideangle lens at its widest f/2 aperture is incredible:

- At infinity, the saggital continuous red line of contrast for 5 lp/mm (the highest one in the MTF graph) of the Apo-Summicron-SL 35 mm f/2 ASPH almost touches the top line of the chart of 100% contrast with a value about 98.9 %in the center of the image, in the center, about 98.2 % at 10 mm from the image center and 97.5% on the corners (the red line of contrast for 5 lp/mm of the Apo-Summicron-M 50 mm f/2 ASPH delivers a value on corners of 88% at 21 mm from the center of the frame).

Also at infinity, the discontinuous tangential red line of contrast for 5 lp/mm of the Apo-Summicron-SL 35 mm f/2 ASPH virtually superimposes with the aforementioned saggital continuous red line of contrast for 5 lp/mm during its whole path from image center to corners with almost identical incredible values.

- At infinity, the continuous sagittal red line of contrast for 10 lp/mm of the Apo-Summicron-SL 35 mm f/2 ASPH reaches a value of about 98% in the center of the image, about 97.5 % at 10 mm from the center and 97% on the corners (the continuous sagittal red line of contrast for 10 lp/mm of the Apo-Summicron-M 50 mm f/2 ASPH yields on corners a value of roughly 73% at 21 mm from the center of the frame).

- At infinity, the discontinuous sagittal red line of contrast for 10 lp/mm of the Apo-Summicron-SL 35 mm f/2 ASPH reaches a value of about 97.8% in the center of the image, around 97 % at 10 mm from the center and approximately 94.6% for the corners (here the discontinuous sagittal red line of contrast for 10 lp/mm of the Apo-Summicron-M 50 mm f/2 ASPH delivers a value on corners of 96% at 21 mm from the center of the frame).

- At infinity, the continuous sagittal red line of resolution for 20 lp/mm of the Apo-Summicron-SL 35 mm f/2 ASPH reaches around 91% in the center (roughly equalling the Apo-Summicron-M 50 mm f/2 ASPH) and around 87% on the corners (here the continuous red line of resolution of the Apo-Summicron-M 50 mm f/2 ASPH gets a value of 63%).

- At infinity, the discontinuous sagittal red line of resolution for 20 lp/mm of the Apo-Summicron-SL 35 mm f/2 ASPH is around 91% in the center (where it superimposes with the continuous red line of resolution for 20 lp/mm up to roughly 11 mm from the center, where both of them reach a value of around 93.5%) and a value on corners of approximately 87% (here the discontinuous red line of resolution for 20 lp/mm of the Apo-Summicron -M 50mm f/2 ASPH reaches a identical value of 87%.)

- At infinity, the continuous sagittal red line of resolution for 40 lp of the Apo-Summicron-SL 35 mm f/2 ASPH reaches a value of 91% in the center of the image (the continuous red line of resolution for 40 lp of the Apo-Summicron-M 50 mm f/2 ASPH gets a value of 73% in the center of the image), around 82 % at 10 mm from the center and around 77% on the corners, at a distance of 21 mm from the image center (here the continuous sagittal red line of the Apo-Summicron-M 50 mm f/2 ASPH reaches a value of 55% at 20 mm from the image center, thanks to a titanic effort made by Peter Karbe who managed to beat at this point the value of 53% at 15 mm from the center, while preserving a highly praiseworthy value of 54% on the corners).

- At infinity, the discontinuous sagittal red line of resolution for 40 lp reaches a value of 91 % (at this point the discontinuous sagittal red line of the Apo-Summicron-M 50 mm f/2 ASPH attains a value of 73.5 %), reaching a value of approximately 87% at 10 mm from the image center and getting a value of 68% on the corners (here, after a further optical feat accomplished by Peter Karbe, the discontinuous sagittal red line of the Apo-Summicron-M 50 mm f/2 ASPH yields a value of 69.5 %, the same one as at a distance of 14 mm from the image center and a stunning quality increase with a value of 70% at 15 mm from the center and 71.5% at a distance of 16.5 mm from the center, that´s to say a value very near the 73.5% of the image center in an area near the corner).

In addition, Leica has always deemed fundamental the feedback provided by professional photographers testing its new lenses before launching them into market.

Therefore, however impossible it may seem, these values would outperform the already stratospheric ones reached at its widest f/2 aperture by the benchmark Apo-Summicron-M 50 mm f/2 ASPH and would instantly turn the Apo-Summicron-SL 35 mm f/2 ASPH wideangle lens into the new world yardstick in its focal length and luminosity.

Peter Karbe, Head of Optics at Leica Camera A.G, currently the best optical designer in the world and one of the most important and influential ones in history along with Erhardt Glatzel, Ludwig Bertele, Max Berek and Walter Mandler, as proved by the rack of extraordinary Leica M, Leica S and Leica SL lenses created by him, along with his overall supervision Leica SL lenses designed by Dietmar Stuible and Siegrun Kammansapart from having fulfilled some further major technical feats like in 1993 with the Leica M6J, when he modified Willi Keiner´s Leica M2 0.72x viewfinder, increasing it up to 0.86x, raising the image field in almost a 20% (as well as expanding the rangefinder effective base from 49.9 mm up to 59.1 mm, augmenting the focusing precision with highly luminous primes between 35 and 75 mm shooting at full aperture and with longer focal length lenses at every diaphragm). 
 © jmse 
                                                                                                     
And this is even more difficult to believe if we bear in mind that as a general rule, any comparison between a reference-class 50 mm standard lens and a benchmark 35 mm wideangle one will be won by the former, because the wider is the coverage of a lens, designing and manufacturing difficulties increase in a geometric way, and much more if you want to confer a 35 mm lens the true apochromatic correction in the way Leica does it, id est, without any compromise.

But there´s more. It seems apparent that the Apo-Summicron-SL 35 mm f/2 ASPH outperforms the exceptional image quality delivered by the Apo-Elmarit-R 100 mm f/2.8, and its optical performance even beats the one delivered by the diffraction limited Apo-Telyt-R 280 mm f/4, whose stratospheric image quality is better at widest aperture than at f/5.6, f/8 and f/11 (diaphragms in which optical performance goes on being excellent).

As a matter of fact, in the MTF chart of the Apo-Summicron-SL 35 mm f/2 ASPH at its widest f/2 aperture, its saggital continuous and discontinuous red lines of contrast for 5 lp/mm and 10 lp/mm are nearer from the top 100% line than in the MTF chart of the Apo-Telyt-R 280 mm f/4, and the same happens with the continuous and discontinuous sagittal red lines of resolution for 20 lp/mm and 40 lines/mm.

The Leica Camera A.G headquarters at Leitz Park Building in Wetzlar has become an international benchmark hub of optical designing not only aimed at the creation and manufacture of lenses for 24 x 36 mm format M-System cameras and SL-System Cameras), but also for APS-C format with such superb lenses for Leica TL and CL cameras like the Summicron TL 23 mm f/2 ASPH (equivalent to a 35 mm in 24 x 36 mm format), the Leica Elmarit-TL 18 mm f/2.8 ASPH (a gorgeous and tiny lens equivalent to a 27 mm lens in 24 x 36 mm format, featuring 8 elements — four of them aspherical — in 6 groups, a length of 2,1 cm and a weight of 80 g) and Micro Four Thirds Format, where its collaboration with Panasonic has spawned such outstanding lenses like the Leica DG Elmarit 200 mm f/2.8 O.I.S (equivalent to a 400 mm f/2.8 lens in 24 x 36 mm format) redifining the concept of wildlife photography in synergy with the Panasonic G9 camera, the Leica DG Noctitron 42.5 mm f/1.2 ASPH, the Leica DG Vario-Elmarit 50-200 mm f/2.8-4 ASPH and others with which the image quality delivered by small sensors rises significantly.
© jmse

This way, it seems clear that the Apo-Summicron-M 35 mm f/2 ASPH is a landmark design in the History of Optics and by far the best 35 mm lens ever made for 24 x 36 mm format.

REMARKABLE VERSATILITY OF A NEW ALL-AROUND PERFORMER YARDSTICK 35 MM F/2 LENS FOR 24 X 36 MM FORMAT

If the Apo-Summicron-SL 35 mm f/2 ASPH is really as extraordinary as hints suggest and truly diffraction limited or very near it, it would have a highly versatile use:

a) At its widest f/2, f/2.8 and f/4 apertures in such photographic genres like photojournalism, street photography, fashion and travel photography.

b) Between f/8 and f/16 as a lens for landscapes, because the resolving power, contrast and sharpness yielded by this new Leica wideangle lens must be extraordinary, with exceedingly lavish detail and highly probably fantastic colours.

Needless to say that the results this amazing lens can obtain not only coupled to the 24 megapixel Leica SL full frame camera, but particularly attached to the 47 megapixel sensor of the new Panasonic SR1 full frame EVF camera can be truly spectacular.

And the potential of the full frame mirrorless EVF camera with Foveon 24 x 36 mm sensor that Sigma will launch into market in 2019 in synergy with the Apo-Summicron-SL 35 mm f/2 ASPH could likewise be remarkable, because when the photographic context enables enough light to pass through all the three layers of Foveon sensors and feed them with photons, RAW archives have a second to none sharpness, thanks to the absence of low pass filter, the lack of interpolation and a greater chromatic information, though it isn´t less true that this kind of multilayer Foveon sensors suffer more with flare, ghosting, residual chromatic aberrations and on using slow shutter speeds. Anyway, chances are that Sigma will do a strenuous effort with its new mirrorless EVF 24 x 36 mm format camera to fix those aspects as much as possible.

THE PINNACLE OF AN OPTICAL REVOLUTION WHICH STARTED IN 2008

Diagonal left view of the front element and barrel of the Apo-Summicron-SL 35 mm f/2 ASPH held by Dietmar Stuible, Optical Designer at Leica Camera A.G. As with other SL lenses, the machining of the anodized aluminum is top-notch.
© jmse

The Apo-Summicron-SL 35 mm f/2 ASPH is the evolutive apex of an optical revolution that began in October 2008 with the first prototypes of the 37.5 megapixel Leica S2 medium format camera attached to a Summarit-S 70 mm f/2.5 ASPH CS and featuring ISO 100 as only sensitivity.

David Farkas (one of the world´s leading authorities on Leica photographic gear and CEO of Leica Store Miami) explaining the features of the first prototype of Leica S2 medium format camera with an only sensitivity of ISO 100 held by Justin Stailey (then M System Product Specialist at Leica Camera A.G) inside the Brown Hotel of Louisville (United States) during the 40th Annual Meeting of the LHSA in October of 2008.
© jmse

That camera featured a 30 x 45 mm medium format sensor and the autofocus lenses created for it by Peter Karbe were then and keep on being the best MF objectives ever made.

And subsequent better versions like the Leica S Type 006 (2012-2015), Type 006 S-E (September 2014-2015) and Type 007 (August 2015 until nowadays ) offered increased sensor sensitivity, predictive autofocus, higher speed, improve handling and a number of enhanced functions.

The great Italian fashion photographer Amedeo M. Turello in front of the façade of the Leitz Park Wetzlar main building in 2014. As a user of the Leica S2, his unique images using outdoors natural light to reveal the true character of his models speak for themselves and ooze elegance, style, emotions and passion to spare, in addition to a simple production approach whose goal is to depict intimate moments. He was one of the first pros on the go to prove that the medium format Leica S System of cameras and lenses was the benchmark in image quality, full-fledged efficiency shooting handheld, ergonomics and viewfinder within its product segment, with an optical performance comparable to 4 x 5 large format analogue cameras, thanks to the S primes designed by Peter Karbe, the best MF lenses made in the world until now, something that will be significantly enhanced with the new Leica S3 medium format camera announced during the recent Photokina 2018, featuring a last generation 64 megapixel CMOS sensor, 3 fps (the fastest MF camera in existence), impressive high and very high up to 50,000 ISO capabilities, a dynamic range of fifteen diaphragms, new colour filters on the sensor for optimum colour reproduction attaining wonderful skin tones, and scheduled to be launched into market in 2019.
© jmse

The Leica S Medium Format Reflex System has been from 2008 hitherto the reference-class MF one in terms of image quality (comparable to 4 x 5 large format analogue cameras) and handling (optimized for shooting handheld, with a size slightly smaller than a professional 24 x 36 mm format reflex digital camera and a similar use convenience).

But the core of that system was the formidable assortment of MF lenses designed by Peter Karbe and making a flawless symbiosis with the 30 x 45 mm format Kodak CCD sensor and the superb Fujitsu Maestro DSP featuring R-80 and FR-V CPUs of the Japanese brand with VIWL architecture.

A host of highly innovative technologies were used in the manufacture of these amazing MF objectives, both in optical and mechanical spheres.

And among those MF autofocus lenses there are some benchmark MF primes like the 8 elements in 6 groups Summarit-S 70 mm f/2.5 ASPH CS, Summicron-S 100 mm f/2 ASPH, Apo-Macro-Summarit-S 120 mm f/2.5, Summarit-S 35 mm f/2.5 ASPH, Super-Elmar-S 24 mm f/3.5 ASPH and zooms like the Vario-Elmar-S 30-90 mm f/3.5-5.6 ASPH, all of them with their own integrated microchip for complete control of every function, in addition to the further availability of most of the S-System lenses in versions with central leaf shutters for maximum creative freedom when using additional lighting.

These milestone S-System medium format lenses are so perfect that they don´t need any software correction, and right off the bat they became a technological platform for Leica from the viewpoint of optical evolution of its lenses for different formats, to such an extent that the huge know-how and experience gleaned with their design and manufacture were seminal for the inception and production of the SL lenses, the best ones ever made for 24 x 36 mm format from 2015 onwards, something which has resulted in yardstick objectives like 

- The Summilux-SL 50 mm f/1.4 ASPH, by far the best standard f/1.4 lens ever made along with the Zeiss Otus 55 mm f/1.4.

- The Apo-Summicron-SL 50 mm f/2 ASPH.

- The Vario-Elmarit-SL 24-90 mm f/2.8-4 (the best standard zoom ever made, delivering image quality comparable to the first-rate Leica SL 24 mm, 35 mm, 75 mm and 90 mm primes).

- The stratospheric Apo-Vario-Elmarit-SL 90-280 mm f/2.8-5.6 ( whose optical performance with continuous sagittal line for 40 lp/mm in the center reaching 83% contrast at 90 mm f/2.8, 84% contrast at 160 mm f/3.5 and 81% contrast at 280 mm f/4 slightly beats the 80% center of the image contrast of the also stratospheric Apo-Telyt-R 280 mm f/4 at f/4 — though on the corners at f/4 the Apo-Telyt-R 280 mm f/4 goes on slightly getting the upper hand — , so this extraordinary zoom is one of the most commendable optical feats in the history of photographic optics).

But if the aforementioned Leica S and SL System lenses have meant a quantum leap in the evolution of photographic optics and will keep on being benchmark objectives for many years, however incredible it may seem, hints clearly suggest that the new Apo-Summicron-SL 35 mm f/2 ASPH is a further quantum leap in terms of image quality with which Leica Camera A.G has gone beyond itself.

How has Leica managed to create this incredible 35 mm f/2 ASPH lens?

Evidently, in the same way as happened with the previous Leica SL primes and zooms, the large L-Mount boasting a 51.6 mm diameter and an exceedingly short flange of 20 mm has been very important, together with new and breakthrough state-of-the-art technologies, particularly in the scope of aspherical lenses, significant advances in electromecanics making possible new approaches in optical designs and a higher manufacturing accuracy of optical elements, ultramodern production methods, highly sophisticated new hardwares and softwares, the powerful stepper motors for the autofocus, the drive for the aperture and the fast move of the elements used for focusing, a great knowledge on exotic optical glasses and their properties, tighter assembly tolerances in lenses, a steady improvement of the coatings and inner baffling to minimize stray light and reflections to enhance contrast in difficult lighting environments, a very precise centering of the optical elements, etc.

Peter Karbe holding an optical element of a Leica lens. As a Head of Optics at Leica Camera A.G, his labour supervising the Leica SL lenses designed by Dietmar Stuible ( a young and exceedingly talented optical designer who apart from a number of Leica SL lenses was the designer of the Vario-Elmar-S 30-90 mm f/3.5-5.6) and Sigrun Kammans (driving force of the famous Vario-Apo-Elmarit-R 70-180 mm f/2.8, author of the mechanic part of the Summicron-M 35 mm f/2 ASPH from 1997 designed by Peter Karbe, currently engineer at the Leica Sports Optics and together with Michael Hartmann, the mastermind behind many of the stunning Leica binoculars, the  international benchmark in this scope, with landmark devices such as the Leica Noctivid, on the brink of getting utter colour neutrality). has been essential, along with Leica state-of-the-art technologies in the manufacture of aspherical lenses, both those ones produced by means of pressure molding (used above all for wideangle lenses) and the ones made using CNC-controlled grinding and polishing machines (mainly used for longer focal lengths).
© jmse

But achieving that level of optical performance (slightly beating the cream of the crop of Leica R and SL teleobjectives) with a wideangle lens is something in the frontier of the impossible, making necessary to have tons of experience and proficiency in lens designing, particularly when it comes to choosing the best path from the different ones offered by the highly advanced optical designing softwares to get that impressive image quality even at full aperture and that extraordinary uniformity of performance at every diaphragm and focusing distance while simultaneously avoiding that size and weight increase hugely. And that is the most difficult task to attain for any optical designer.

 If it was´t enough with the Apo-Summicron-SL 35 mm f/2 ASPH, Leica Camera A.G announced during the recent Photokina 2018 in Cologne (Germany) that it will release three more Apochromatic lenses in 2020 : a 21 mm, a 24 mm and a 28 mm, stretching the true apochromatic correction up to the superwideangle realm, something really fascinating that seems to confirm that Leica has been thoroughly preparing with enough anticipation the L-Mount Alliance with Panasonic and Sigma and the new 24 x 36 mm digital sensors featured by the mirrorless full frame EVF 24 x 36 mm format cameras that both Japanese firms will launch into market in 2019, as well as paving the way for a new between 40 and 60 megapixel Leica SL 2 mirrorless EVF full frame camera that could perhaps appear in 2020. Needless to say that the second to none optomechanical quality of Leica lenses is a major factor enabling the German photographic firm to be able to flawlessly adapt to future sensors between 50 and 120 megapixels made by different brands which could appear in future. Such is the optical expertise of Wetzlar brand, whose young talents like Dietmar Stuible have had great teachers in world-class optical designers and engineers like Peter Karbe and Sigrun Kammans.
© jmse

The new Apo-Summicron-SL 35 mm f/2 ASPH means a historical landmark for the Wetzlar firm and an optical achievement in the border of the scientifically feasible, even being a more perfect lens than the extraordinary Summarit-S 35 mm f/2.5 ASPH medium format lens (partially boasting DNI of Walter Mandler´s 12 elements in 10 groups manual focusing Elmarit-R 19 mm f/2.8 Version 2 — made between 1990 and 2009 — in its 11 elements — two of them aspherical, the large front one with great curvature and the much smaller back one — in 9 groups optical formula ) for the 30 x 45 mm format Leica S cameras, and stretching the true apochromatic correction (indicating the highest optical quality and usually reserved for 50 mm or longer lenses) to the wideangle scope of 24 x 36 mm format, with unbeatable levels of resolving power, sharpness, contrast and duration in time, proving once more the huge optomechanical prowess of the Leica Camera A.G optical designing team made up by Peter Karbe, Sigrun Kammans and Dietmar Stuible.


For other articles on this blog please click on Blog Archive in the column to the right

To comment or to read comments please scroll past the ads below.

All ads present items of interest to Leica owners.


_________________________________________________________________________


      www.eddycam.com        


Buy vintage Leica cameras from 
America's premier Leica specialist 

                          
           http://www.tamarkinauctions.com/               http://www.tamarkin.com/leicagallery/upcoming-show


Click on image to enlarge

Please make payment via PayPal to GMP Photography

Click on image to enlarge
Please make payment via PayPal to GMP Photography

Click on image to enlarge
Please make payment via PayPal to GMP Photography