Thursday, May 22, 2014

NEVER PUBLISHED LEICA PICTURES FROM THE PAST


The newsmagazine [M]ittelhessen , published in Wetzlar, asked its readers to send in Leica related pictures to be published in commemoration of the grand opening of the new headquarters of Leica Camera AG in Leitz Park in Wetzlar.

<p>Nicht draus trinken, aber tolle Bilder machen konnte man mit der Leica M3. So wie dieses von Wolfgang Sperling aus Gilching, der die M3 ab 1957 als technisch-kaufmännischer Lehrling selbst vom ersten bis zum letzten Arbeitsgang montiert hat. Das Foto entstand 1959 im Wetzlarer Freibad Domblick.</p>
Wolfgang Sperling, the owner of this M3 was an apprentice at Leitz.
In 1957 he built this camera himself from the first to the last assembly step. 


“It was the pride of a Leitzianer (Leica employee) to own his own Leica” one former employee wrote.  Many of the readers followed the request and sent pictures which show many interesting and even amazing things.  They give an intimate account of the company and its working environment.


From 1948 to 1989 high quality custom optical glasses were developed for production at Leitz.
Here Rainer Dreuth (right) and Helmut Gaul can be seen casting an experimental fluorophosphate glass. 


Prince Bernhard of the Netherlands visiting Leitz


Leiz at Photokina in the 60s


Two Experts talking shop


Photograph taken by Oskar Barnack with the Ur-Leica


For the complete number of photographs, go to:

Friday, May 16, 2014

LEICA CAMERA AG - VISIT US ON OUR OPEN DAY IN LEITZ-PARK, WETZLAR


An invitation from Leica Camera AG for
Saturday 24 May 2014

hero_teaser_img_03

A MILESTONE IN THE HISTORY OF LEICA
The opening of Leitz Park in Wetzlar  

It is both a beginning and a return. With the inauguration of its new and larger corporate headquarters, Leica Camera AG is returning to its roots. Wetzlar, in the German state of Hesse, is the birthplace of the Leica camera and the home of Ernst Leitz, the company that went on to become Leica Camera AG. This is where, 100 years ago, Oskar Barnack invented and constructed the first successful still-picture camera for 35 mm cine film with a negative format of 24 × 36 mm and laid the foundation of the Leica 35 mm camera – an innovation that irrevocably changed the world of photography and paved the way for countless classic, spectacular, historic and earth-shattering photographs.

We would very much like you to join us for the official opening of our new complex and the celebration of ‘100 Years of Leica Photography’ and warmly invite you to visit our ‘Open Day’. Find out all about the world of the legendary Leica products, ‘Made in Germany’, first hand – and closer than ever before. Experience the Leica legend and take a look behind the scenes at the precision and quality of Leica manufacturing processes. Join us on a journey through the history of 100 years of Leica photography. The Leica Galerie and numerous cultural highlights are waiting to amaze and inspire you. In addition to the Leica product milestones from our very beginnings to the present day, we will also be showing a multitude of exhibitions of photography through the ages. Masterpieces by world famous Leica photographers from a whole century of Leica photography. Pictures that made history; complemented by works of contemporary photography that will write the next chapters.

 LEICA-HQ-GERMANY-LEITZ–PARK-WETZLAR-2

LEICA-HQ-GERMANY-LEITZ–PARK-WETZLAR-3

LEICA-HQ-GERMANY-LEITZ–PARK-WETZLAR-4

LEICA-HQ-GERMANY-LEITZ–PARK-WETZLAR-5

LEICA-HQ-GERMANY-LEITZ–PARK-WETZLAR-7

LEICA-HQ-GERMANY-LEITZ–PARK-WETZLAR-6

LEICA-HQ-GERMANY-LEITZ–PARK-WETZLAR-1

LEICA-HQ-GERMANY-EXPERIENCE-LEICA-FIRST-HAND-1

LEICA-HQ-GERMANY-EXPERIENCE-LEICA-FIRST-HAND-2


VISIT US ON OUR OPEN DAY IN LEITZ-PARK, AM LEITZ-PARK 5 IN WETZLAR:
ON SATURDAY 24 MAY 2014, BETWEEN 10 A.M. AND 6 P.M
.
Food, drinks and a fantastic programme for children are all laid on. And there is no need to register if you wish to come.

Even after our Open Day you have the possibility to visit our “World of Leica Camera” in the Leitz-Park Wetzlar.

DATE
05/24/2014 - 05/24/2014

LOCATION
Leica Camera AG
Am Leitz-Park 5
35578 Wetzlar
Germany

Phone: +49 (0)6441 2080-0


Thursday, May 15, 2014

LEICA: WIE ALLES BEGANN


Von [m] ittelhessen haben wir den folgenden Bericht erhalten:


LEBENDE LEGENDE Eine Marke schreibt Erfolgsgeschichte


Wetzlar. "Leica ist eine Marke. Leica hat einfach Potenzial." Das hatte der heutige Aufsichtsratschef Andreas Kaufmann 2004 sofort erkannt. Der Salzburger Investor kaufte damals das vor der Insolvenz stehende Kameraunternehmen. Heute schreibt Leica schwarze Zahlen, feiert hundert Jahre Kleinbildfotografie und kehrt mit einem 65-Millionen-Euro-Neubau nach Wetzlar zurück. Eine Erfolgsgeschichte.

 <p>65 Millionen Euro hat der Neubau in Wetzlar gekostet. Er soll weit mehr als eine Firmenzentrale sein und Gäste aus aller Welt in die Region locken. Im Neubau gibt es eine Leica-Galerie, ein Museum, viel Ausstellungsfläche, ein Fotostudio, die gläserne Produktion und ein Besucherrestaurant. (Foto: Schwarz)</p>
65 Millionen Euro hat der Neubau in Wetzlar gekostet. Er soll weit mehr als eine Firmenzentrale sein und Gäste aus aller Welt in die Region locken. Im Neubau gibt es eine Leica-Galerie, ein Museum, viel Ausstellungsfläche, ein Fotostudio, die gläserne Produktion und ein Besucherrestaurant. (Foto: Schwarz)


Es war das Jahr 1914, als Oskar Barnack, Leiter der Versuchsabteilung bei Leitz, die Ur-Leica erfand und damit die Fotografie im vergangenen Jahrhundert revolutionierte. "Barnack, das war ein Tüftler und Erfinder", erinnert sich Günter Osterloh, ehemaliger Produktmanager bei Leica, Verfasser von Anwenderberichten und Leiter der Leica-Akademie bis 2002. Osterloh, der derzeit alte Schätze im Leica-Archiv für die Ausstellung im Wetzlarer Neubau sichtet und aufbereitet, verweist gerne darauf, wie Barnack Anfang des 20. Jahrhunderts einen Schokoladendieb mit einer versteckten Plattenkamera in seinem Büro überführte. "Er versteckte sie hinter einer Wandverkleidung, knotete das Ende einer Schnur an den Auslöser und das andere an die Schublade, in der die Schokolade lag. Der Dieb knipste sich selbst." In dieser Zeit entwickelte Barnack auch die Ur-Leica. "Allerdings", so weiß Osterloh, "mehr nur so nebenbei, als Hobby."

Ein Hobby, das um die Welt ging. Zuerst mit Ernst Leitz II, der mit der Kleinbildkamera im Gepäck eine Überfahrt nach New York unternahm. Zehn Jahre später entschied Leitz II, die Ur-Leica in Serie zu produzieren und weltweit zu vertreiben. Das Produkt schlug ein.

"Hätte es diese Kamera nicht gegeben - wir würden heute hier nicht sitzen", sagt Stefan Daniel, Bereichsleiter Produktmanagement bei Leica-Camera. Dabei sei es nicht nur die kleine Ur-Leica, die Foto-Geschichte geschrieben hat, so Daniel. Auch das Zubehör, das Barnack erfand, sei wegweisend gewesen. So hatte der Leiter der Versuchsabteilung eine Filmpatrone entwickelt, um den Film bei Tageslicht problemlos in die Kamera hinein- und wieder herauszubekommen.

 <p>"Leica ist in einem neuen Zeitalter angekommen": Aufsichtsratschef Andreas Kaufmann. (Foto: Schwarz)</p>
"Leica ist in einem neuen Zeitalter angekommen":
Aufsichtsratschef Andreas Kaufmann. (Foto: Schwarz)

Für diese sogenannte Leica-Kassette konnte man den Film als Meterware kaufen und aufdrehen. Dass genau 36 Bilder auf einen Film passen, ist kein Zufall, verrät Daniel: Es habe an der Spannweite von Oskar Barnacks Armen gelegen: "Es war die Länge, die sich ergab, wenn Barnack Filmanfang und -ende bei ausgebreiteten Armen in beide Hände nahm."

 <p>Schätze aus dem Archiv warten auf ihre Ausstellung. (Foto: Schwarz)</p>
Schätze aus dem Archiv warten auf ihre Ausstellung. (Foto: Schwarz)

Auch der Schuh, der auf der Ur-Leica für den abnehmbaren Sucher angebracht war, ist längst zur Norm für alle Kameratypen bis heute geworden: Der Blitzschuh einer modernen Digitalkamera passt noch immer problemlos auf den Ur-Leica-Sucher. Zum Erfolg der Kleinbildkamera hat nicht zuletzt das Leitz-Milar-Objektiv mit 43 Millimetern Brennweite beigetragen. Nur so konnten wirklich scharfe Bilder entstehen, die problemlos vergrößert werden konnten, erklärt Daniel. Inzwischen sind in dem Unternehmen viele Kameratypen produziert worden, die Fangemeinde von Leica ist groß und weltweit zuhause.

 <p>"Ein Kleinod": Vorstand Alfred Schopf. (Foto: Schwarz)</p>
"Ein Kleinod": Vorstand Alfred Schopf. (Foto: Schwarz)

Dabei gibt es nicht den Leica-Kunden schlechthin, weiß Vorstandsvorsitzender Alfred Schopf: "Es gab mal das Klischee, es sei der 55-jährige Zahnarzt, der zwei Porsche in der Garage stehen hat." Doch dem sei nicht so, versichert der Vorstand. "Die Bandbreite unserer Kunden reicht vom 18-jährigen Nerd bis hin zum mexikanischen Wrestler. Es gibt nicht den typischen Leica-Kunden."

 <p>Ein Fan der Ur-Leica: Stefan Daniel. (Foto: Schwarz)</p>
Ein Fan der Ur-Leica: Stefan Daniel. (Foto: Schwarz)

<p>Die Legende lebt: In zehn Tagen wird der Neubau eröffnet. (Foto: Schwarz)</p>
Die Legende lebt: Am 24. Mai wird der Neubau eröffnet. (Foto: Schwarz)

Seit 2010 führt Alfred Schopf das Unternehmen, die Kameraproduktion hat er seitdem von 700 auf 2500 Stück im Monat gesteigert. Den gebürtigen Schwaben fasziniert vor allem die Marke Leica: "Sie ist für mich ein Kleinod in der deutschen Markenlandschaft und eine Legende im Bereich der Fotografie." Außerdem habe ihn an der Aufgabe, den Vorstandsposten vor vier Jahren zu übernehmen, gereizt, "Leica dahin zurückzuführen, wo die Marke meiner Meinung nach hingehört: an die Spitze".

<p>Hüter des Archivs und Kenner der Leica-Geschichte: Günter Osterloh. (Foto: Schwarz)</p>
Hüter des Archivs und Kenner der Leica-Geschichte: Günter Osterloh. (Foto: Schwarz)

Dass Leica inzwischen in einem neuen Zeitalter angekommen ist, zeigen nicht nur die schwarzen Zahlen, die das Unternehmen längst schreibt. In Wetzlar ist in den vergangenen Monaten für 65 Millionen Euro ein imposanter Neubau mit 30 000 Quadratmetern Nutzfläche mit gläserner Produktion, Galerie, Museum, Leica-Store, Fotostudio für Profis, und einem Besucher-Restaurant entstanden. Allein 2000 Quadratmeter im Foyer werden als Ausstellungsfläche genutzt, 650 Mitarbeiter haben in dem Neubau Platz.

"Das Gebäude soll zum Ausdruck bringen, dass Leica in einem ganz neuen Stadium angekommen ist", sagt Aufsichtsratschef Kaufmann, der Wetzlar als "hochwertigen industriellen Standort" bezeichnet.

Der Neubau trägt dem neuen Stadium des Unternehmens Rechnung. Und auch dem Thema Optik: Die Hauptgebäude bilden ein Fernglas und ein Objektiv ab, Intarsienarbeiten im Fußboden und runde Beete sowie der Springbrunnen im Park spiegeln die Linsen wider, ohne die die Fotografie undenkbar wäre.

Ohne die Leica, die lebende Legende, natürlich auch.


Leica - zurück in Wetzlar

Am 24. Mai feiert das Kameraunternehmen Leica 100. Geburtstag und lädt ein zum Tag der offenen Tür in seinen Neubau im Wetzlarer Leitz-Park. Diese Zeitung hat den Umzug in den vergangenen Wochen begleitet, mit alten und jungen Leitzianern gesprochen, Interviews mit Vorstand und Aufsichtsrat geführt. Lesen Sie unsere Serie "100 Jahre Leica – Zurück in Wetzlar" und ab dem 23. Mai unsere Beilage "Leica – Legende und Leidenschaft".


Thursday, May 8, 2014

CRYSTAL CAVE DISCOVERED WITH HELP FROM LEICA


Many Leica owners consider a trip to Wetzlar, the former and new Leica Mecca, a worthwhile undertaking.  Less than 50 miles from Frankfurt, it is easy to get to.  The guided tours of the new Leica plant at Leitz Park are very informative and offer a close look at how these cameras and lenses are made.  Another highlight of visiting Leica is the Leica museum.

About 15 miles from Wetzlar is Weilburg.  A side trip to Weilburg is definitely worth consideration.  It is the location of the topic of this post.  I recommend using a route that goes through Braunfels, only a bit more than 2 miles from the former Leica headquarters in Solms.  There you’ll have the opportunity to visit Burg Braunfels (Braunfels Castle) which dates back to 1246.

 
Burg Braunfels

A part of Weilburg is called Kubach, place of the Kubacher Kristallhöhle (Kubach Crystal Cave).  The Kristallhöhle is a relatively new discovery.  The story goes that in 1881 miners looking for phosphorite stumbled by chance on an underground cave full of stalactites and stalagmites that was so big, apparently the local church was said to have fitted in it.  But since this was not the mineral they were looking for, the entrance was filled in and the cave’s location forgotten.

However, not only did the miners tell other local people and even the press about the cave, they allegedly brought some of the stalactites back to the surface that are now in a local museum.

Over the years the story was passed on about the cave, until in 1973 holes were bored in the area that it was believed to be located in.  While those boreholes did not find the cave being sought, it did find one with rare crystals on the walls.

A container, small enough to fit the borehole, had been equipped with a camera and flash to take photographs of the newly discovered cave.  That camera was a Leica.  It is now on display, hanging from a line right below the borehole.

 
Container holding the Leica

In the years that followed a pathway down to the cave was excavated and since 1981 visitors have been able to take tours.  At the deepest point the floor of the cave is 78m (256 feet) below ground, and this part of the cave is 30m (98.5 feet) high – the highest cave that is open to the public in Germany.


The tour takes about 45 minutes and afterwards visitors can also go in the museum above ground, which shows more about how the cave was discovered but also about the mining that used to take place in the area.


Main entrance with a number of large rocks from the mineral museum inside

Going down into the cave is an exciting experience, but it is not possible for everyone.  Warning signs at the entrance list a range of medical conditions which are prohibitive to making the descent.  These include anyone who has had a heart attack, suffers from angina pectoris, or is taking nitrous-based medication.  Sturdy shoes are also recommended for the 347 steps down to the cave’s entrance.


From personal experience, I know that it is not so much going down into the cave, but coming up again.  But I found it worthwhile, for the cave itself and because it offers the opportunity to see a little known item of Leica history.


The cave’s website is http://www.kubacherkristallhoehle.de


GET MORE ACCURATE EXPOSURES WITH A HAND HELD LIGHT METER


Since the advent of the early selenium cell light meters in the 30s, light meters have come a long way.  Built-in, automatic exposure control has made exposure settings so effortless that a lot of camera users hardly give it a thought anymore.  On the other hand, especially in professional applications, full manual control over exposure settings is often an absolute must.  A portrait for instance might call for a white background.  Obviously, a white background material, like seamless paper, is the correct choice here.  Yet, just because we use a material which we consider white, this does not necessarily turn into a white background in a photograph.  As a matter of fact, given the right control, a photograph taken of a subject against a white background can actually result in a photograph which shows a very dark or even black background, just as a black background can be rendered white in a photograph.  All that is necessary is a good understanding of exposure and a good hand-held light meter.

Most hand-held light meters are basically designed as incident light meters, yet for full control over our exposure settings a reflective light meter is absolutely necessary also.  Let’s look at the differences:  A reflective light meter, like all of the light meters built into our cameras, reads the intensity of the light which is reflected off the subject.  An incident light meter on the other hand will read the intensity of the light which illuminates the subject.  Let’s look at both types and their inherent differences.

If we take a reflective light meter and aim it at a subject of average brightness, it will give an accurate reading.  For easier understanding, let’s aim the light meter at a square which is painted an average gray.  Such a surface will reflect an average amount of the light which illuminates it and the meter will react accordingly, giving a certain exposure setting.  Without change in illumination, if the gray square is replaced by a pure white one, what will happen?  The white surface obviously will reflect a lot more light which the light meter will register.  Replacing the square with a black one, will result in just the opposite.  Without any change in relative brightness, our meter has now come up with three distinctively different exposure settings.

Reflective light meters are all calibrated to register (or assume) an average level of reflectance, as with the gray square.  Subsequently, the exposure reading obtained from the gray square is the correct one.  The white surface will actually fool the meter into registering a higher light intensity, just as the black one will result in registering a lower light intensity.  Both of those exposure settings will be wrong.  The end result is actually that the meter will render exposure settings which make all three surfaces in the photograph grey.  This is the very reason why photographs of a snow scene will usually be underexposed, while photographs at dusk or at night often come out much lighter than the actual scene.

This is where an incident light meter has tremendous advantages.  It only registers the relative brightness of illumination.  The resulting exposure settings will make an object of average brightness average in the photograph also.  Subsequently, a lighter surface will be lighter in the photograph just as a darker one will show up darker..

So it may seem that for accurate camera settings an incident light meter is the way to go.  In most situations this actually is indeed the case.  But what about the white background?  The exposure setting we choose has to be such that not only the subject is exposed properly, but also the background, which in our example is to be white.

A three stop overexposure will generally result in white, just as a four stop underexposure will result in black.  This is easily verified by taking an evenly illuminated white back ground and taking a reflective reading.  We then open the lens by three stops and take an exposure.  Then subsequent exposures are taken in 1/3 stop increments until a four stop underexposure has been reached.  The results will then show the various shades of gray (white and black are also considered shades of gray here) which can be achieved with various degrees of over and under exposure.  Please note that these are average settings.  Digital sensors vary in their response to over and underexposure.  However, a simple test like the one above will easily show the amount of overexposure and underexposure necessary to render white or black without detail.

For the example , if for a white background it is necessary to see if it is three stops overexposed, we must do the following:

We determine the correct exposure for the subject with the light meter in the incident mode.  This will be very accurate and therefore establish the actual camera settings.  These settings also need to overexpose the background by three stops in order to render it white.  To check this, all we need to do is switch the meter to the reflective mode.  Now the meter will register the amount of light which is actually reflected by the background.  If this indeed shows an overexposure of three stops, the background will be white, as would a four or 5 stop overexposure.  But that is not advisable at all since otherwise the background will reflect such a strong amount of light that it very likely will result in flare or loss of detail at the edges of the subject.  If the reflective reading of the background registers less than a three stop overexposure, it is ultimately a simple interpretation of what the background will look like.  A two stop overexposure for instance would render a very light gray background, a one stop overexposure would still render a noticeably darker grey.  The same exposure would render an average or neutral grey, while underexposure would render progressively darker shades of grey until the background is rendered black.

For example:  The basic exposure for the subject is 1/60 sec @ f/5.6.  For the background to be three stops over, the meter would have to read 1/60 @ f/16.  If we were to expose at f/16, the background would be medium gray, but since the actual camera setting for the subject calls for f/5.6, that is indeed a three stop overexposure compared to f/16.  Does it matter if the background material is actually white?  No it does not!  Regardless of color or brightens, if the background is illuminated such that it registers a three stop overexposure, it will be white.  On the other hand, if the overexposure is less than three stops, the background will show various degrees of light grey, red, green or whatever other color the background may be, but with an underexposure of four stops, all will be black.


The above photograph is a good example of predicting the outcome of the photograph with the help of a good, hand-held light meter.  The bright light, outlining the profile of the face and the hands was purposely chosen at +2 1/2 (2 1/2 stops over).  This was determined with an incident light reading of just the main light source and then opening the lens by 2 1/2 stops.  The rest of the face  needed to be quite dark, but also needed to show detail.  For that an underexposure of 2 1/2 stops was chosen.  This again was done with an incident reading by adjusting the intensity of the light source until it registered –2 1/2.  This photograph was actually shot in a studio with all white walls and no black background material was used.  The subject was approximately 30 feet from the background.  With that distance, so little light reached the background that the reflective meter did register an underexposure of 3 ½ stops.  In the original enlargement one can actually see a slight separation between the dark part of the hands and the background which is ever so slightly lighter.  This kind of control would not be possible without a good, handheld light meter offering both incident and reflective reading capability, and certainly no automatic metering system, however sophisticated, would allow this to be done.


A similar technique was applied for the above color photograph.  Via incident reading the correct exposure for the subject and subsequent camera settings were determined.  A spot with blue gel was used on the background.  For the relatively intense blue an overexposure of one stop was chosen.  With a reflective reading the background light was adjusted until this exposure was reached.

Could the same background exposure be achieved with an incident reading?  Not at all.  While an incident reading can determine the relative brightness of the light source, it cannot give any information about how much of that light is actually reflected by the background material.  A reflective meter on the other hand will read exactly that.  Therefore, to have the total control described above, both incident and reflective meters are absolutely essential.

It must also be mentioned here that a lot of light meters require the removal of the incident sphere and replacement with a reflective reading attachment.  In situations as described above, those meters have proven to be very cumbersome.  Light meters which allow the incident sphere to slide aside and thus changing to a reflective reading have proven to be much more practical.

Could the subject exposure be determined with a reflective meter?  Yes, but it is much more difficult.  Especially with portraits, we have to deal with a large variety of skin tones.  Most Caucasian skin tones are too light and would lead to a slight underexposure with a reflective reading, just as very dark skin tones would lead to overexposure.  An incident meter on the other hand will automatically render exposure settings which will render the skin tones accurately, regardless of how bright or dark they might be.  An incident meter will render true tonality in both color and black and white.

A good example is the photograph below.  A simple, diffused light source (umbrella) was used as the only form of illumination.  This, of course, rendered a mostly black photograph.  The incident meter, aimed at the light source easily gave the correct camera setting.  Most reflective light meters would have failed with the possible exception of a spot meter.  Any automatic exposure control would have been fooled by the mostly black scene, including any of the computer controlled matrix metering systems, regardless of manufacturer.


The question is often asked about where to aim the incident meter when multiple light sources are used.  That ultimately depends on the approach to lighting.  I know that a lot of photographers set up lighting, especially for portraits, by establishing certain lighting ratios, which then are set up with the help of a light meter.  I prefer to exercise full visual control.  It is my philosophy that no meter “knows” what lighting is right for an individual.  Further, I strongly feel that the lighting should be set to accent the individual.  Preconceived lighting ratios can’t always do that.  Therefore, I set up lighting to best accent the task at hand.  Once I decide on a certain lighting, as in the above examples, I start with the main light and then use fill as necessary.  With other words, I adjust the lights until they look good.  Then, for the reading, I aim the incident meter toward the main light source, may it be a soft box, umbrella, scrim, window or any other.  That will give the correct camera settings, and everything else will literally fall into place.

A word of caution about measuring range of the light meter.  Using large format cameras often necessitates very small apertures like f/32 or f/45.  To apply the same control as described above to get a true white background would subsequently require a light meter capable of reading apertures of f/90 or f/128.  While some light meters are capable of doing this for continuous light, few are able to do the same for electronic flash.  The same also applies to maximum exposure time.  While very long exposure times usually are not necessary, it is however, a good idea to have ample reserve in this respect in order to be able to handle all photographic situations.  For my own use the longest exposure time has been one hour.


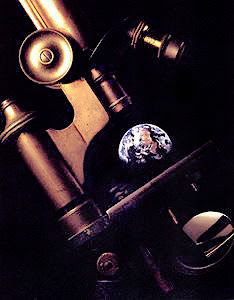
The above photograph is not computer manipulated.  It is a double exposure of the microscope and a carefully positioned rear projection screen with the image of the earth projected onto it.
The exposure for the microscope, once lighting was set up, was determined with an incident reading and the first exposure was done accordingly with just a black background.  After carefully positioning the rear projection screen, a reflective reading of the projected image was taken.  An incident reading will not work in this situation since there is no illuminating light source.  Instead an actual reading of the true brightness of the projected image had to be taken, which can only be done with a reflective meter.  The meter was placed flat against the rear projection screen over the area showing the brown area visible in the center.  No adjustments to the reading were necessary because this color of the earth is of neutral density.  This reading was then used to expose the background.

A common practice among professional photographers is to use Polaroid film or to use the viewing screen of digital cameras to verify exposure.  While there is nothing inherently wrong with that, it is still beneficial to be able to take an accurate and reliable exposure reading since some photographic situations simply don’t allow for enough time to do so.  The photograph below is such an example.


The front elevation of this building is facing west.  Therefore late afternoon / early evening setting sun lighting was chosen.  I also decided to use tungsten film to accentuate the blue sky (a tungsten setting for the white light adjustment on a digital camera would do the same).  As it became darker, spot readings of the entry way and main stair case of the building were taken.  The interior was very much neutral in density; subsequently the reflective spot readings established the actual exposure settings.  These were checked periodically to make sure that no changes took place.  For the intensely blue sky exposures of neutral to +1 are necessary.  At that time of day lighting changes very fast.  To get the correct exposure, spot readings were taken of the sky right above the building.  As soon as the sky density had reached the +1 level, exposures were taken in short intervals until the sky darkened to neutral.  These changes take place so quickly that no Polaroid test exposure would have rendered usable exposure settings.

None of the above examples were exposed with the help of Polaroid film or the almost instant feedback of the viewing screen on a digital camera.  But they do show how a good hand held light meter can be an invaluable tool for total exposure control.  Yet there is more.

Many photographers use seamless paper to achieve different colored backgrounds, and at times this is indeed a good choice.  However, colored gels can in a lot of cases do very much the same, again with absolute control.  In general, a white background material will usually lead to relatively light, pastel colors since it does reflect a large amount of the ambient light in addition to the background lighting.  Gray surfaces are helpful in this respect.  If, however, really intense, pure colors are needed, this is best done with a flat black background material like black seamless.  The same test, as described above for backgrounds from white to black, can be done here.  Regardless of the color of the gel, the three stop over exposure will render white as a four stop underexposure will render black.  Exposure changes in 1/3 stop increments will reveal the various color densities which can be achieved.  This incidentally is repeatable with virtually absolute accuracy if the same gels and background materials are used.


Photography inevitably requires exposure settings.  The more control we are able to exercise over these exposure settings, the better the outcome of our photographs.  Besides the camera, the most important tool here is the photographer, his or her knowledge about exposure control and the help of a good reflective/incident light meter.


Tuesday, May 6, 2014

100 JAHRE LEICA FOTOGRAFIE


We received the following article from PROFIFOTO in Germany:


CAFÉ LEITZ


“Cafė Leitz.” has opened

Wetzlar has a new café.  It is located at Leitz Park and is appropriately called “Cafė Leitz.”  It is greeting its guests all in white.  It offers 52 tables inside and 46 outside with a view of the fountain and the administrative building of the Leica Camera AG.  Manager Matthias Emmer of the firm Aramark and his team are looking out for the guests.  They offer home made cakes and baked goods, chocolates and truffles as well as soups and salads.  In addition there are freshly made sandwiches in the design of a camera.  Café Leitz is open Monday through Friday from 10 to 7.  It can be hired for private parties.  Also open to the public is the “Casino” in the main building of Leica.  There you can order Breakfast starting at 7:30 and lunch from 11:45 to 1:30, Monday through Friday.  Closing time is 3:30.  (Phone 06441-2080113)


Thursday, May 1, 2014

HOW DID THEY DO THIS?


With the advent of digital photography and computer manipulated photographs, we have come to expect the extraordinary, maybe even the seemingly impossible.  Unfortunately, this has also caused some of the older, conventional photographic methods to become relics of the past, soon to be forgotten.

There is no doubt that modern, computer methods have made it substantially easier and more productive to manipulate photographs, to show the unusual.  Yet we have seen similar things done, in the past, with just conventional photographic techniques.  In a modern studio operation, digital techniques are definitely necessary to maintain a competitive edge.  But for just plain, photographic fun, some of the old, conventional techniques have a lot to offer.


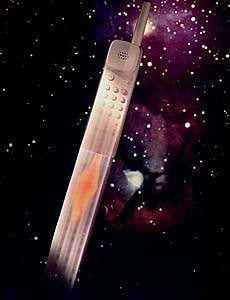
The photograph in this article has often been thought of as being computer generated or manipulated.  Yet it was done by standard, photographic methods and a bit of ingenuity.  It came about as an assignment for a local client.  The basic idea of the shot was specified, and it was up to the photographer to execute the idea in the studio and to put it on film.

The photograph is the result of multiple exposures on the same sheet of film.  Following is an account of how this was done…

As a camera, a 4x5 view camera was chosen, although any other camera could be used as well.  Initially, the phone was hung up with very thin, micro filament line.  It would be very difficult to hang the phone in an angle; instead, it was hung straight, with the antenna facing down.  Two lines, in an angle were used to prevent the phone from swinging sideways.  An additional two lines were fastened to the antenna to avoid the phone from swinging back and forth.  To allow the phone to be recorded in an angle, the camera was tilted.  The upside down image in a view camera actually made it easier to compose the set, because the upside down phone showed upright on the ground glass.  With cameras other than a view camera, it would be easier to have the phone hung upright.

Lighting was done all with hot lights, using a strong cross light on the key pad, with a softer light source, with the same angle, as fill.  A reflector was used to lighten the dark, opposite side.  The camera was supported on a studio stand with a geared head.  This allowed for an easy addition of the motion streaks.  The initial position of the camera was marked with white board marker directly on the ground glass.  With other cameras the position would need to be marked on the tripod.  Then the camera was tilted down for the position of the end of the motion streaks.  With the shutter open, the camera was slowly tilted upward, until it reached the initial position as marked on the ground glass.  This gave the phone an exact, fixed position for the next exposures, the first of which was the phone by itself, against a black background with the above described lighting.

The flame had to be done carefully, in order not to hurt the phone or set it on fire.  Clients really don’t like it if you burn their products.  A light stand was positioned right behind the phone.  Wrapped in a black cloth, the parts below the phone did not show against the black background.  On top of the light stand a small piece of sponge material was fastened.  The height of the light stand was carefully adjusted such that the sponge was just hidden behind the edge of the phone.  The sponge was soaked with lighter fluid, which burns with a bright, orange flame.  Thus, the exposure of the flame was no problem at all.  Of course, the lighting for the phone was shut off for this exposure.

The fourth and final exposure was for the background.  To allow for the space scene, rear projection was chosen.  A standard, 35mm slide of the scene was projected onto a rear projection screen.  This is a bit trickier, since the product, in this case the phone, must not be allowed to move at all.  The subject lighting must be off for this exposure to avoid any light from spilling onto the rear projection screen.  For the previous three exposures the screen was not in place.  The screen must be carefully put in place, as close as possible to the subject, to avoid any depth of field problems.  Neither a change of aperture or refocusing can be done since both will alter the size of the product in front of the screen.  The product is, what is called, self-masking.  With other words, it blocks out the areas of the background covered by the product.  It is also important to filter the projector lens.  Most projectors use a heat absorbing glass which is slightly green in color.  Without filtration, the rear projection image would have a green cast.  A gel filter of CC10M (10 Color Correction values of Magenta) in front of the projector lens assured the correct color balance.  Thus, the fourth exposure made the phone move through space.

Exposure readings were taken in the following manner:  For the exposure of the phone, the initial reading was an incident reading, facing toward the light source.  To make sure that the bright spot on the phone key pad would not be washed out, an additional spot reading of that area was taken to make sure that it was not over exposed by more than 2 ½ stops.  A three stop over exposure would have rendered the area white without detail.

Experience has shown that the motion streaks will show just fine with the same lighting and a slow tilting of the camera, lasting about two to three seconds.  This is really not that critical, since it doesn’t matter if the motion streaks are a bit lighter or darker, as long as they show up well.  Please note:  The exposure reading for the phone also determined the exposure settings for the motion streaks.  Moving the camera for the motion streaks was the first exposure.

For the flame, a spot reading of the flame, adjusted to a 1 stop over exposure assured that the reddish color of the flame would be maintained without being too dim.

The rear projection exposure was determined with a spot reading also.  Incident readings cannot be applied here at all.  Of the star field, an area with neutral brightness was chosen for the spot reading.  The resulting exposure time then rendered the correct exposure.

It is important to note, that for all four of the exposures the same aperture had to be used. As mentioned already, a change in aperture will slightly change the size of the subject on film.

Since all four exposures show the same subject, this must be avoided.  To select an aperture which gave enough depth of field to cover the subject and the rear projection image, the screen was put in place initially, but then was removed for the first three exposures.


I have found that many such photographs have more than just one solution.  I would be very much interested in hearing about some other ideas how this photograph could have been made.  Such a photograph is obviously beyond everyday shooting.  If anyone has any questions regarding how this was done or to clarify any of the techniques described, please let me know and I will gladly get back to you with an answer.