

Portraits are a form of
photography that can be done in a variety of ways, requiring different skill
levels. The easiest and probably the
most widely used are snapshots of individuals or groups. Nothing wrong with that, but the outcome is
mostly left to chance.
I have always been an
advocate of exercising as much control as possible when taking a photograph,
portraits included. Even when taking
just a simple snapshot, there is a level of control we can exercise. This begins with choosing the individual or
individuals we want to photograph. Since
most people are not accustomed to be in front of a camera, it is best in most
cases if the subjects are unaware that they are being photographed. Subsequently directions are out of the
question. But we do have a choice of
backgrounds in many cases. Simply
changing camera position can lead to a more suitable background. This can also result in a different look of
the lighting. In addition there is the
choice of lenses. To remain more or less
unnoticed, a longer lens can be quite helpful because it increases the distance
to the subject(s).

A simple snapshot with just natural light


A simple snapshot is usually better when the photographer is unnoticed
Lighting for a portrait
offers a huge amount of control and it has the possibility to bring out the
best in whoever we photograph. That
doesn’t necessarily require studio light or anything even close to that. Any available light source will suffice. Outside, during daylight hours, this means
the oldest light source of them all, the sun.
Unfortunately the sun is
also a difficult light source to deal with.
Direct sunlight is very contrasty and renders a very harsh light which results
in very harsh shadows. When we talk
about controlling lighting, what we really do is controlling shadows. A harsh light source like the sun easily casts
ugly shadows which, if not controlled, will result in an ugly portrait. With other words, the lit parts of a person
are usually just fine, it is the shadows that will make or break the
photograph.

The harsh shadows from direct sunlight usually make for a bad portrait.
While some of that can be corrected in Photoshop or similar programs,
it is preferable to correct this prior to taking the photo/
An easy way to avoid these
ugly shadows is to avoid direct sunlight.
The old Kodak advice to always have the sun in the back of the subject
does work, but then you are also shooting into the sun which can create a whole
lot of other problems.

Especially with a suitable background, having the sun in the back of the subject will result in an excellent outdoor portrait
Reflected light can be a
very good light source because it is diffused and, as such, will not create
harsh shadows at all. A light wall or
side of a building can make a wonderful, soft light source.
Large trees can be quite
helpful as well in modifying harsh sunlight.
Having a person standing next to a tree will easily avoid direct
sunlight. In addition, the side of the
face closest to the tree will usually be darker than the other side and thus
even create some modeling of the face.
While we usually don’t carry umbrellas when it’s sunny outside, an
umbrella can serve as a very useful light modifier, and it is easy to
carry. On the other hand, it would
require an extra person to assist during the shoot to hold it in place unless
the camera is on a tripod and is triggered by remote release or the self timer.
Shaded areas generally
increase exposure by a certain amount.
If the background is in bright sunlight, this will lighten the
background. With other words, this
method of lighting also offers a certain amount of control over your background
lighting. For instance, relatively dark
trees like pine trees can be made lighter in the photograph.
It is even possible to
darken the background in outdoor portraits, but this is more involved. To do so would require increasing the subject
exposure by the use of a reflector or reflectors. A bright reflective material will shed
additional light onto the subject, thus shortening the exposure. This in turn will also shorten the background
exposure and render it darker. Even when
no means to control the harsh shadows are available, an electronic flash can be
used as so called fill flash by adding additional light to the shadows to lighten
them and to make them appear less harsh.
This too will slightly darken the background.
One of the best light
sources for shooting indoors is window light.
A large window renders beautiful, soft light. The position of the model relative to the
window allows for a variety of different lighting effects like a front lit
profile, with the model facing the window, or soft side lighting with the
window to the side of the face. Changing
the camera position offers further control.

This is a snapshot of Tiger Jack utilizing just window light

The window light in this case came from a large window off to the left of the subject
Without question, the most
control over lighting is in a studio with studio lights. Of all the different types of lights
available, I much prefer studio strobes.
They have the advantage of the short flash duration which usually will
eliminate any problems with subject or camera movement. However, simple electronic flash units are
less than desirable because you cannot see the effects of the light until after
the photograph has been taken. On-camera electronic flash is generally considered to be the least beneficial light source. Not only does it cast very flat lighting since it is emitted from the very camera position. The flash is usually on top of the camera, right above the lens, creating hardly visible, downward shadow. However, when shooting vertically, the light is off to one or the other side of the camera, casting an ugly shadow of the subject.

Studio strobes have the advantage of modeling lights which are a continuous light source positioned on the strobe such that they show the same lighting pattern as the strobe. They allow full visual control over your lighting and with multiple strobes you can control both your subject as well as your background lighting.

Not bad except for the ugly shadow on the right side of the picture
Studio strobes have the advantage of modeling lights which are a continuous light source positioned on the strobe such that they show the same lighting pattern as the strobe. They allow full visual control over your lighting and with multiple strobes you can control both your subject as well as your background lighting.

Typical studio strobe. The light for the modeling light and the flash tube are positioned such that they will cast an identical light pattern.
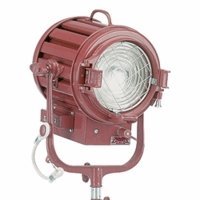
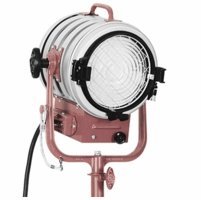
Another popular studio
light are the so called hotlights. They
utilize relatively powerful lightbulbs which emit enough light to render short
enough exposure times to avoid subject or camera movement. However, as the name implies, they are also
quite hot and can make shooting in a studio uncomfortable for the model as well
as the photographer.
As of late studio lights
with light emitting diodes (LED) have become available. These avoid the problem of excessive heat and
thus are without question a better choice.
But both hotlights as well as LEDs have one drawback. Since both of them have to be relatively bright to allow for useable exposure times,
their brightness will also cause the model’s pupils to contract which renders
less ideal looking eyes in the resulting photographs. The modeling lights in a studio strobe are
not anywhere near that bright with the result that the pupils in the
photographs are noticeably larger and thus more attractive. The bright light from the actual flash is
much too short to allow for the pupils to contract.

However, there is one advantage to hotlights and LED lights. They can render exposure settings with the camera meter. Studio strobes do require a flash meter to determine the correct exposure settings.
Much has been written about lighting, lighting ratios and light modifiers. While lighting and its control is essential for a good portrait, I personally reject the use of lighting ratios, the difference in relative values between the lighter and the darker side of the face or any other preconceived setups. To me that is the photographic equivalent to painting by numbers. I feel it is much more important to visually control the lighting and, if it looks good, shoot. What lighting ration that results in is totally irrelevant.
Much has been written about lighting, lighting ratios and light modifiers. While lighting and its control is essential for a good portrait, I personally reject the use of lighting ratios, the difference in relative values between the lighter and the darker side of the face or any other preconceived setups. To me that is the photographic equivalent to painting by numbers. I feel it is much more important to visually control the lighting and, if it looks good, shoot. What lighting ration that results in is totally irrelevant.
When I was still teaching
photography, I had a representative from Kodak come in to talk to my students
about portrait lighting. To my horror,
he continually harped on lighting rations without saying anything about light sources and
their various effects. When it came time
to demonstrate his “skills”, he pulled out several rolls of string which had
markers attached to them. He then
demonstrated setting up the lights within certain distances from the camera with
the help of the markers on the strings to achieve specific lighting ratios, all
the while totally ignoring the actual effects of the lights relative to the
model. He didn’t even turn the lights on
until he was finished with his setup.
Lighting is being
described in many different ways, something that can quickly get
confusing. I want to mention just a few
basic examples which quickly make it clear what basic lighting is being talked
about.

· Front lighting describes basic lighting from
the front of the face. This can be used
with the face toward the camera as well as with the profile of the person and any position of the face in between.

·
Butterfly lighting is a form of front lighting,
usually done with a less diffused or undiffused light source. When positioned correctly, the light will
cast a small, butterfly shaped shadow directly below the nose.

·
Side lighting has the light source off to
one or the other side of the face by varying amounts.

· Split lighting is a more
extreme form of side lighting and, as the name implies, has the light coming
from one or the other side of the face with one half of the face lit and the other
shadowed.

· Rembrandt
lighting is a form of side lighting
with the light source placed such that it will show a triangular shaped lit
area of the eye and just under the eye in the otherwise dark area of the
face. This expression is used because
Rembrandt used this form of lighting in many of his paintings.

There are many more of these descriptions, but to me they quickly become confusing, if not ridiculous. After all, what on earth is John Wayne lighting?
Regardless of what light source is being used, in many cases the shaded areas will be too dark. To add light to the shadows an additional light source can be used. But in most cases a simpler approach is to use a reflector to add some additional light. The intensity of the added light is adjusted by moving the reflector closer or further away. The reflector can be lit by light from the main light source or it can be lit with a separate light.
Regardless of what light source is being used, in many cases the shaded areas will be too dark. To add light to the shadows an additional light source can be used. But in most cases a simpler approach is to use a reflector to add some additional light. The intensity of the added light is adjusted by moving the reflector closer or further away. The reflector can be lit by light from the main light source or it can be lit with a separate light.
Let’s look at lights and
their effect on the lighting. In
general, the smaller in size a light source, the harsher the light will be and
cast the harshest shadows. Increasing
the physical size of the light source will make the light softer, meaning the
transition from light to shadows is more gradual. This doesn’t necessarily require a different
light, we use light modifiers instead. A
frame with a translucent material, placed in front of a harsh light can easily
achieve that, but the lit area of the translucent material must be noticeably
larger to have the desired effect. Just
putting some diffusing material directly in front of the light will make little
difference since the actual size of the light is not increased. Another way to achieve the same effect is to
reflect the light off a white, reflective surface. Foam core sheets are very useful for
that. I have used large 8x4 foot foam
core panels which make a great diffused light source as long as most of the
entire panel is lit. Taping two panes
together such that they can be folded in the middle allows them to be set up
without the need for any other stands etc.
Not only do these light
modifiers allow for achieving very soft lighting, varying the size of the lit
area on them allows to further change the amount of softness to just what is
necessary. Other light modifiers are
umbrellas and soft boxes. Umbrellas are
especially convenient for transportation because they can easily be folded. They basically come as two types, reflecting
umbrellas, where the light is reflected to the subject or diffusion umbrellas
where the light shines through the umbrella.
Here too the size of the lit area of the umbrella determines the
softness of the light. Some umbrellas
are designed to be used either way.
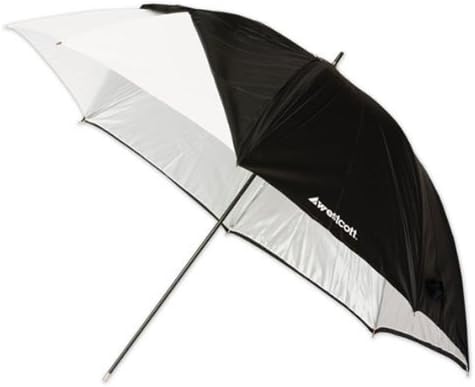
Reflective umbrella. By removing the black cover
it can also be used as a diffusion umbrella
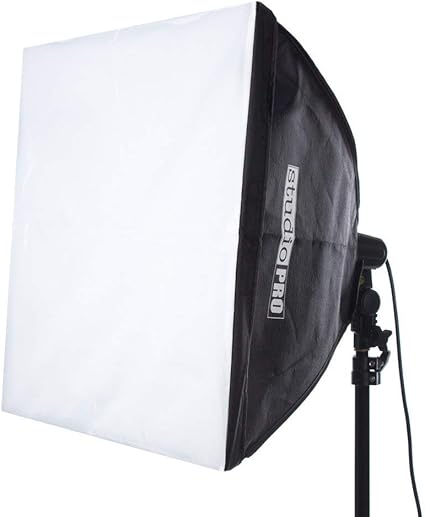
Typical soft box
Soft boxes are very
similar. They are deigned to enclose the
light source and soften the light relative to their size. The amount of softening with any of these
light modifiers can further be influenced by varying their distance to the
subject. The greater their distance from
the subject the smaller they will be relative to the subject.


This was shot on stage with just stage lighting. Other than positioning the face,
no other changes could be made. I chose to position the face to show
Rembrand lighting.

Another example of Rembrand lighting.
Here too existing lighting was used

The soft lighting in this case was the result of a large garage type door opposite from the subjects,
creating the effect of window light.

The only light source here was a chandelier directly above the person. That created very harsh,
long shadows on the face. To lighten them, a large, white piece of cardboard was placed behind
the backrests of the seats in front of the person to reflect light upward.

Another example of utilizing stage lighting.
The steep downward angle of the light created a prime example of
butterfly lighting

Sometimes just outdoor lighting is not sufficient. In this case it rendered the face much too dark.
Reflectors did not add enough light to be useful. A studio strobe, set to match the outdoor lighting
of the background was the answer.

Hard, undiffused light can be quite attractive, providing it is used correctly.
Here the light was positioned such that no shadows can be seen on the face.

Rembrand lighting with a slightly diffused single light source

Rembrand lighting, utilizing the profile of the model with an undiffused
light source. A second light illuminated the left arm of the model
and to highlight the blonde hair.

With the model moving it is necessary to use a softer, diffused
light source like an umbrella to avoid harsh shadows which are
hard to control because of the movement.

A soft light source was positioned slightly to the left slightly above
the face, rendering a very soft illumination biased to the left side of the face.
A hotlight was used for this shot which rendered the pupils relatively small.
The same lighting with a studio strobe would have resulted in larger pupils.

An undiffused light source was positioned to just light an outline of the face,
often referred to as rim lighting.

An undiffused light source is positioned to glance across the back
of the model. The illumination of the face was the result of some
light reflecting off the right shoulder of the model.

The harsh sunlight was easily controlled with the white hat of the
model. The shadow pattern of the sunlight shining through the
rim is an added benefit.

The initial lighting was outlining the face with rim lighting. To keep the other
side of the face from becoming too dark, extra light was reflected to the
left side of the face with a reflector. The soft light from the reflector was
adding light without ever giving the impression that a second
light source was used.

Problems with harsh sunlight can easily be avoided by placing the model in the shade as in this
outdoor model shot.

This is basically split lighting. However careful positioning of the light and
the face to shed just a streak of light on the right eye resulted in the eye
from being too dark. Hard lighting also will often result in bringing out the
color of the eyes.
All of this requires practice and experience. I found it quite helpful to look at photographs of accomplished photographers, trying to determine what type of lighting was used. Then, trying to duplicate it can further shorten the learning curve.
We have a wealth of
means to influence the quality of our portrait lighting and measures of control
which all can result in better portraits, rather than leaving things to
chance.
I realize that these are only a few examples which will hopefully result in a better understanding of portrait lighting. But an article like this can only scratch the surface. Feel free to contact me any time with questions and examples to increase your understanding of lighting and to make the learning curve a bit shallower.
For more on the subject go here
All photographs taken with Leica equipment