
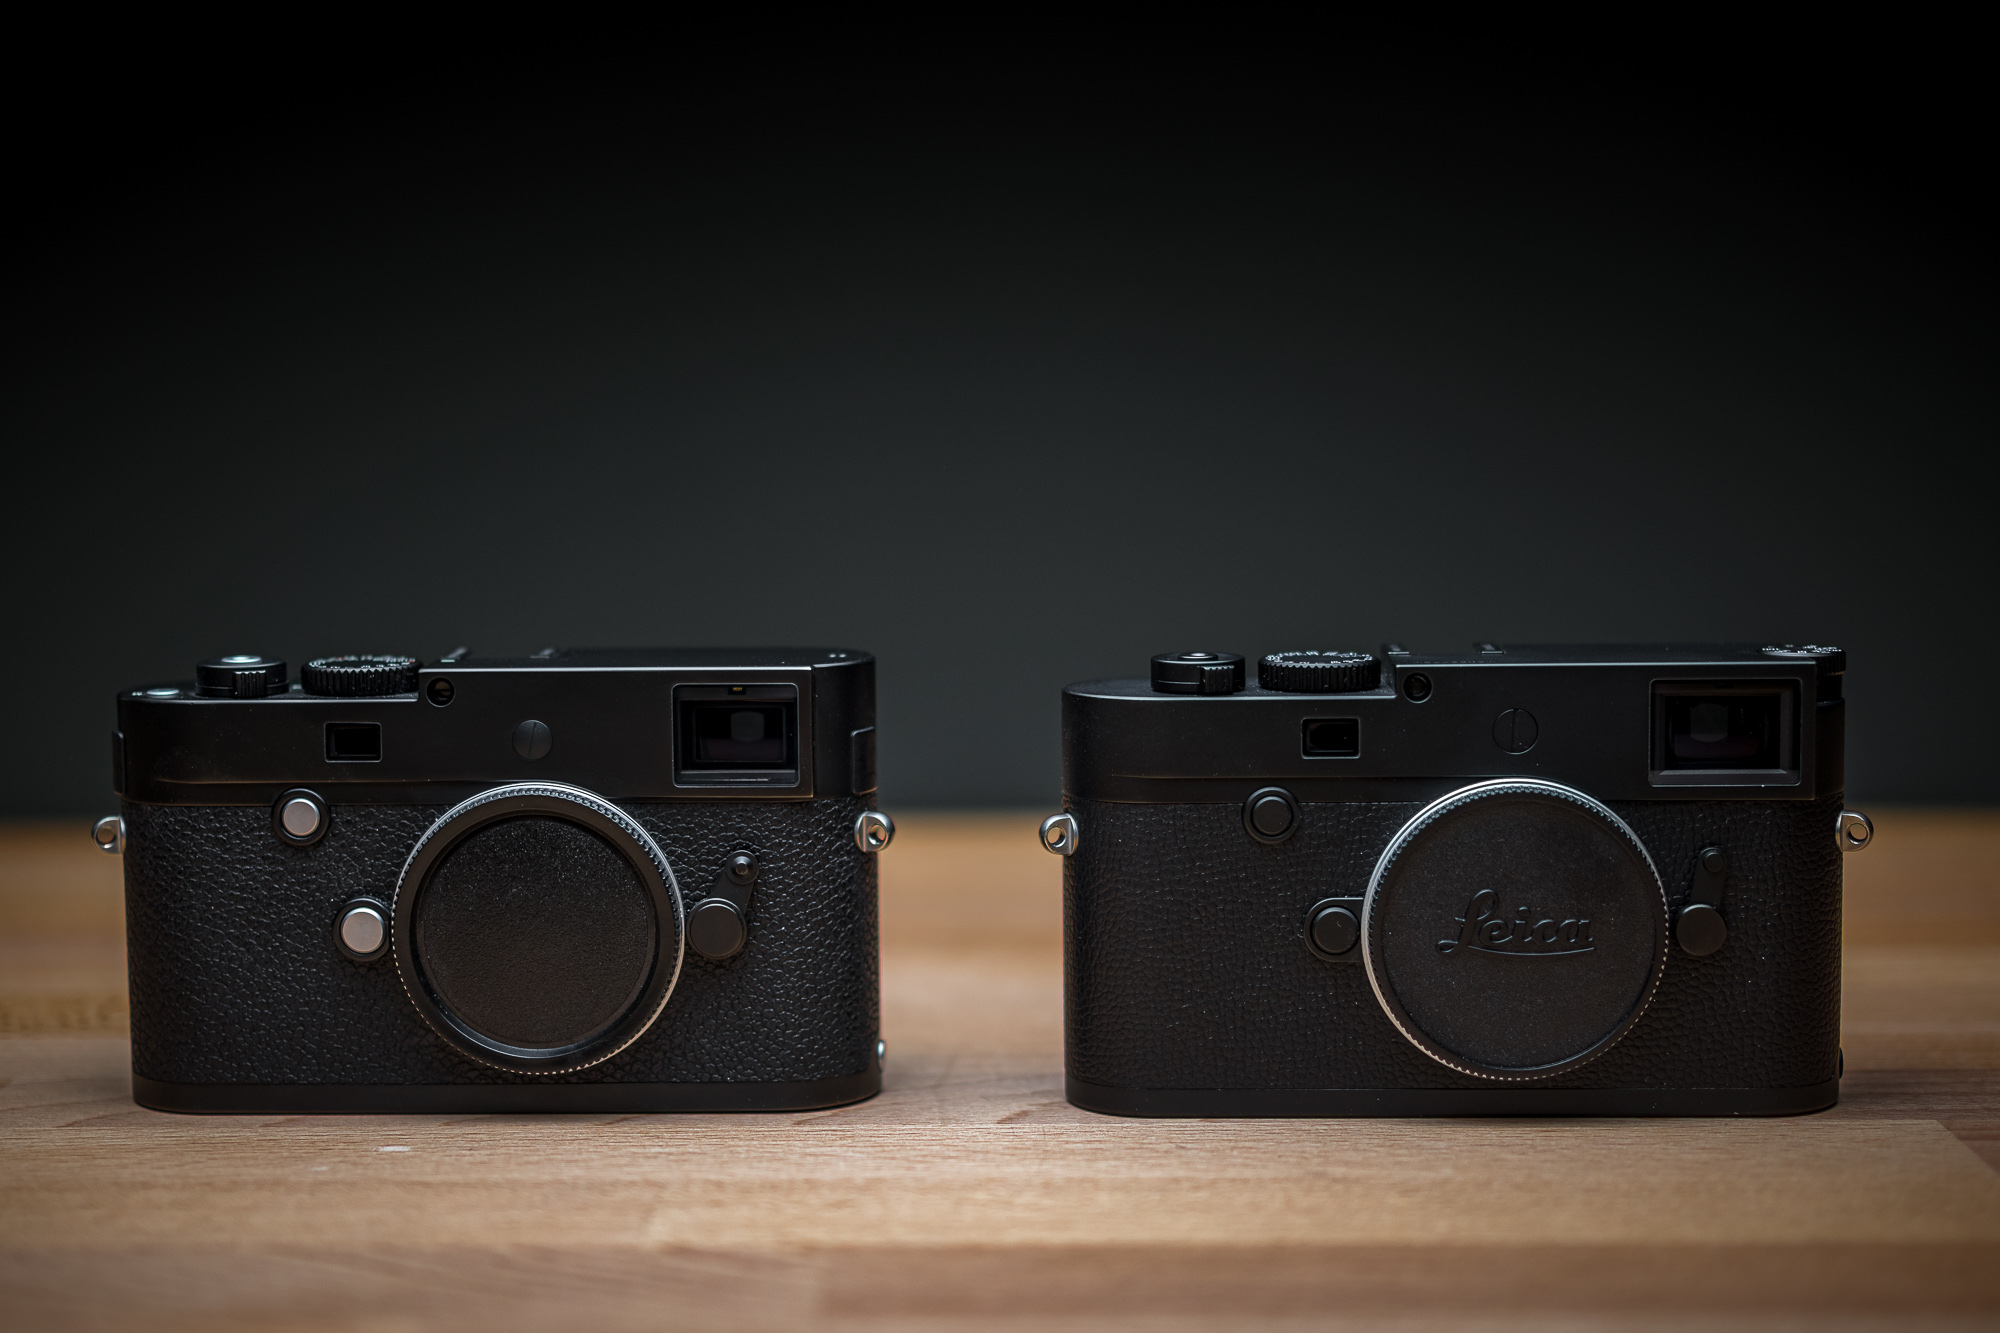
By David Farkas, Leica Store Miami
Shortly after the M Monochrom (Typ 246) was introduced back in early 2015, I published an article comparing it to an M (Typ 240) with its color files converted to black and white to see if high ISO performance was really superior with a dedicated monochrome sensor, along with the previous M Monochrom (M9M) to gauge any generational improvement. The match-up was certainly illuminating, clearly showcasing the superiority of the then-new M246 over both its CCD-based predecessor and color CMOS sibling. The M9M and M240 both put up a good fight and displayed their own low-light capabilities. But the M Monochrom (Typ 246) was the clear victor, pulling even further ahead at the higher ISO settings.
Since publishing that article, there have been some major developments in the Leica world. In 2015 alone, both the Q (Typ 116) and SL (Typ 601) were introduced, each featuring exceptional low-light performance care of their next generation 24-megapixel sensor architecture. Then, in January 2017, the M system got a significant upgrade with the launch of the M10. Included with the myriad overall improvements was a sizable bump to high ISO performance from the M240. And just within the past six months, the SL2 has doubled the resolution from the original SL, while the latest M10 Monochrom now offers up even higher ISO capability, as well as boasting 41 megapixels for the first time in an M camera.
A lot has changed in the last five years. And with so many new options in the Leica lineup, I figured it was high time for a refreshed B&W ISO Showdown in 2020. And fair warning – a copious quantity of images lie ahead. As in, over 100 comparison images.
Thoughts and caveats
Before we dive in too deep, let’s get the caveats out of the way first. Tests like this are, by definition, pixel-peeping. And I know that many don’t consider that a positive thing. Personally, I favor a more holistic approach, but do value the clarity of a well-designed, controlled test.
When evaluating a new camera for a full review, I form my opinions by venturing out and using it for real work. Actual results under various lighting conditions, with a wide variety of subject matter serve as the foundation to my review. I don’t actually start writing a single word until I’ve had ample time to both shoot and process the resulting images, in order to get a clearer picture of the character and capabilities of the camera.
But even that’s not the whole story. See, there is far more to judging the strength of a photographic tool than image quality alone. How it feels in hand, the sound of the shutter, the clarity of the viewfinder, the ease and accuracy of focus, interaction with the UI, overall responsiveness, etc. Only after considering the total experience of using a camera, can I truly develop a cogent assessment of it as a photographic tool. I’m a photographer first and foremost. My reviews are always taken from that perspective.
And while I place heavy emphasis on real-world shooting, there is undeniable value in understanding the critical performance envelope of a camera under ideal test conditions. Knowing, empirically, how the camera will perform when you push it to its limits, allows you as a photographer to work within those parameters comfortably and confidently. More insight and understanding into our tools is never a bad thing. So, let’s not hate on the pixel-peeping this time around, ok?
Okay, more caveats.
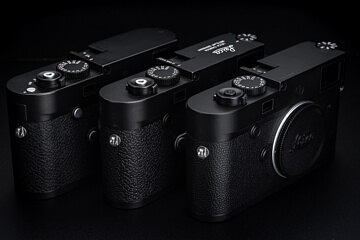
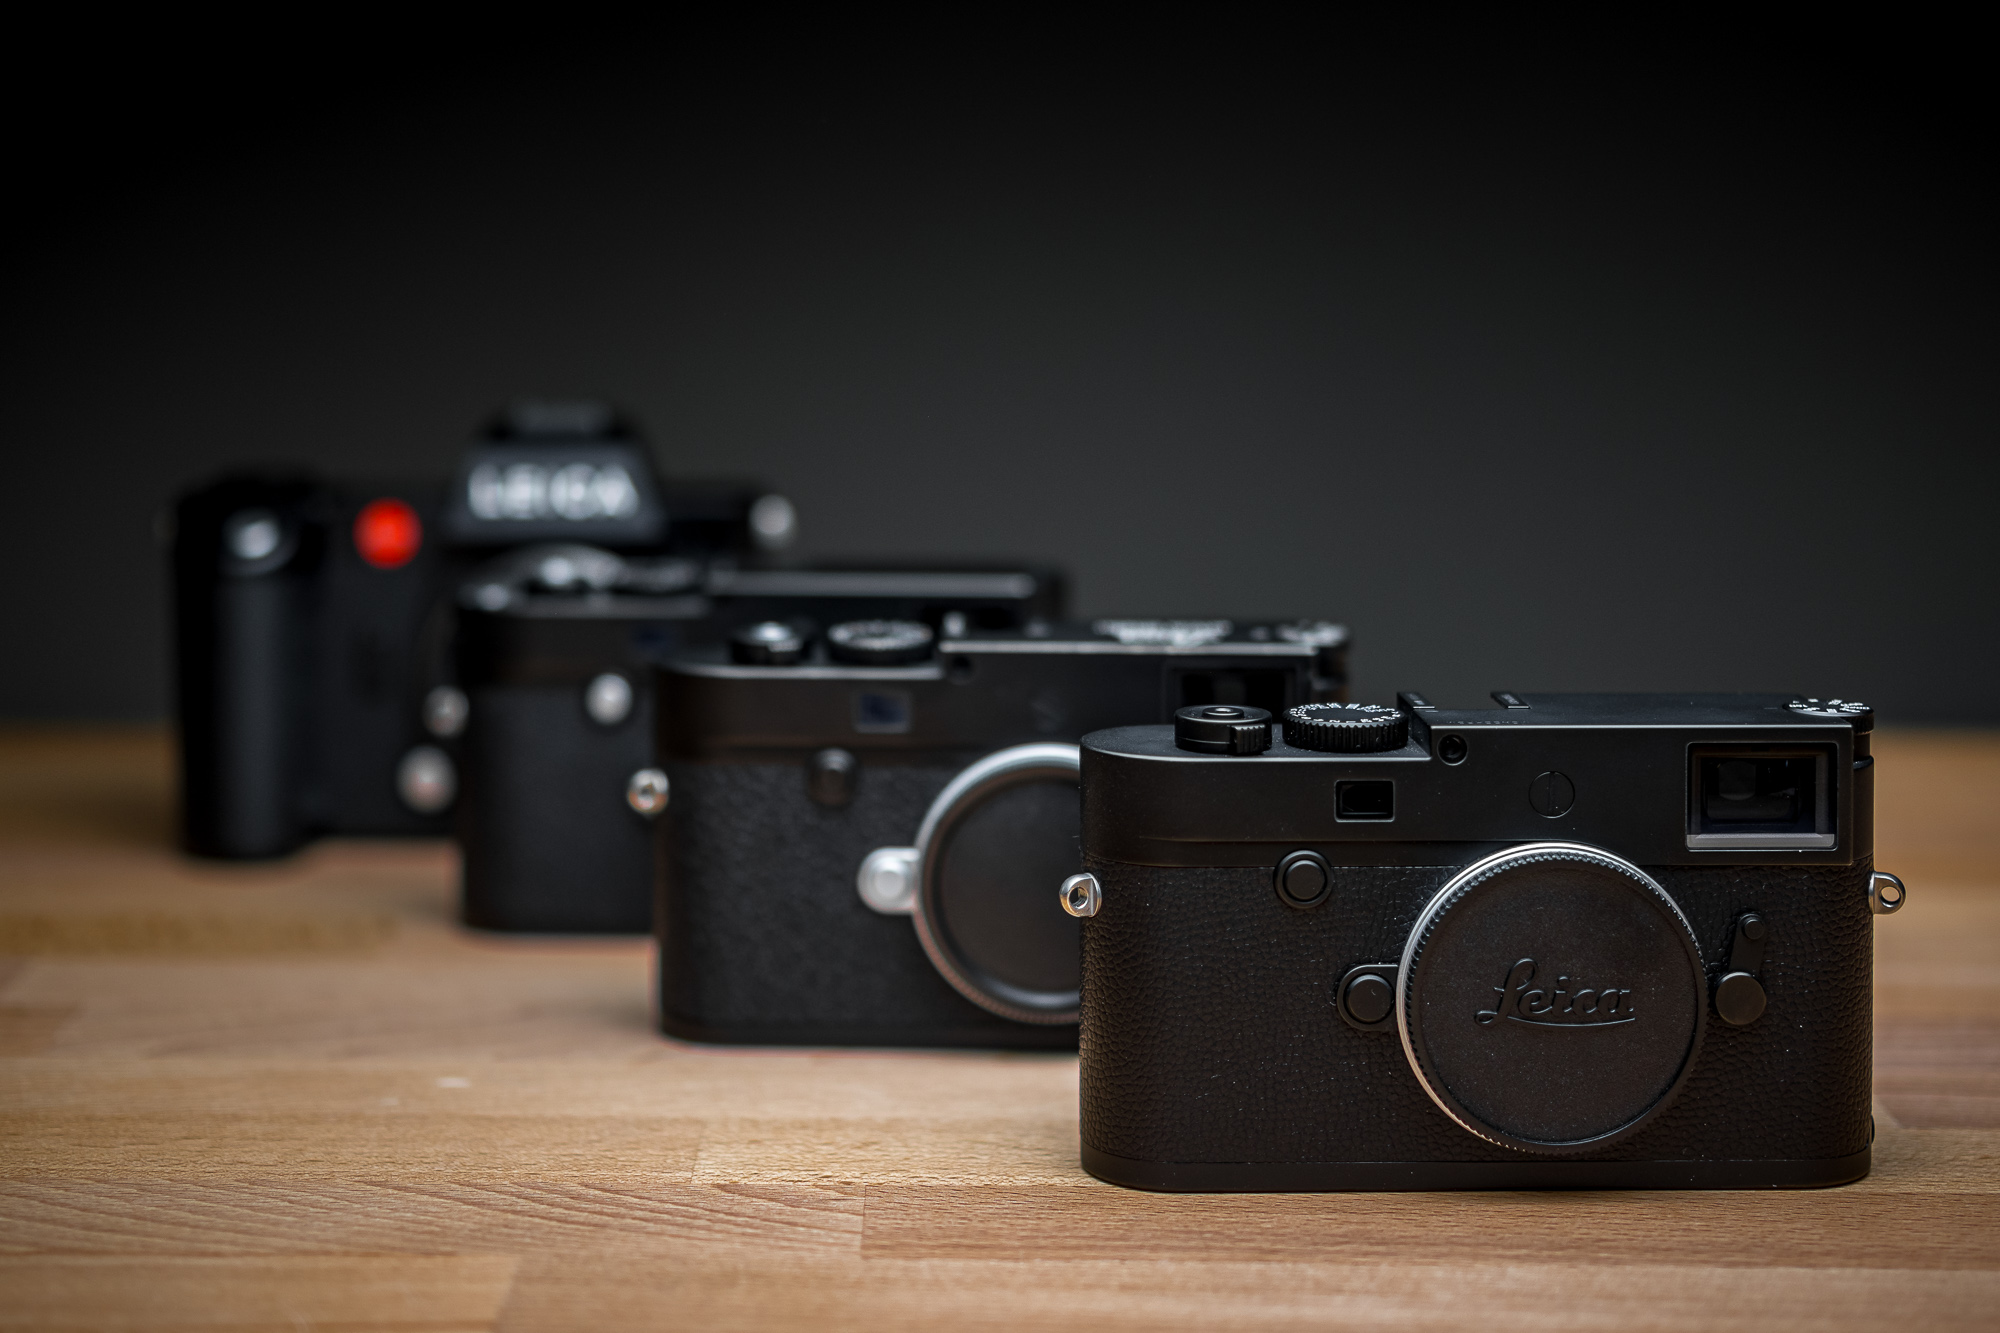
Testing is difficult. Testing is imperfect. And no single methodology will be ideal. But, I’ll explain my approach and reasoning behind it. Starting off, let’s take a look at our contenders for this showdown:
| Camera | Resolution | ISO Range | Sensor Type |
| Leica M10 Monochrom | 41 MP | 160 – 10000 | Monochome |
| Leica M Monochrom (Typ 246) | 24 MP | 320 – 25000 | Monochrome |
| Leica M10-P | 24 MP | 100 – 50000 | Color |
| Leica SL2 | 47 MP | 50 – 50000 | Color |
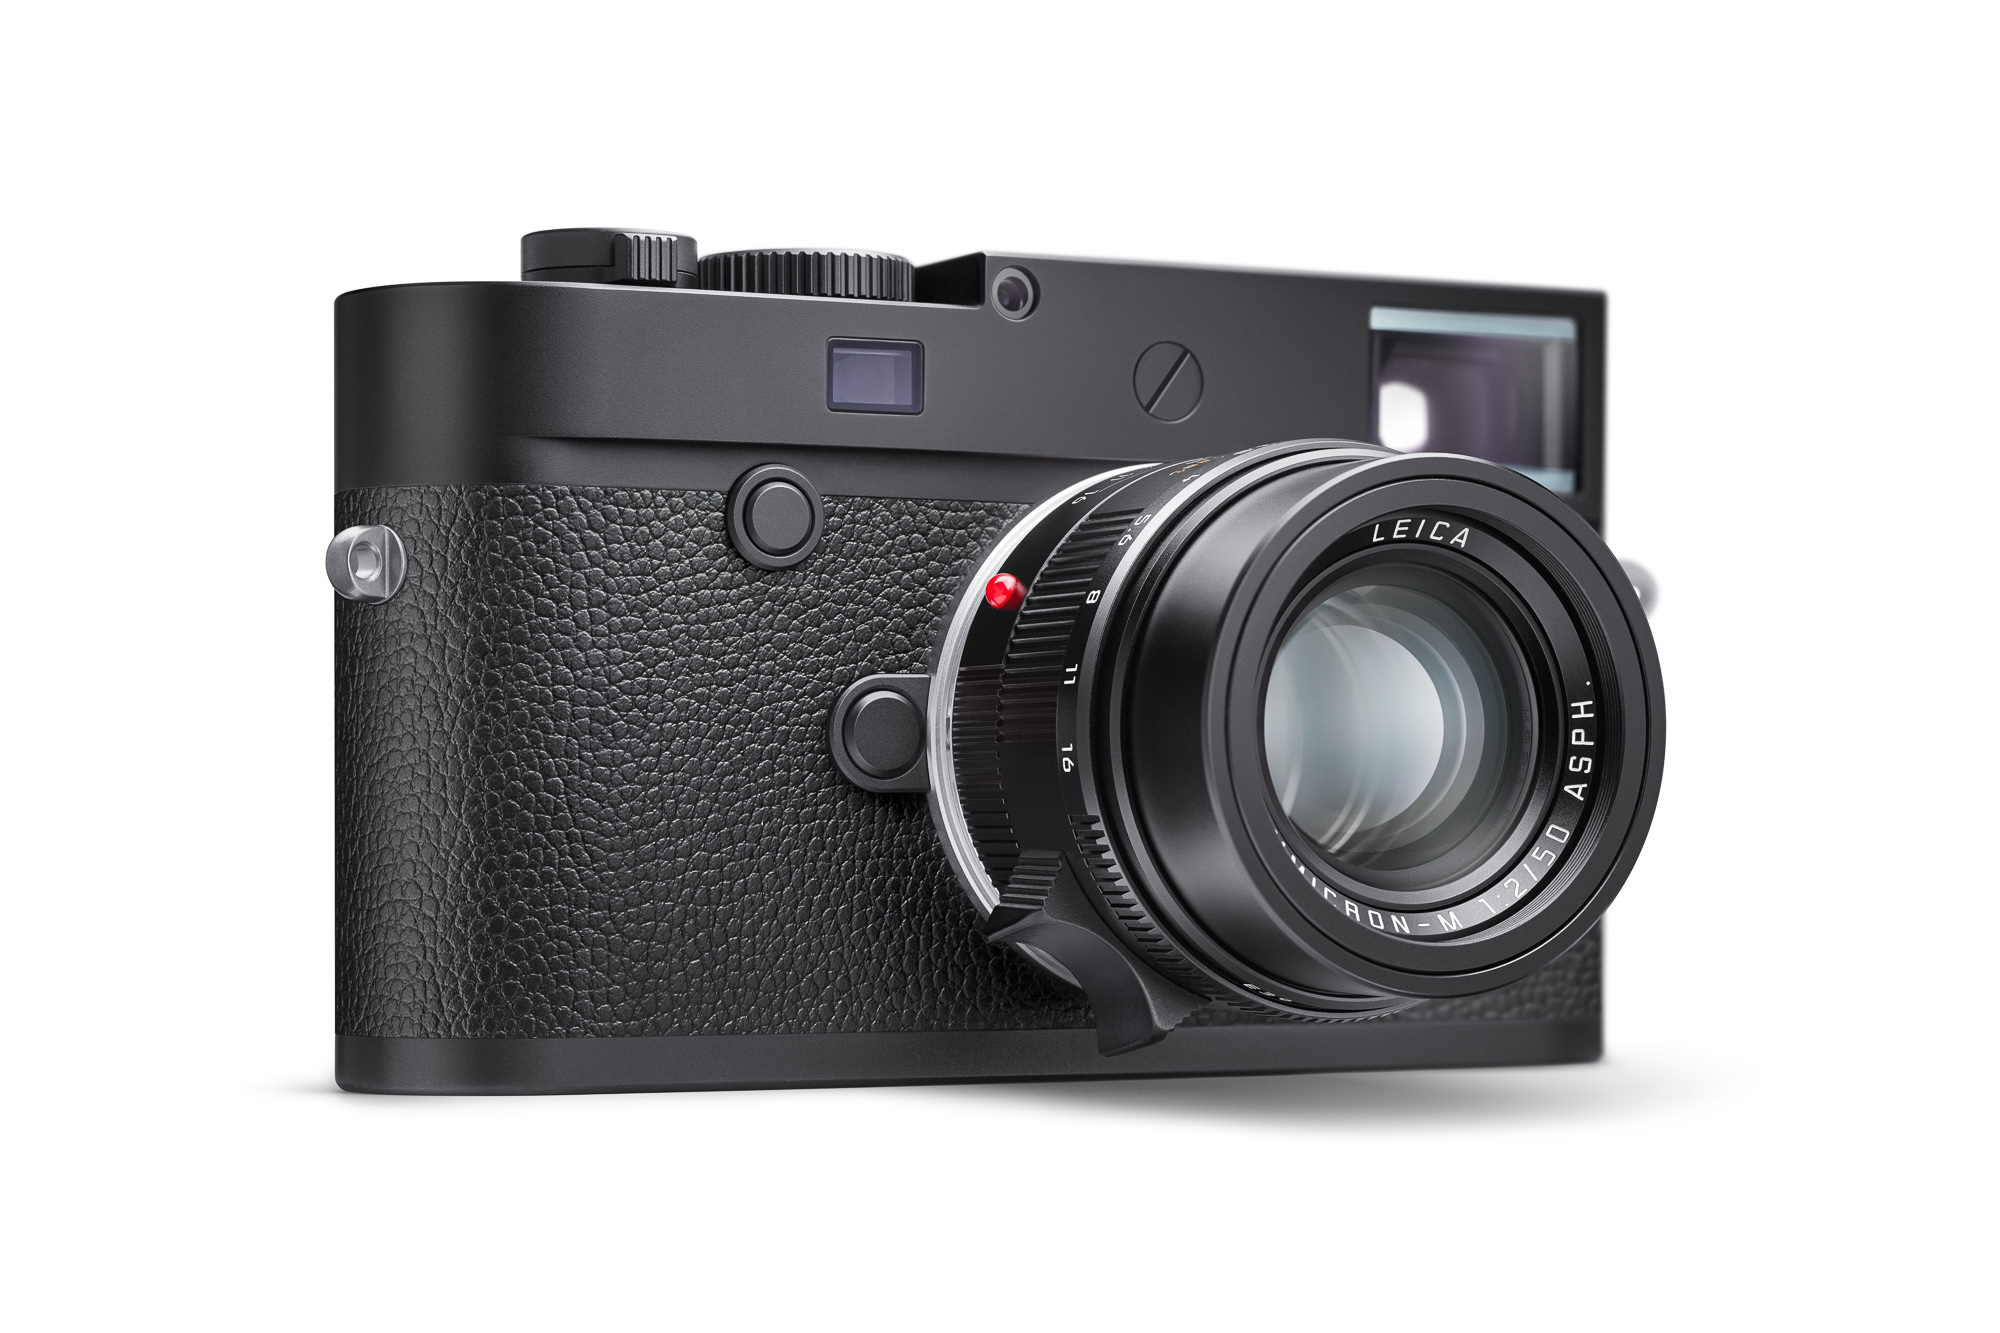
Clearly, there are a fair amount of dissimilarities in our round-up. Three different resolutions. Widely ranging ISO values. Color and monochrome sensors. Thankfully, we can use the same exceptional lens, the APO-Summicron-M 50mm f/2 ASPH, on all cameras. They also all feature live view with focus magnification allowing for critical focus off the sensor. But this is where the similarities end and the testing challenges begin.
ISO Range
Showing every single ISO value on all cameras wasn’t feasible. Not only are the lowest and highest values different on all (except for the max of 50000 on the M10-P and SL2), the SL2 only has whole ISO values, not thirds like the M cameras. This is slightly problematic as performance differences are typically apparent with small changes towards the upper end of the range. Thankfully, 1/3 stop moves were insignificant at lower ISO values, so I stuck to whole ISO steps at 6400 and below.
Past ISO 6400 we start to see some meaningful changes with each incremental bump, so I’ve included all 1/3 stop results all the way up to the M10M’s maximum of ISO 100000. Doing so created way more comparison sets, but I think most will appreciate the added granularity. In addition to the lack of 1/3 stops on the SL2, note that there are no discrete steps between ISO 12500 and ISO 25000 on the M246, so for 16000 and 20000 the M246 is still showing the 12500 result. Just be aware when viewing these comparisons.
With regards to the ISO range disparity, I chose to start at a common value of ISO 200, making a small exception for the M246 which competes here at ISO 320, as this is its base ISO. No, 200 isn’t base ISO for any of the other cameras, but there is no real quality sacrifice versus the actual base values.
At the top of the range, I let the M10M strut its stuff and show results all the way up to its maximum of ISO 100000. And since none of the other cameras go as high, I freeze them at their respective upper limits. Bear this in mind as well when looking at the comparison images. While only showing the changes in the M10 Monochrom, I do think quantifying the improvement relative to the other cameras is useful.
I decided against underexposing and pushing the exposure in post processing to emulate even higher ISO values. The reality is that while possibly interesting to some, I can’t realistically imagine anyone actually doing this in a real shooting scenario.
Resolution
Four cameras, three different resolutions. In our test grouping, we’ve got 47, 41, 24 and 24 megapixels. For this challenge, I took a two-pronged approach. First, after taking into account the SL2 not fitting into the granular ISO comparisons due to its whole stop ISO limitation, along with its sizable megapixel disparity with all the other cameras here, I omitted it from the all-camera match-up. What you’ll see below are 3-way match-ups between all the M cameras. But don’t worry. I did include the SL2, just in a separate series below versus the M10 Monochrom, both at full native resolution.
With the SL2 eliminated from the main M camera match-up, we’re still left with the M10 Monochrom at 41 megapixels pitted against two 24 megapixel cameras. So, in an attempt to produce the most apples-to-apples comparison, I downsampled the M10M files to 24 megapixels. Why not scale the others up to 41? Well, I vehemently oppose uprezzing beyond native resolution as you can’t make something from nothing, and doing so can create additional artifacts. But, reducing size to match up actually makes some sense.
Let’s suppose for this test, instead of 100% crops displayed on screen, I made 24 x 36 inch prints. In essence, I would be downscaling the higher resolution image to match the other two. Except we don’t think of it that way. Rather, the larger image file benefits by requiring less enlargement. So while at first, reducing the resolution advantage in this case may seem counterintuitive, if we simply consider this a test at a given output size, it actually does make sense.
And if you want to see the full resolution difference on display, I’ve included that as well. To simplify this additional series, I’ve matched up the M10 Monochrom against its predecessor the M Monohcrom (Typ 246) and only included one photo per ISO. I did warn you about there being a lot of images. But this way, everyone should be (mostly) satisfied.
Full Size Images Download
Now, just in case all the following comparisons don’t fully satisfy your curiosity and you want to do your own evaluations, I’m leaving a link to download the full resolution exports for each camera at (almost) every ISO. The images were output directly from Lightroom as non-resized JPGs, with no output sharpening and saved at a quality level of 100. For all intents and purposes, they are on par quality-wise with TIFF files.
The Test
With all the reasoning out of the way, time to move onto to the test setup and methodology.
Like my previous B&W ISO Showdown five years ago, I went with an Italian food-themed tabletop setup as it offers a wide variety of detail, texture and tonality. A big thanks to our office manager Rayssa for styling the scene better than I ever could. Unlike the last time around, I opted to use controlled studio lighting rather than window light. The continuous studio light affords far more control with regards to exposure and white balance, as well as 100% consistency from shot to shot. For lighting, I’m using a single Intellytech Light Cannon F-165 Bi-Color LED Fresnel. With a CRI of 97+, this is an extremely accurate, flicker-free professional cine light with full spectrum illumination.
All cameras were mounted on my Gitzo 3-Series tripod and Really Right Stuff BH-55 ball head using Arca-style quick release plates. The same APO-Summicron 50mm f/2 ASPH lens was mounted on all cameras, with the addition of the M-Adapter-L for use on the SL2. Focus for all shots was on the text of the balsamic vinegar bottle and was achieved in live view with focus magnification assist. The aperture was set to f/8 and the cameras were put into Aperture priority mode.
I first set the exposure of the M10 Monochrom as it has the widest ISO range and I needed to be sure that the shutter speed for this highest setting wouldn’t exceed 1/400th of a second, the fastest available shutter speed. Then, all cameras were shot at base ISO, adjusting exposure compensation as needed to match up to the M10M as a reference. Once exposures were squared away, I shot a full ISO series on each camera using the 2-second self timer to avoid any possible vibration. And even after all that, there was still slight framing differences between the cameras.
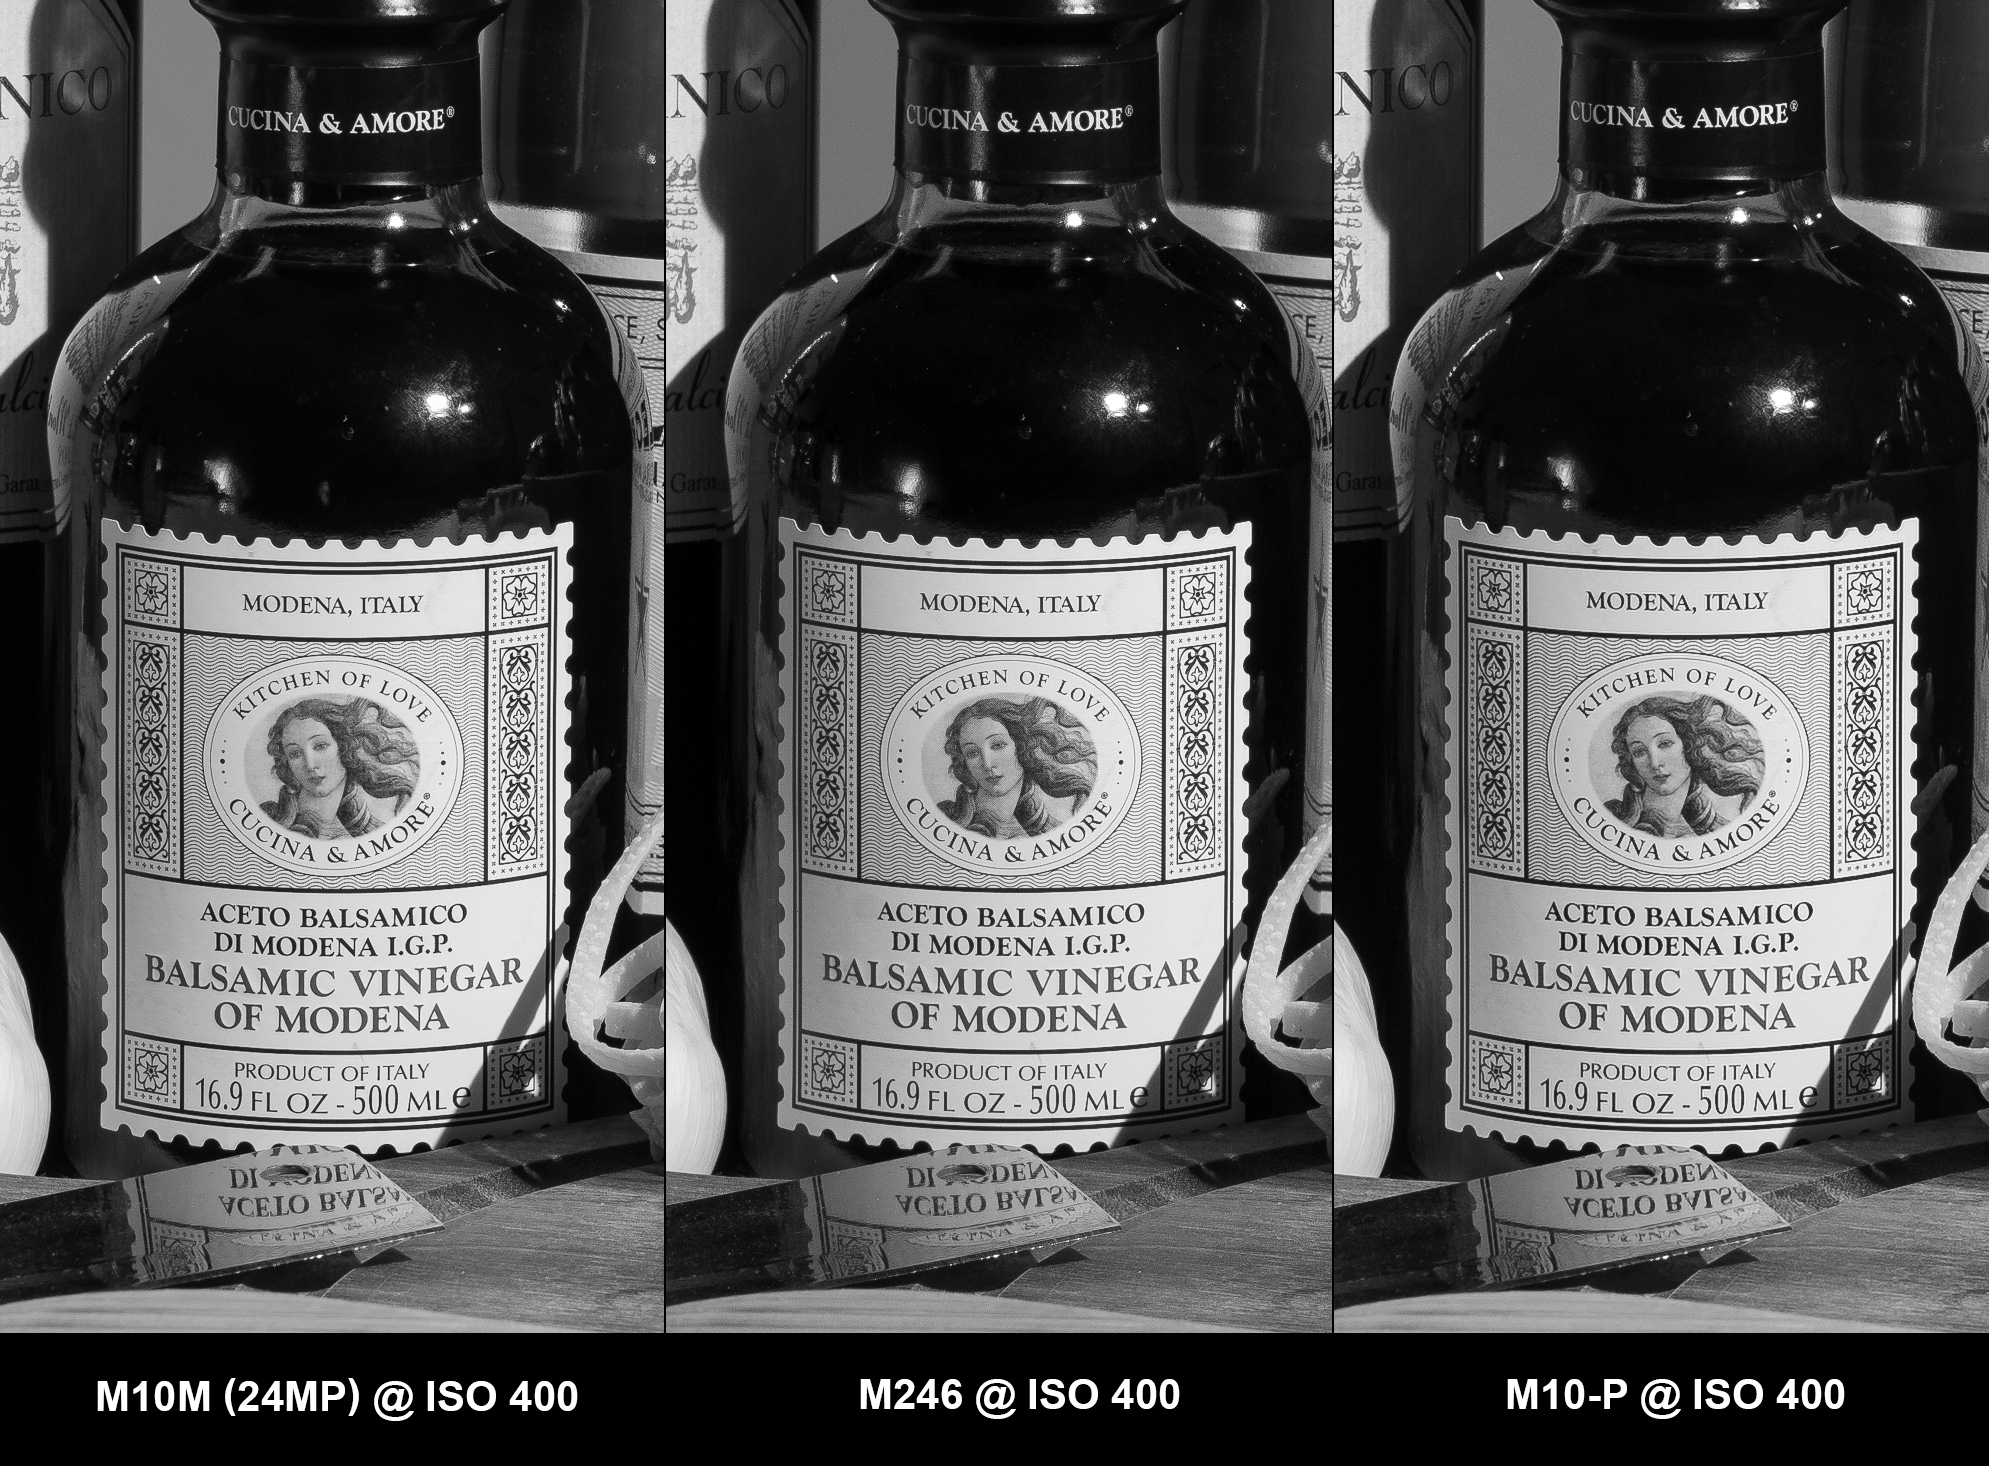
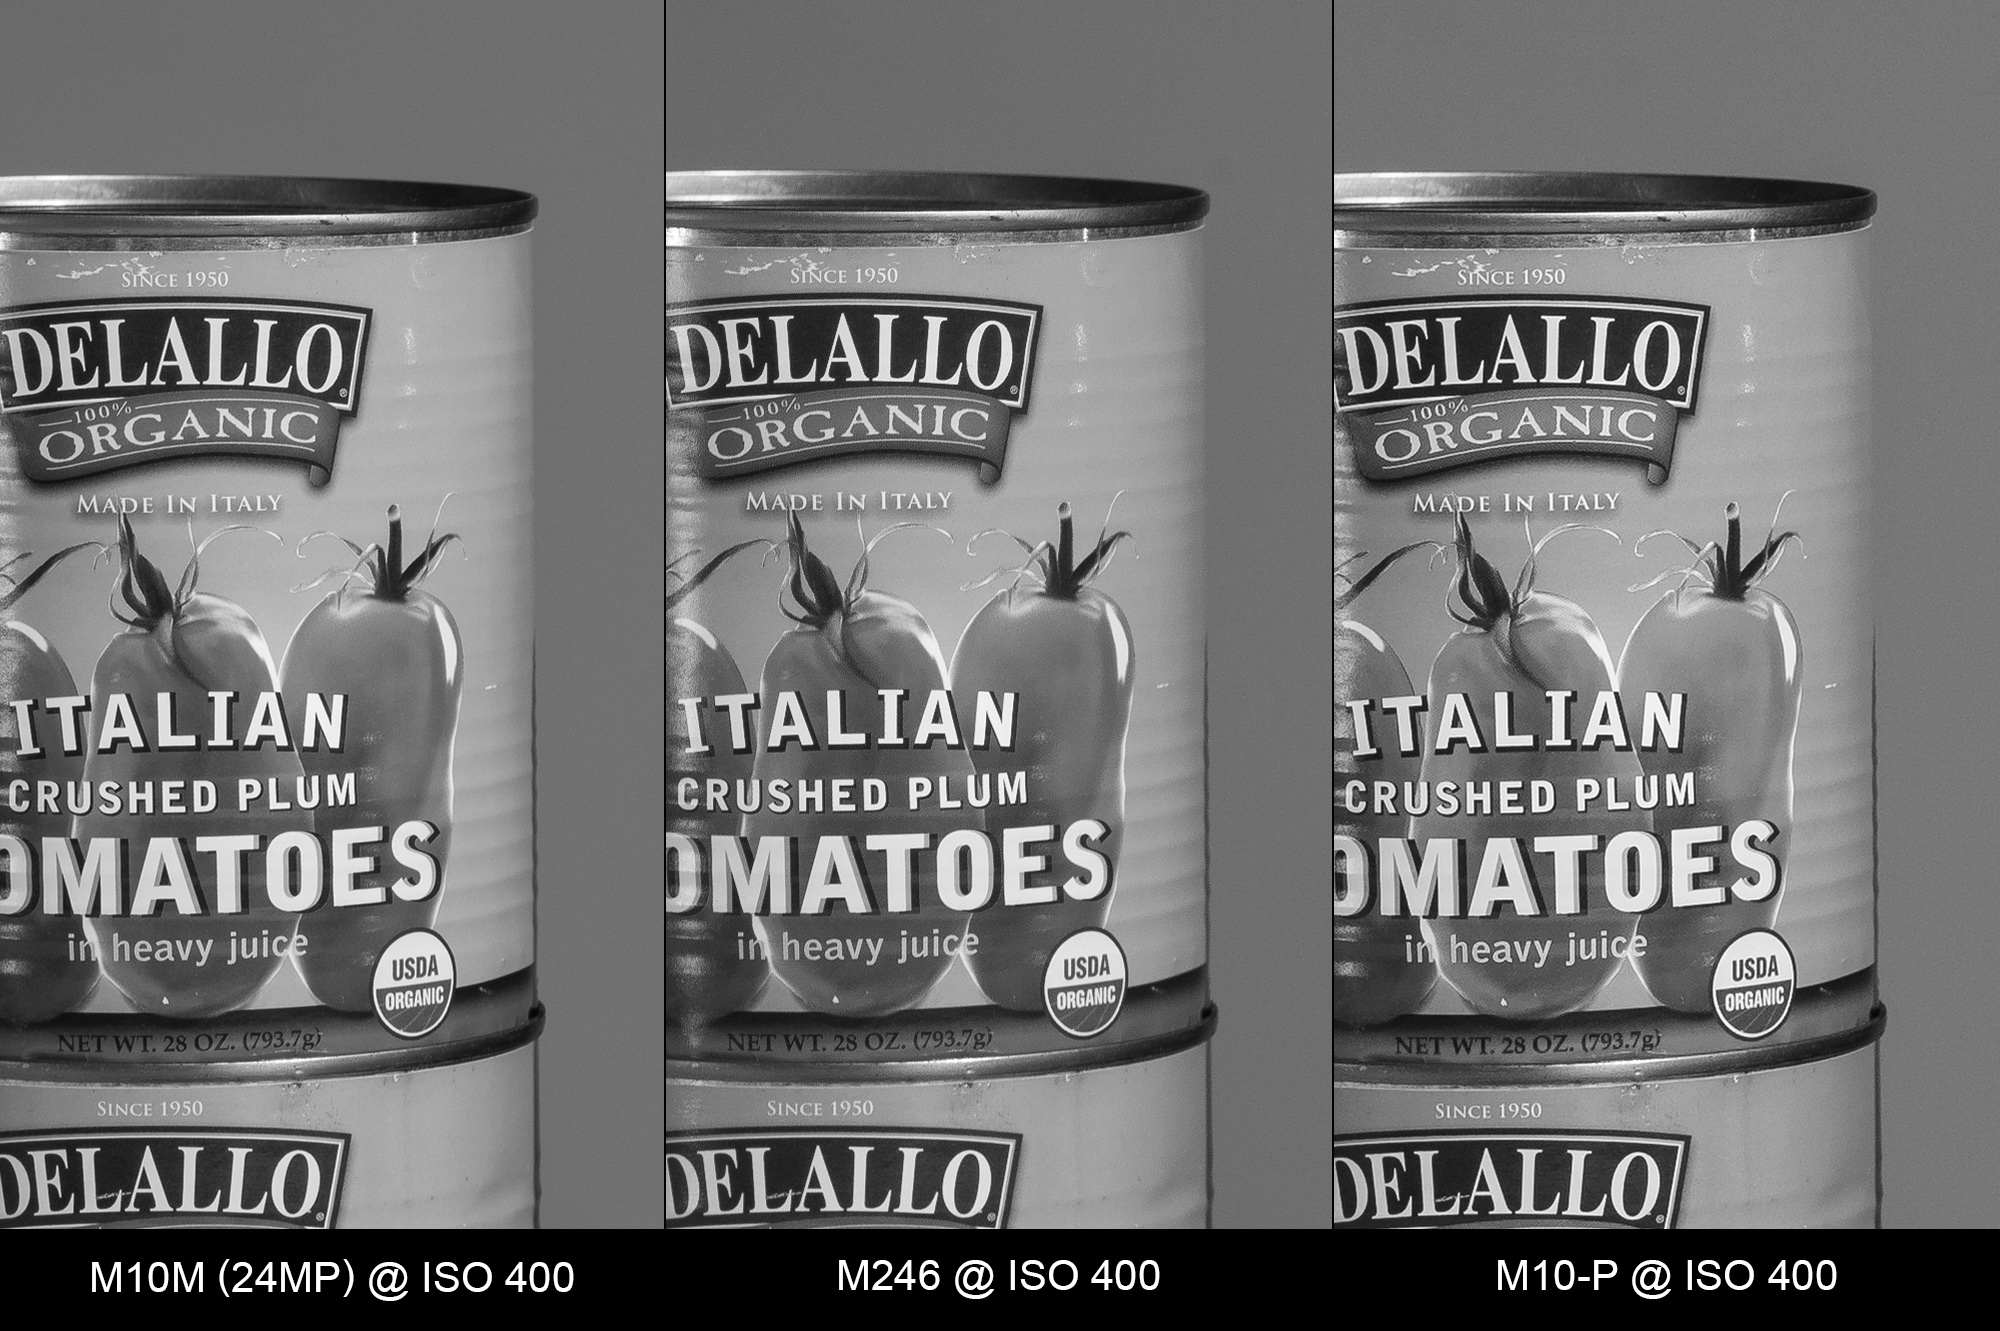
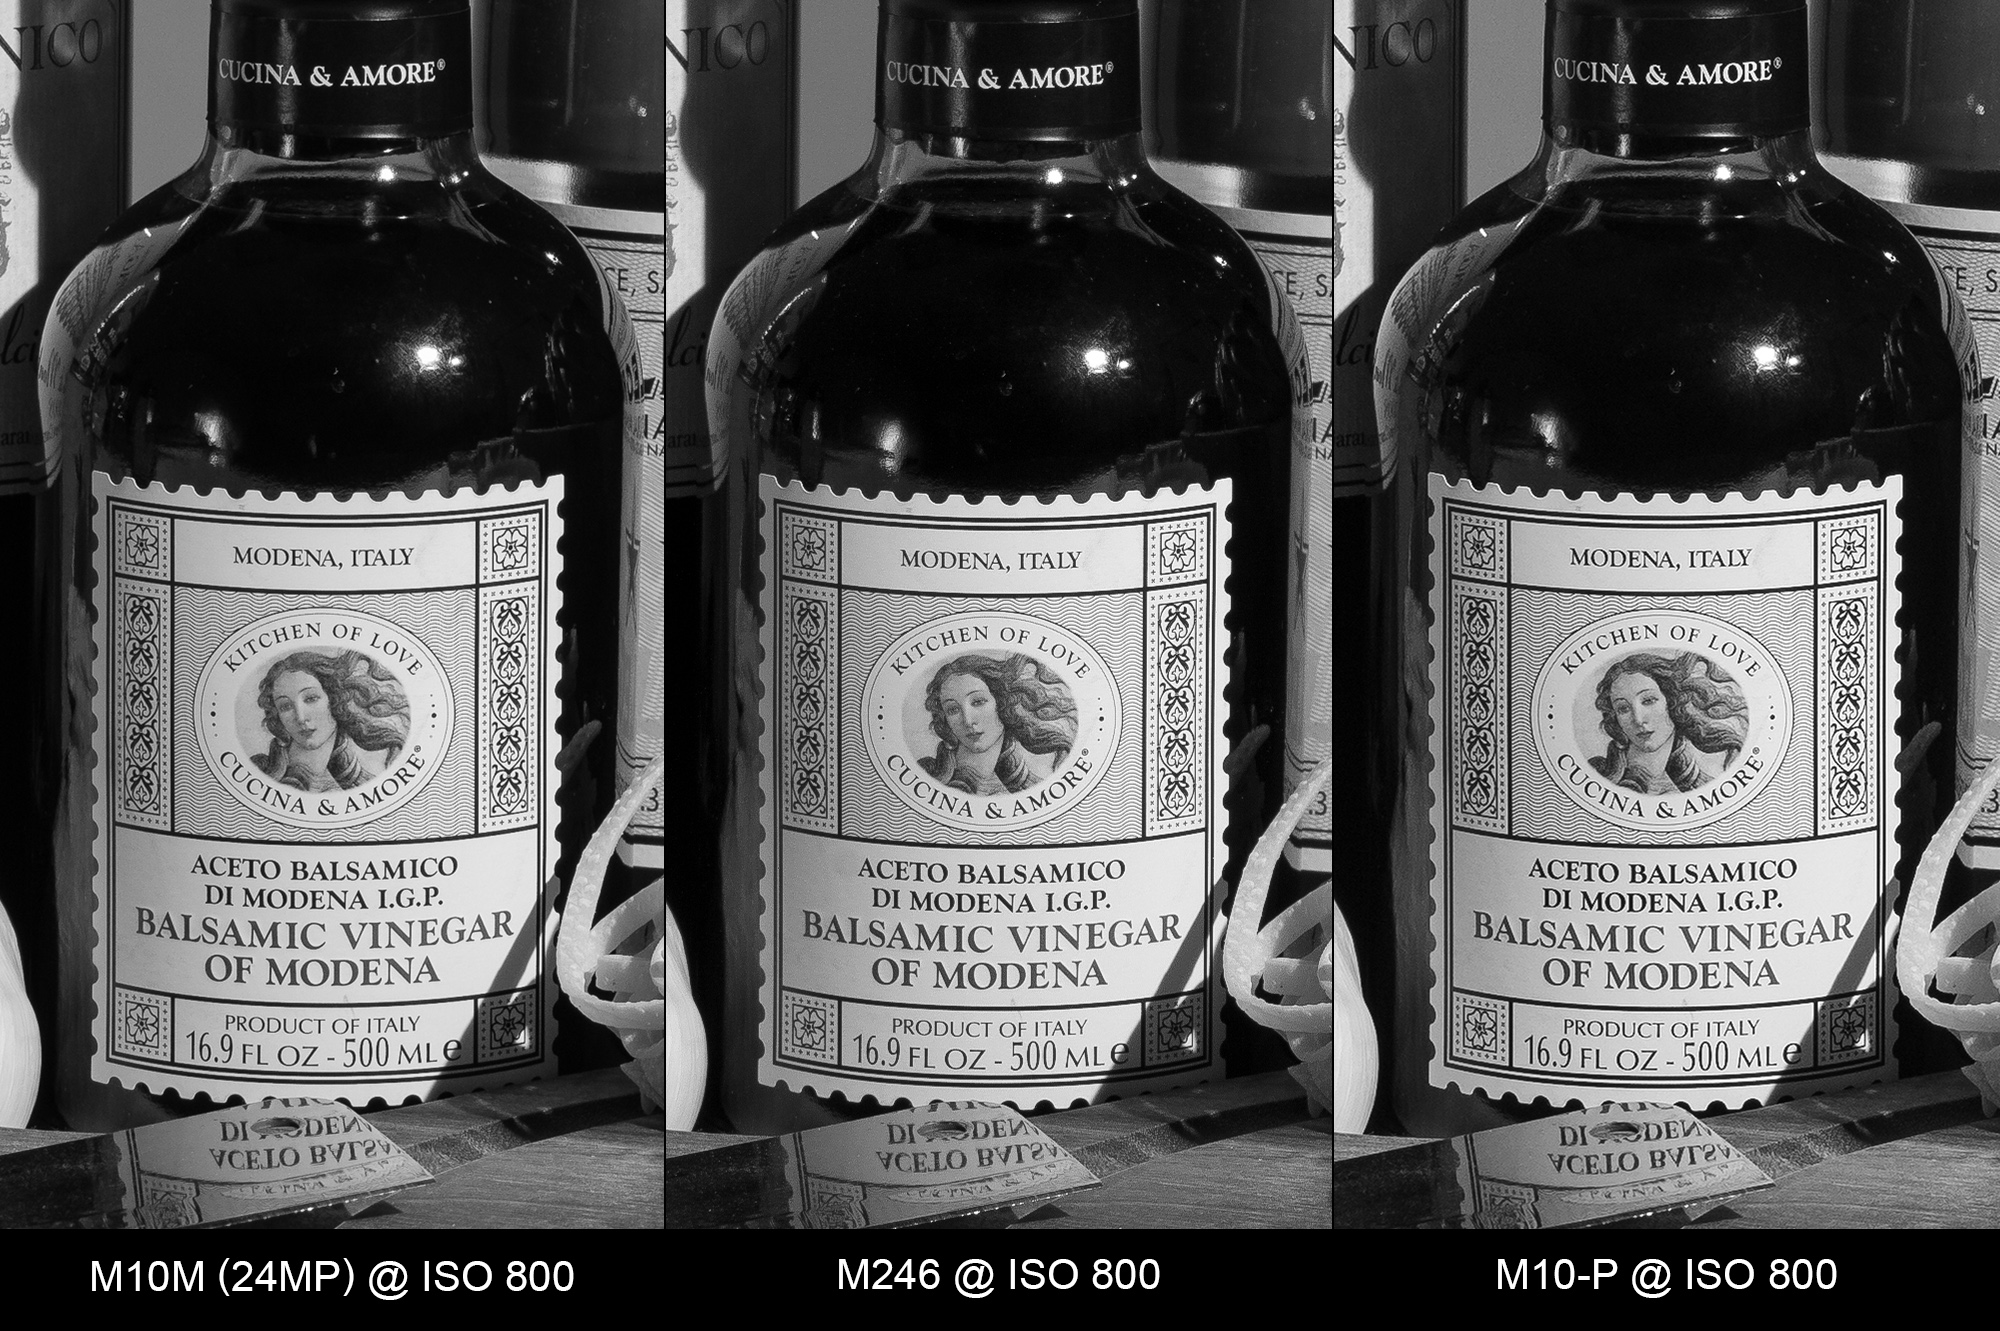
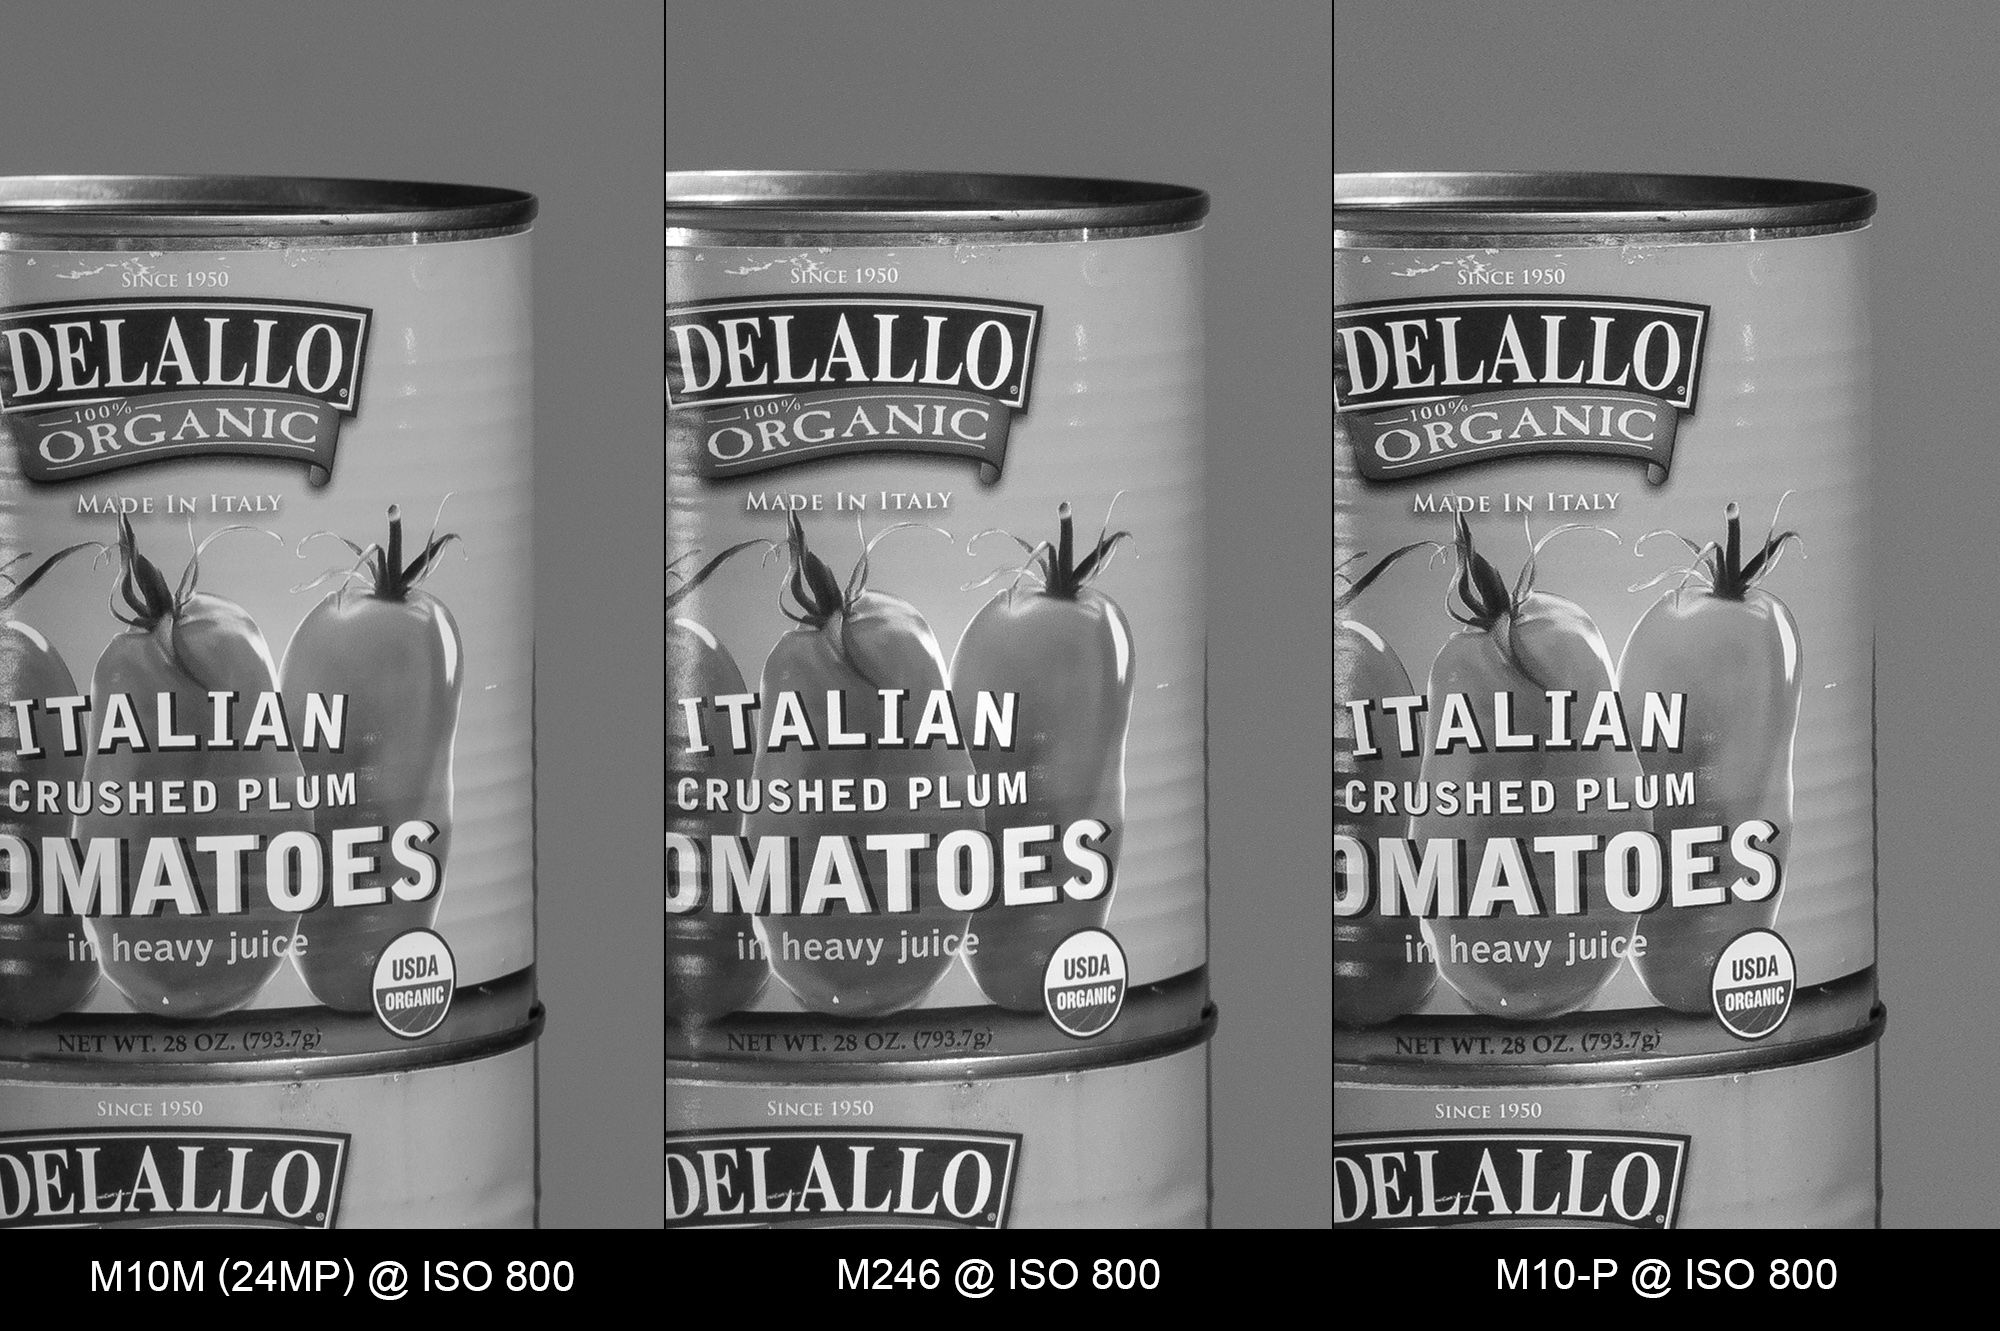
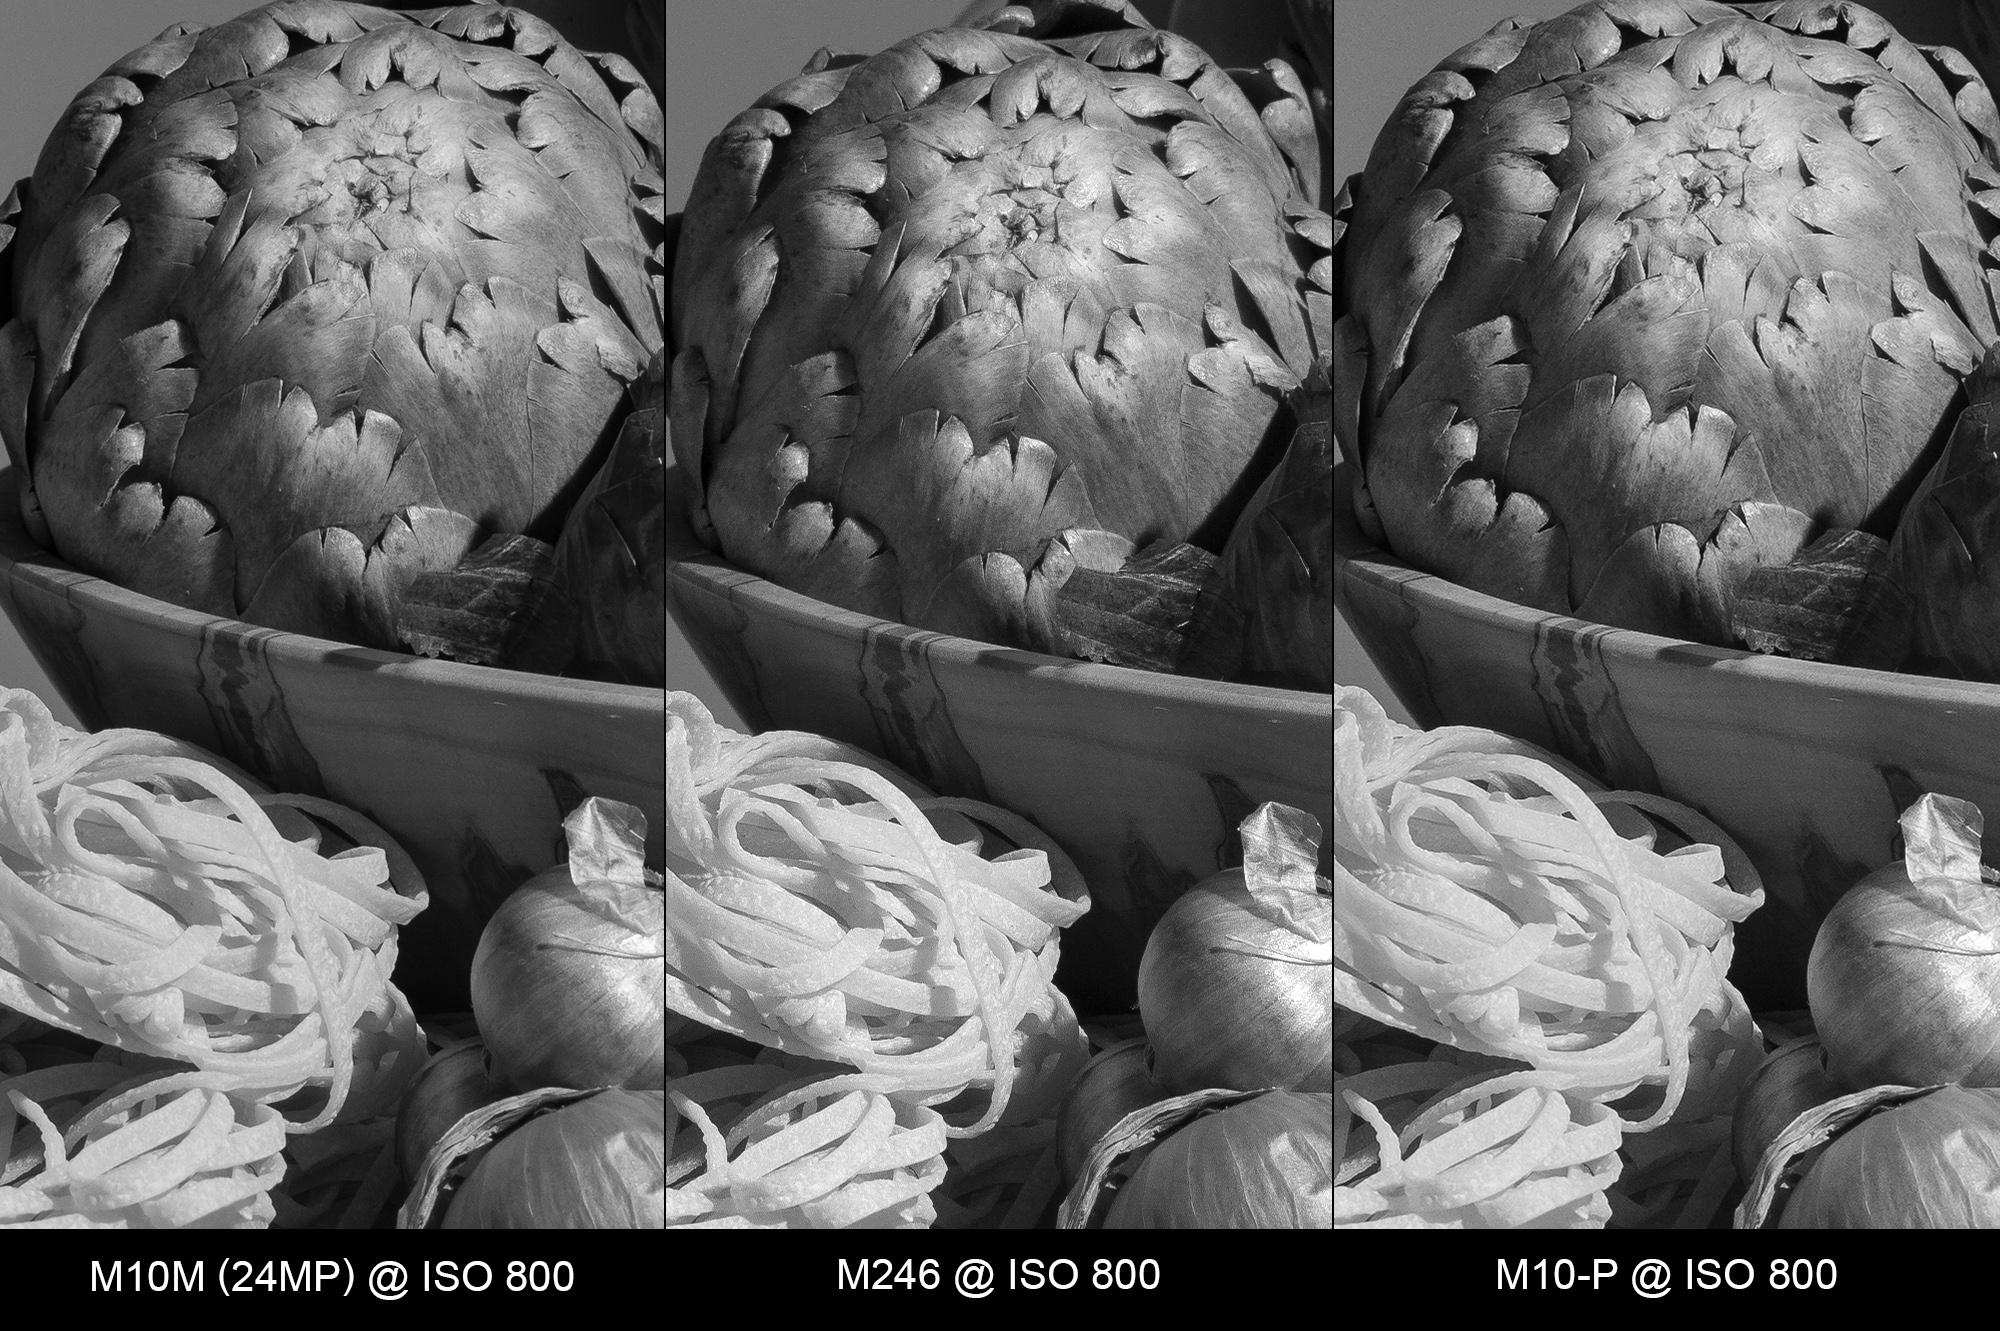
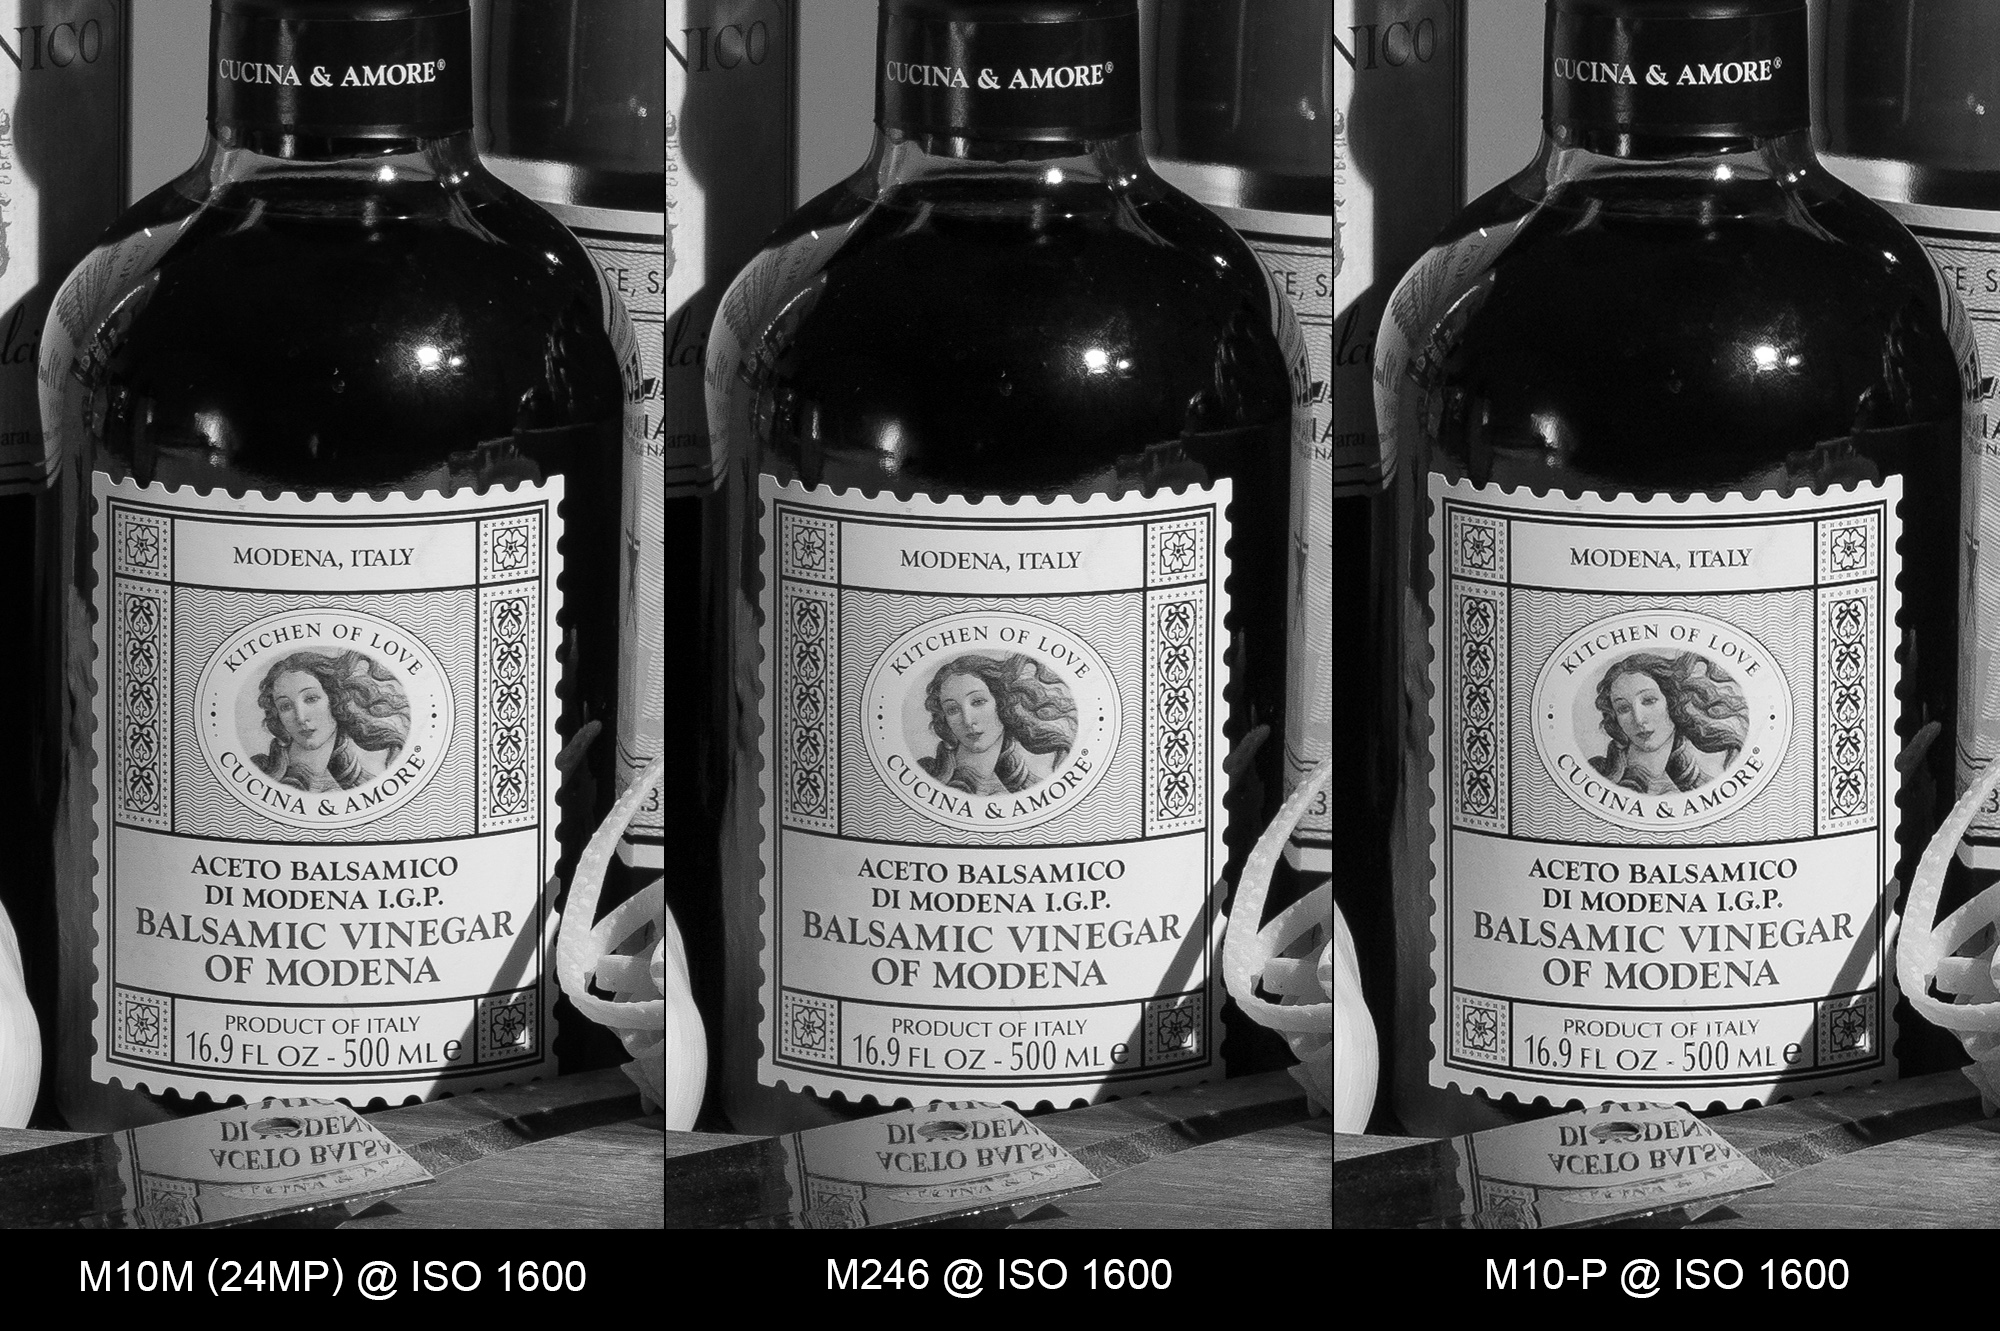
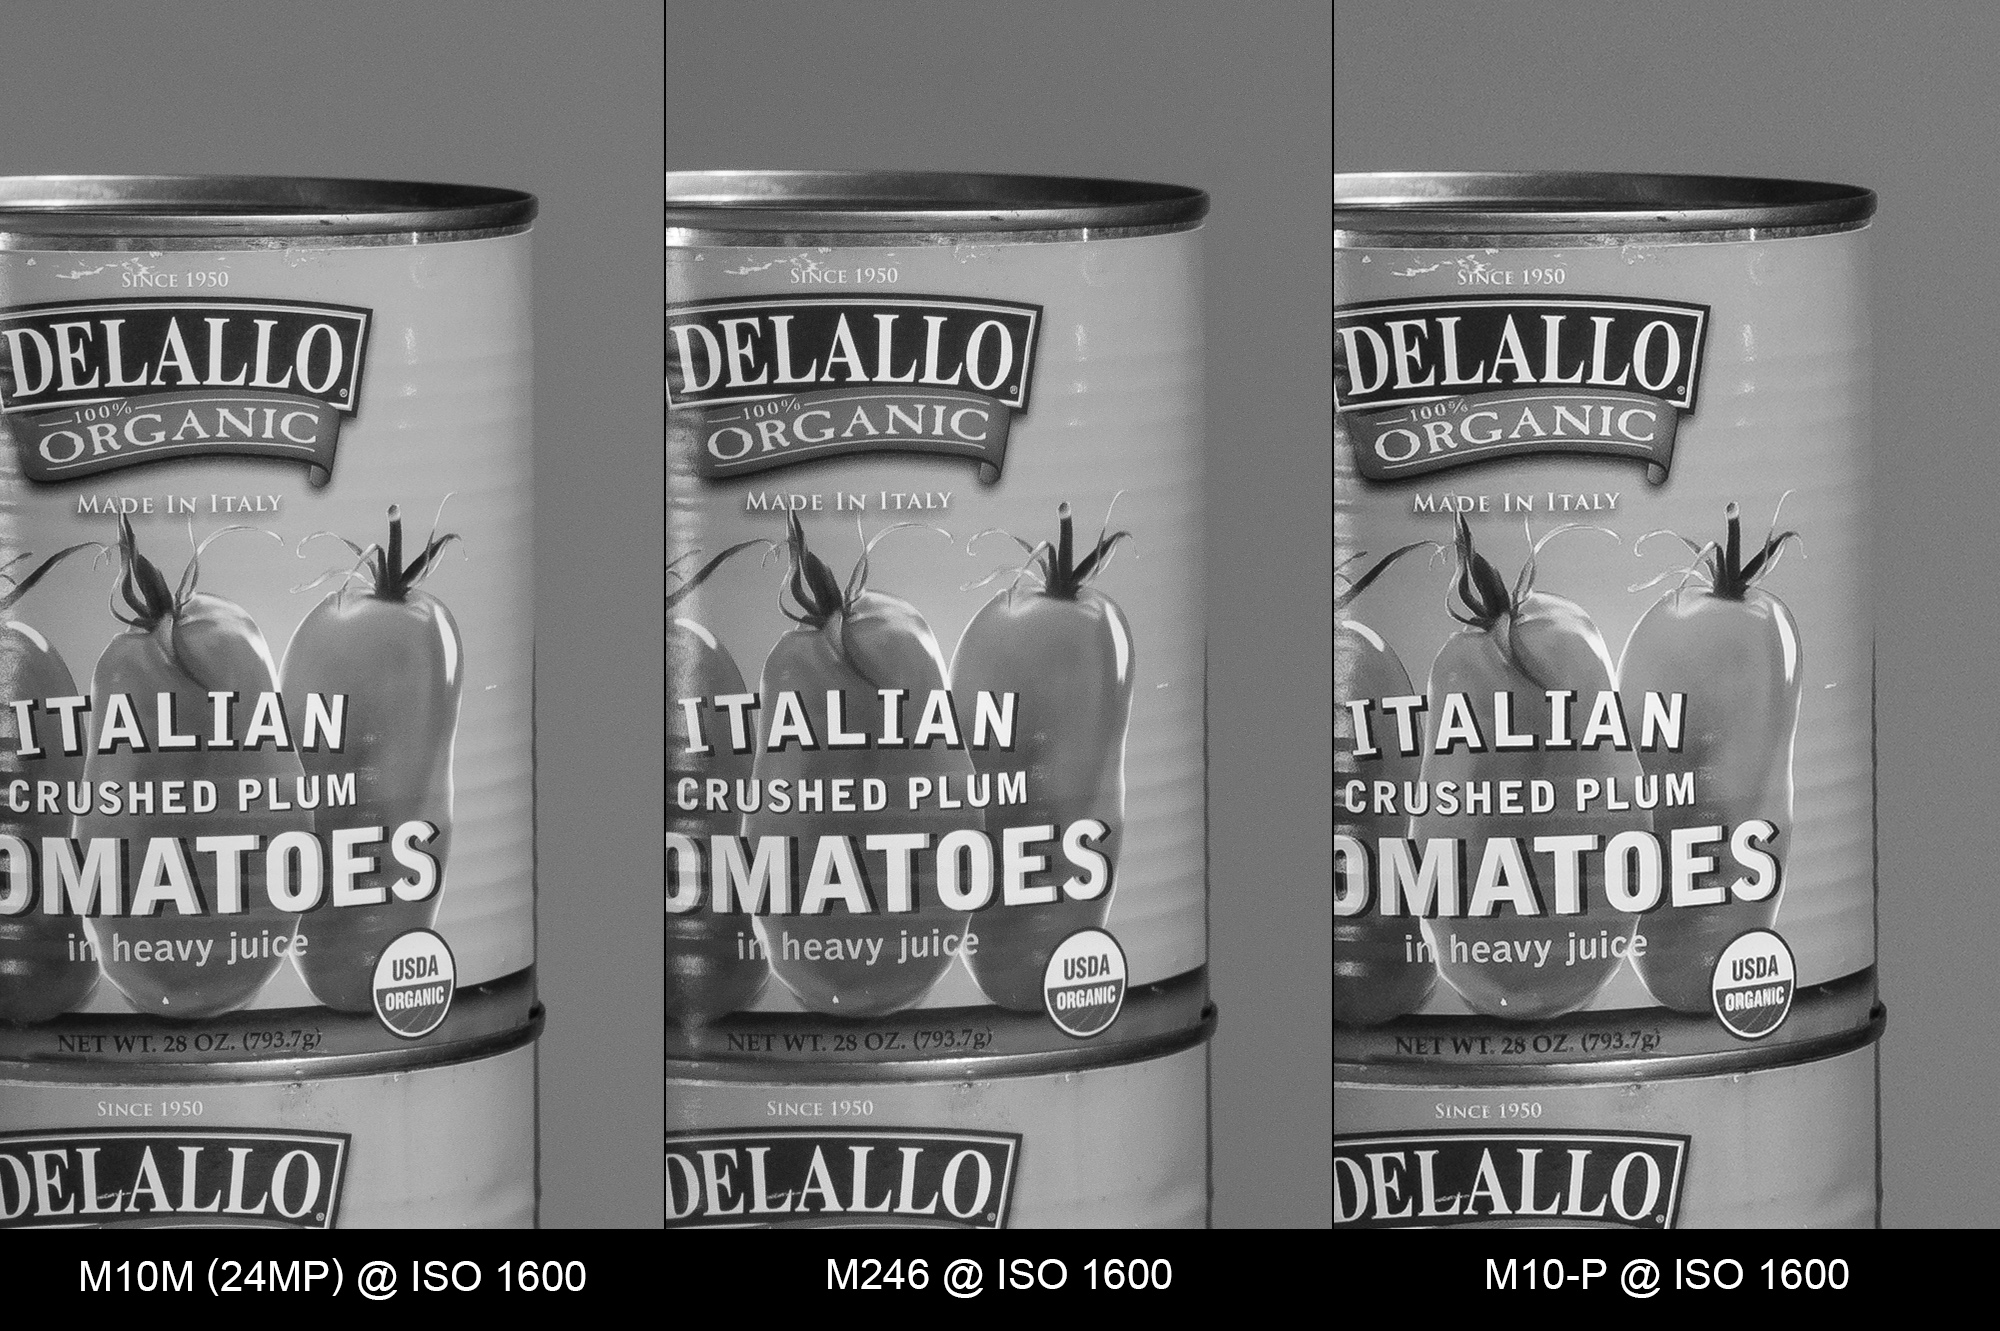
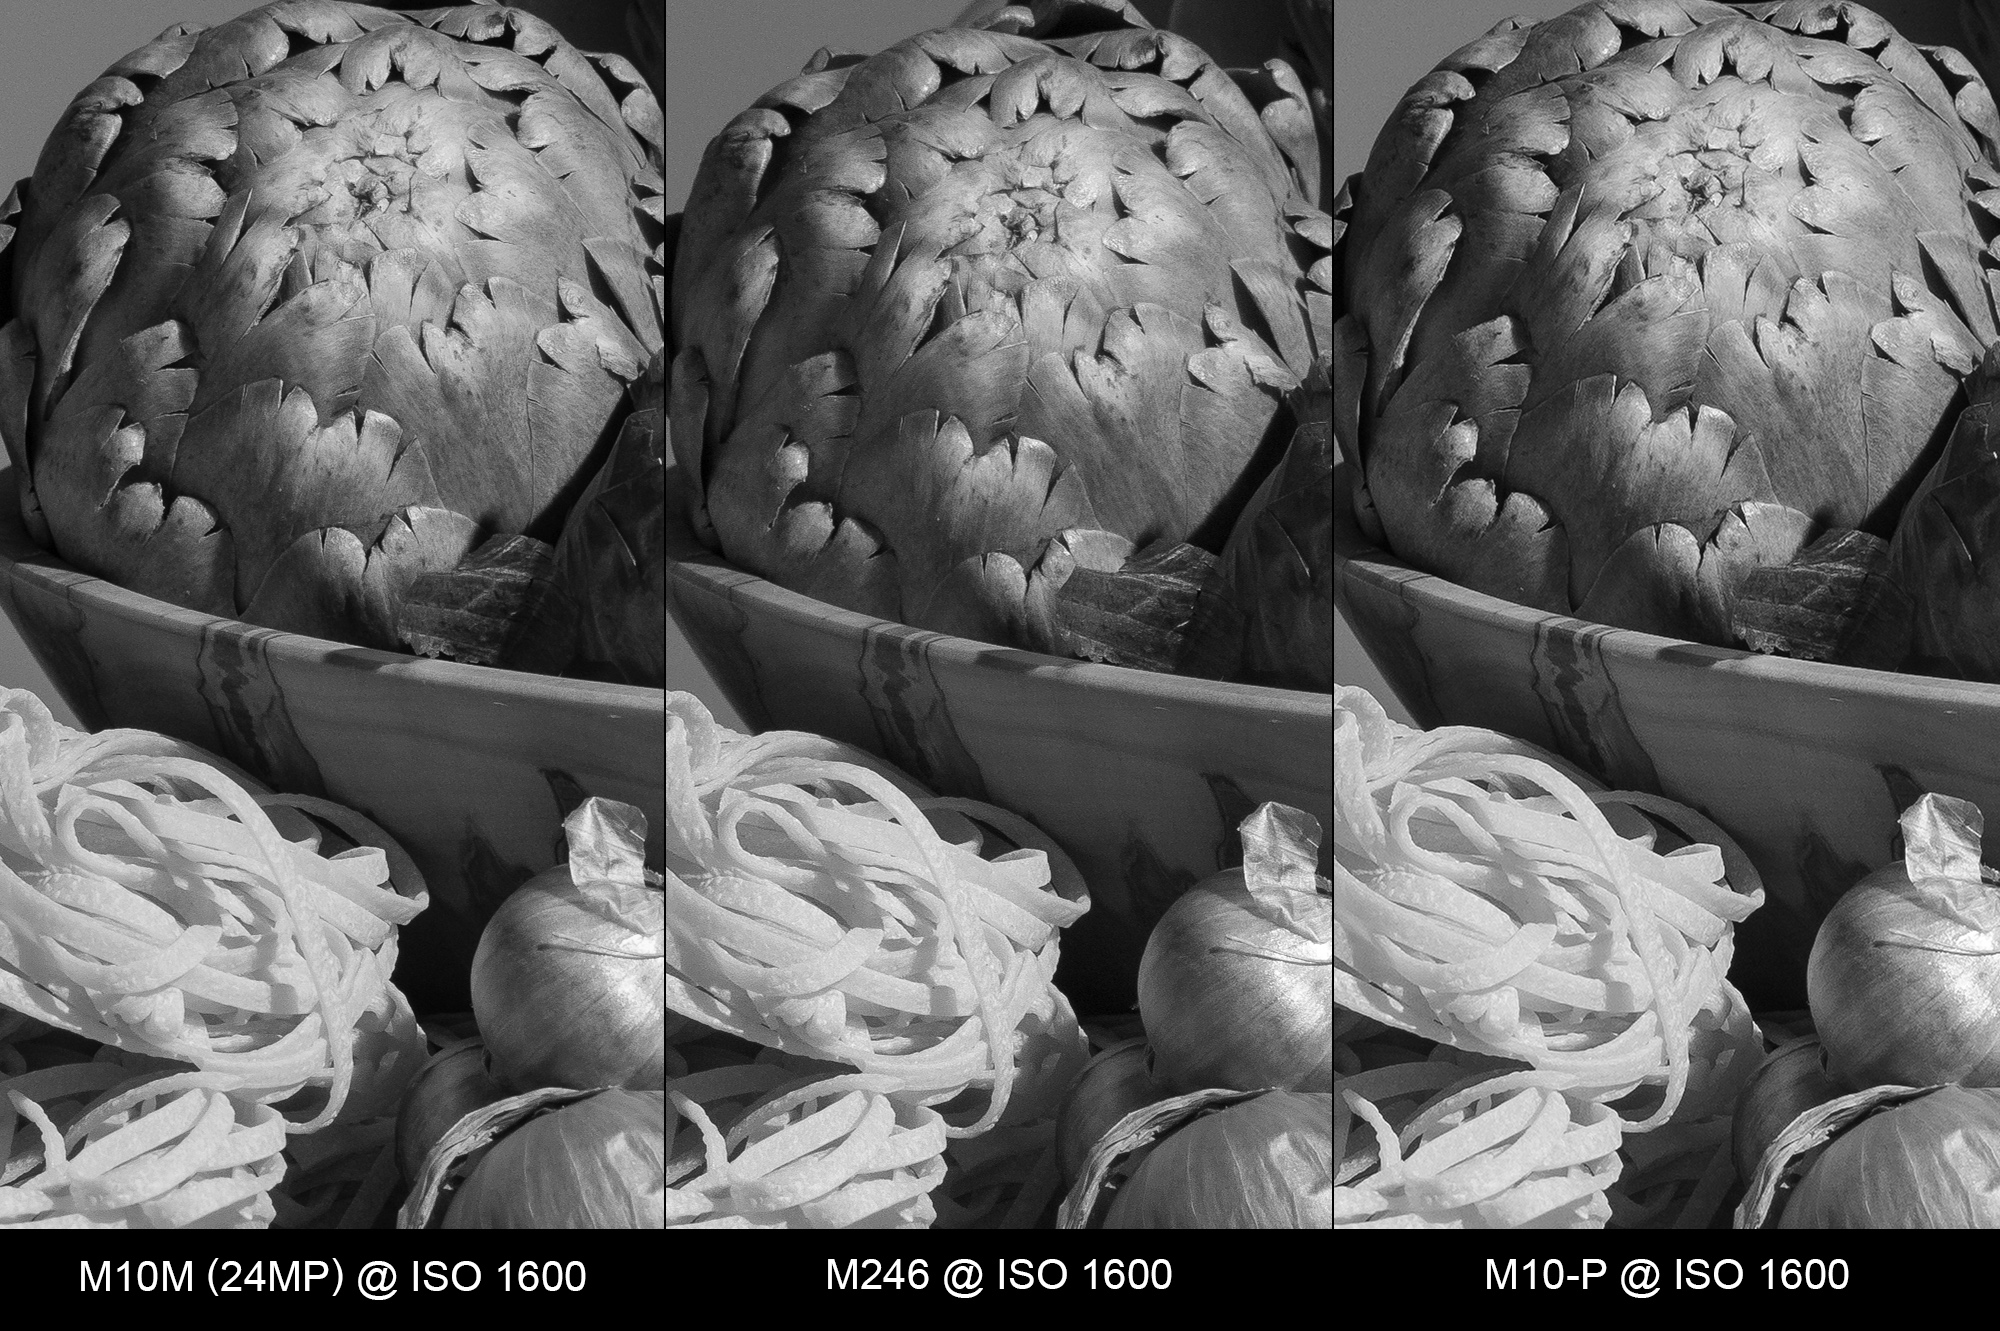
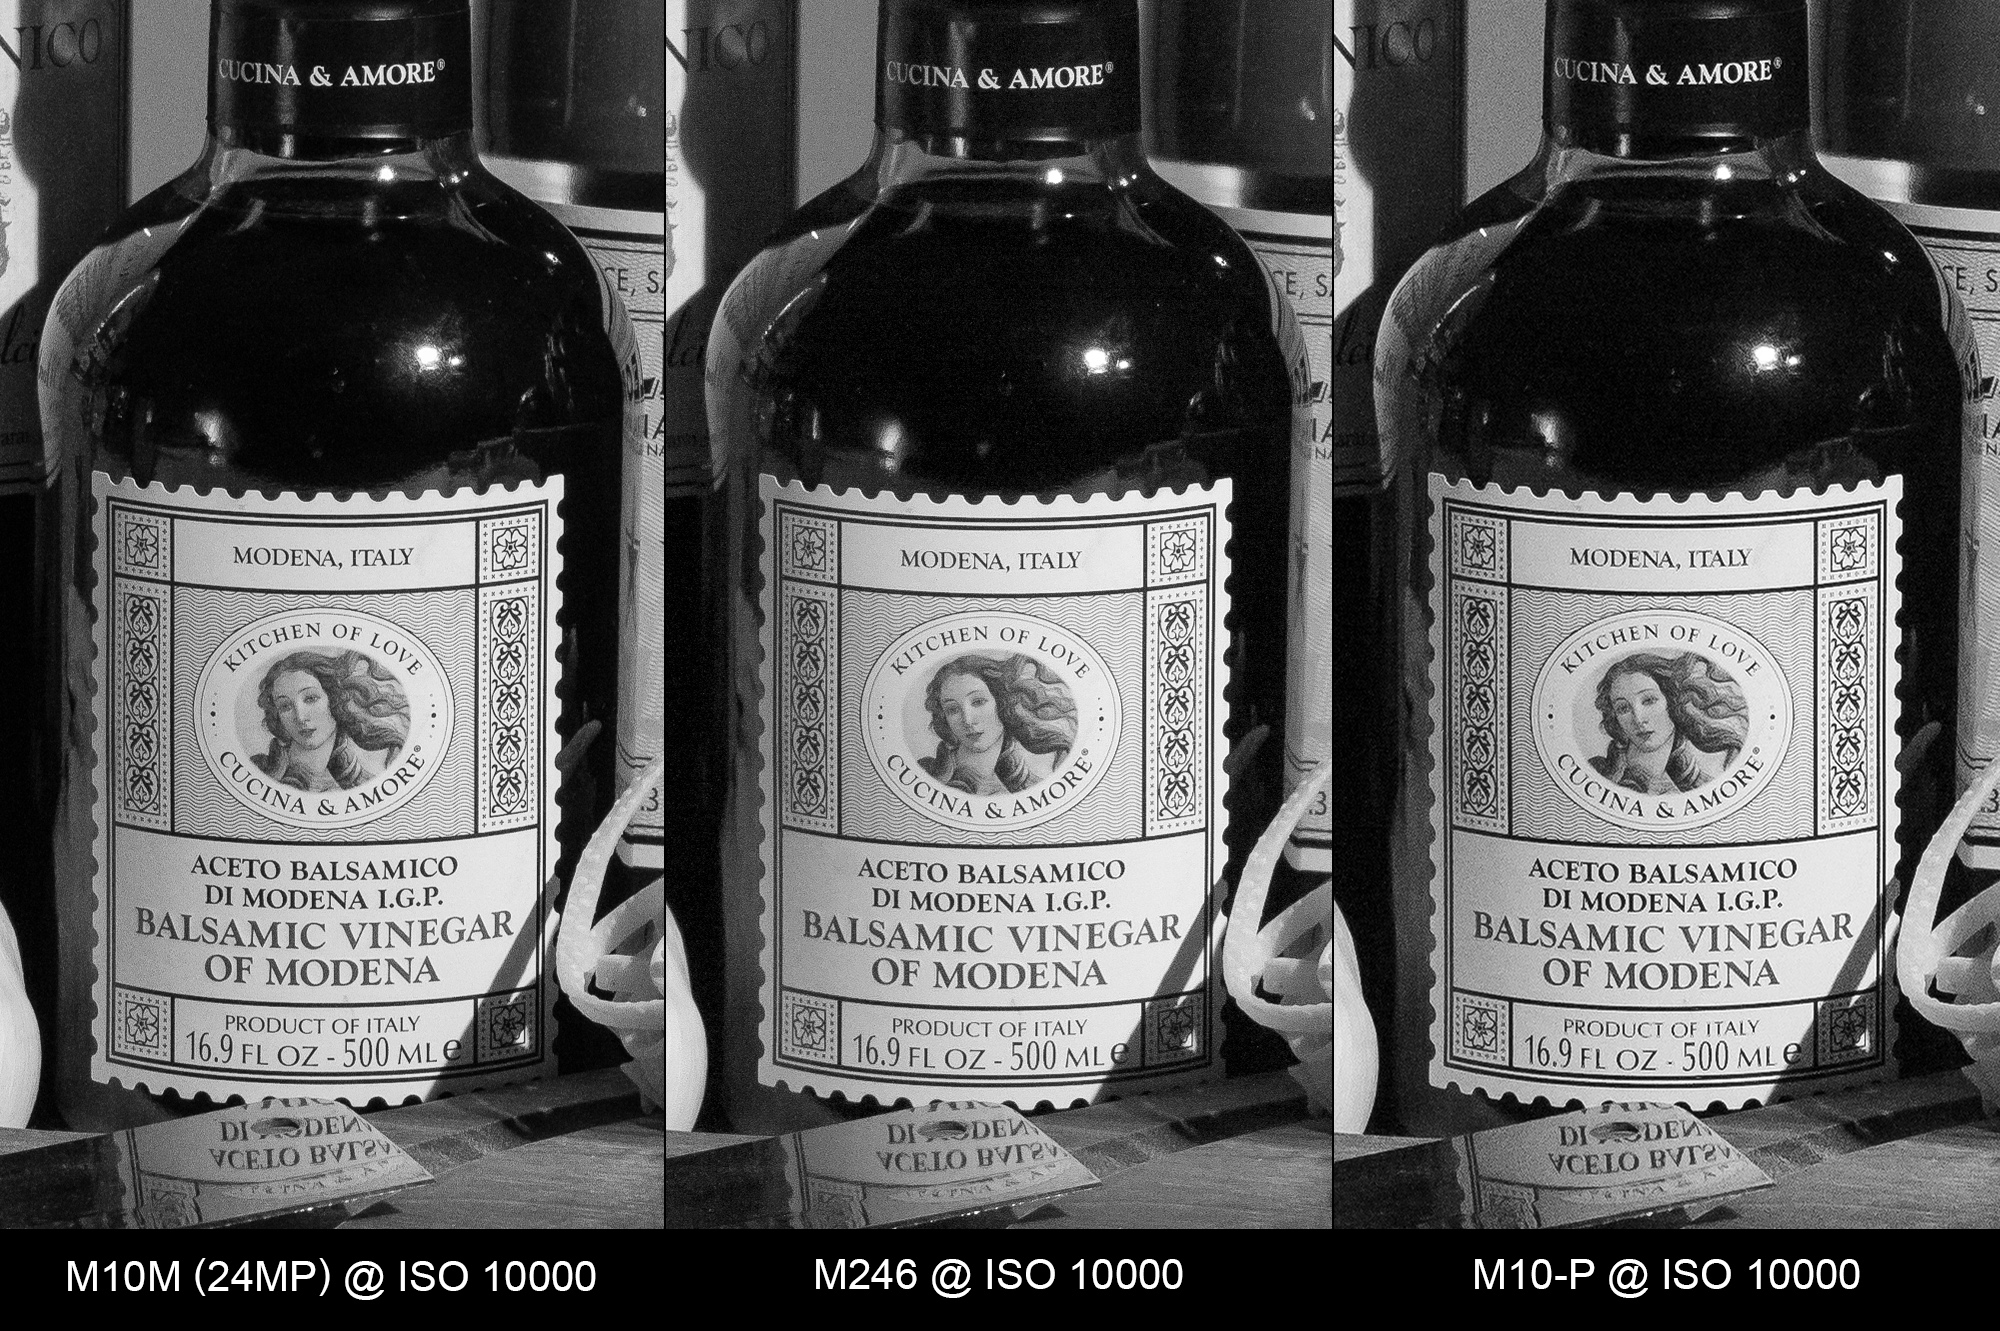
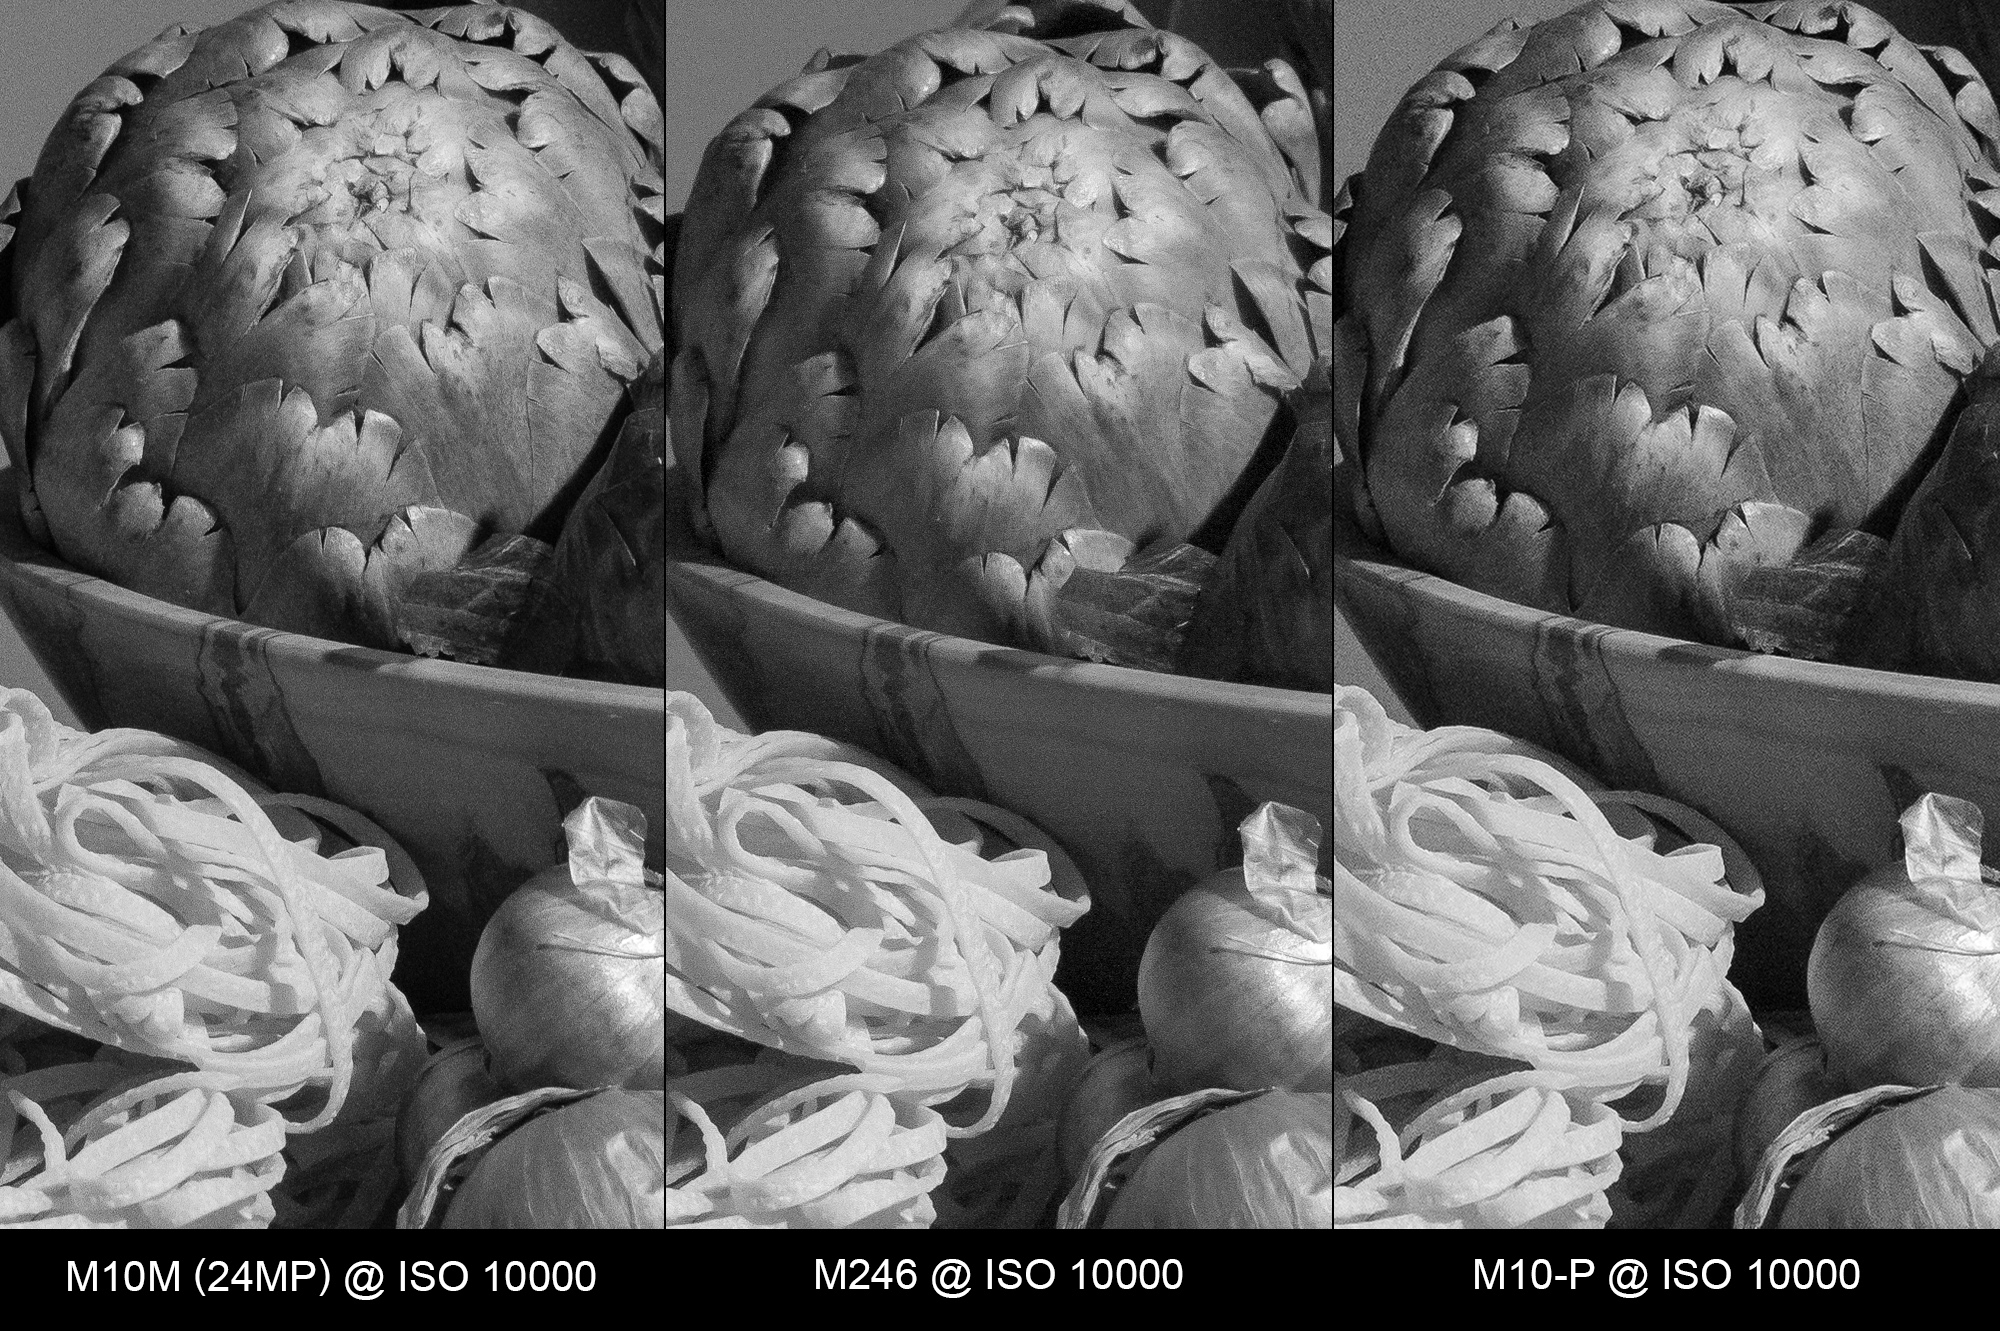
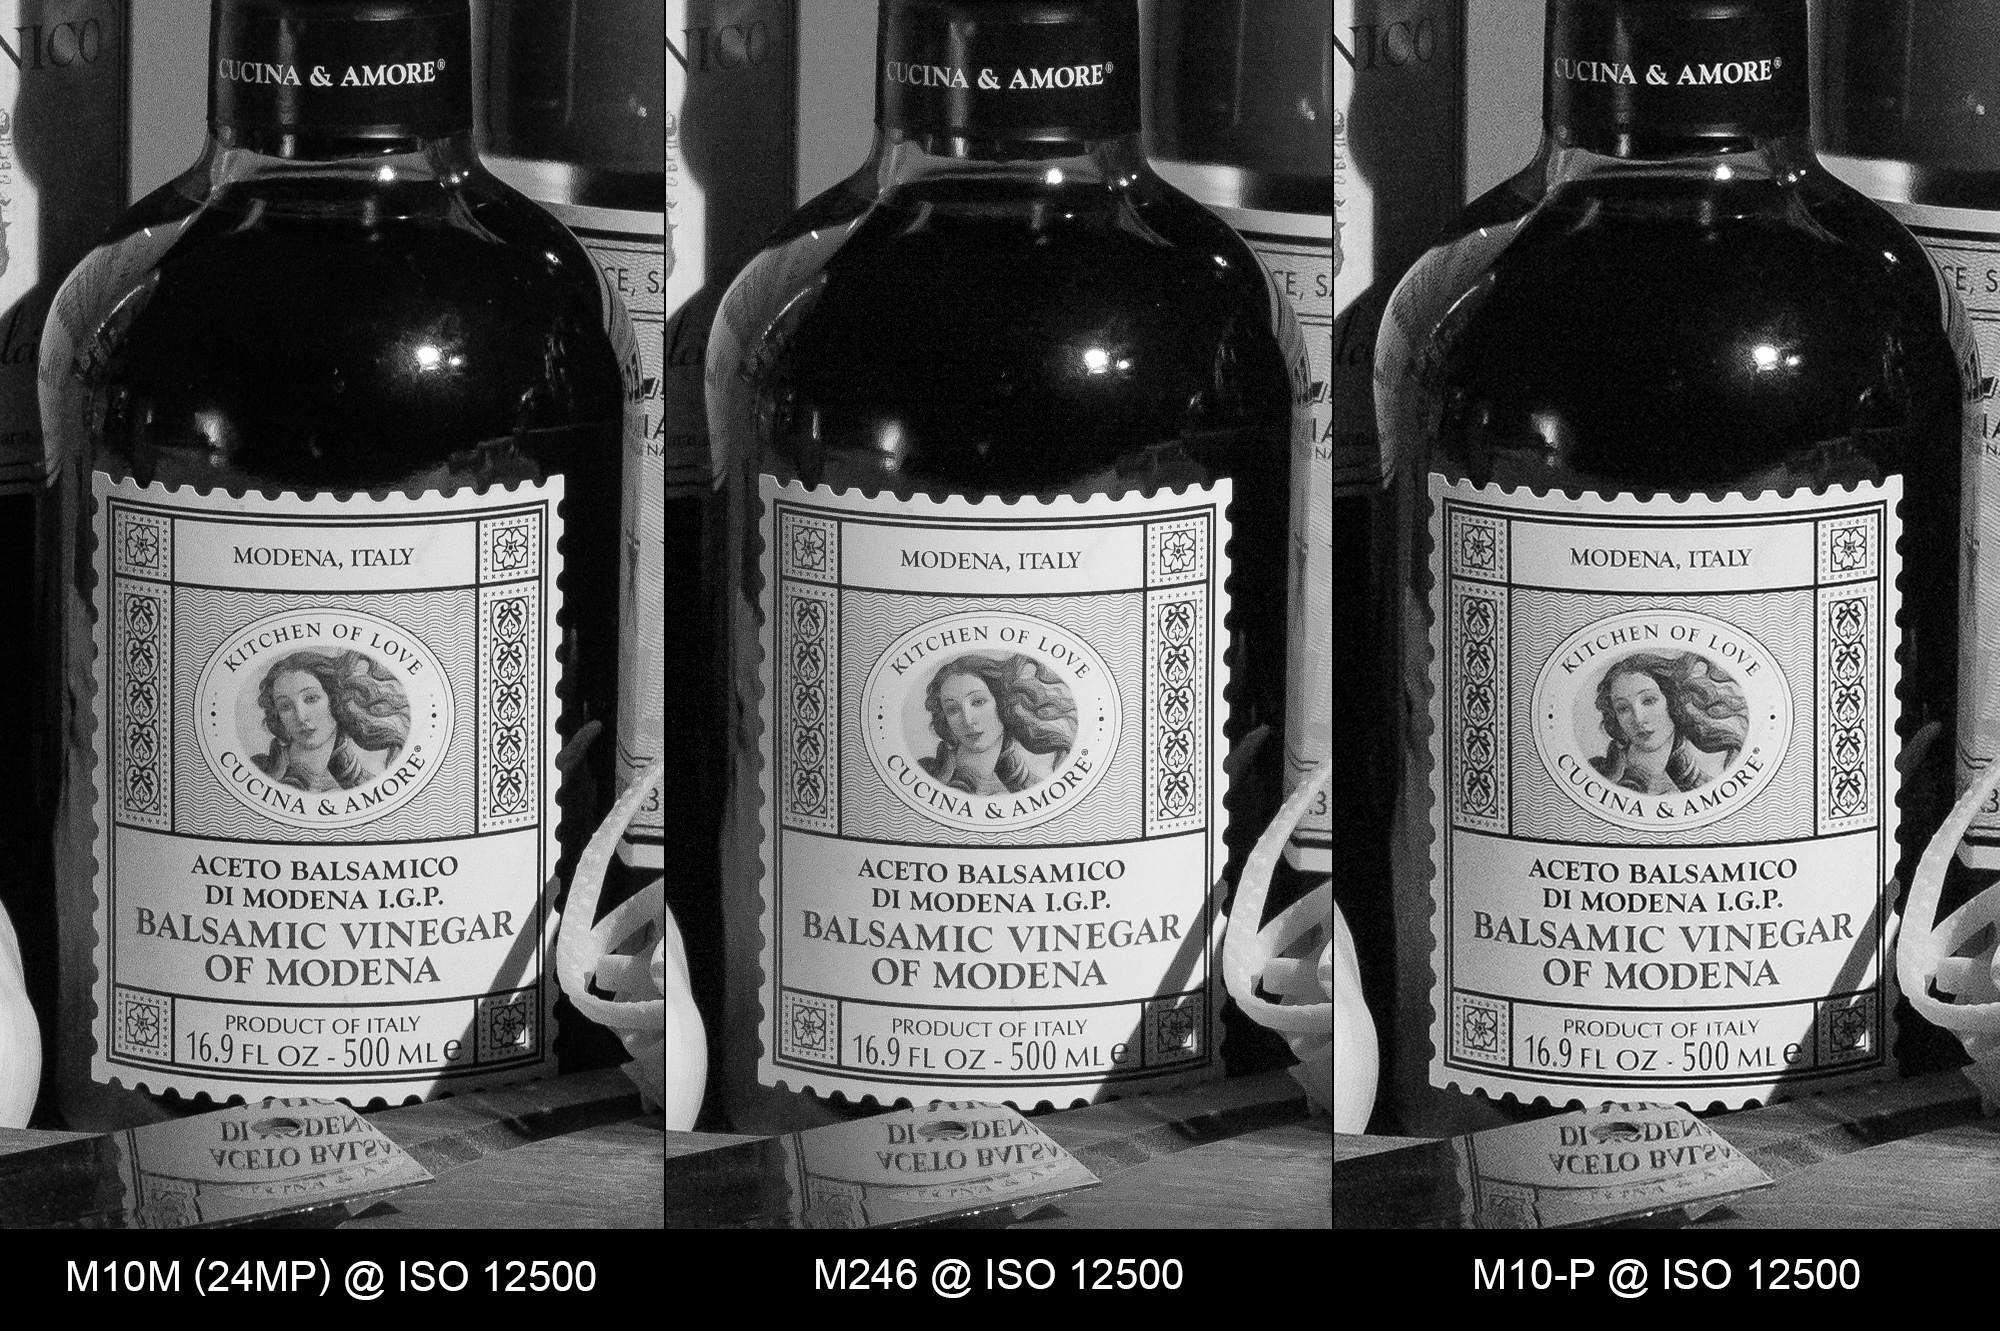
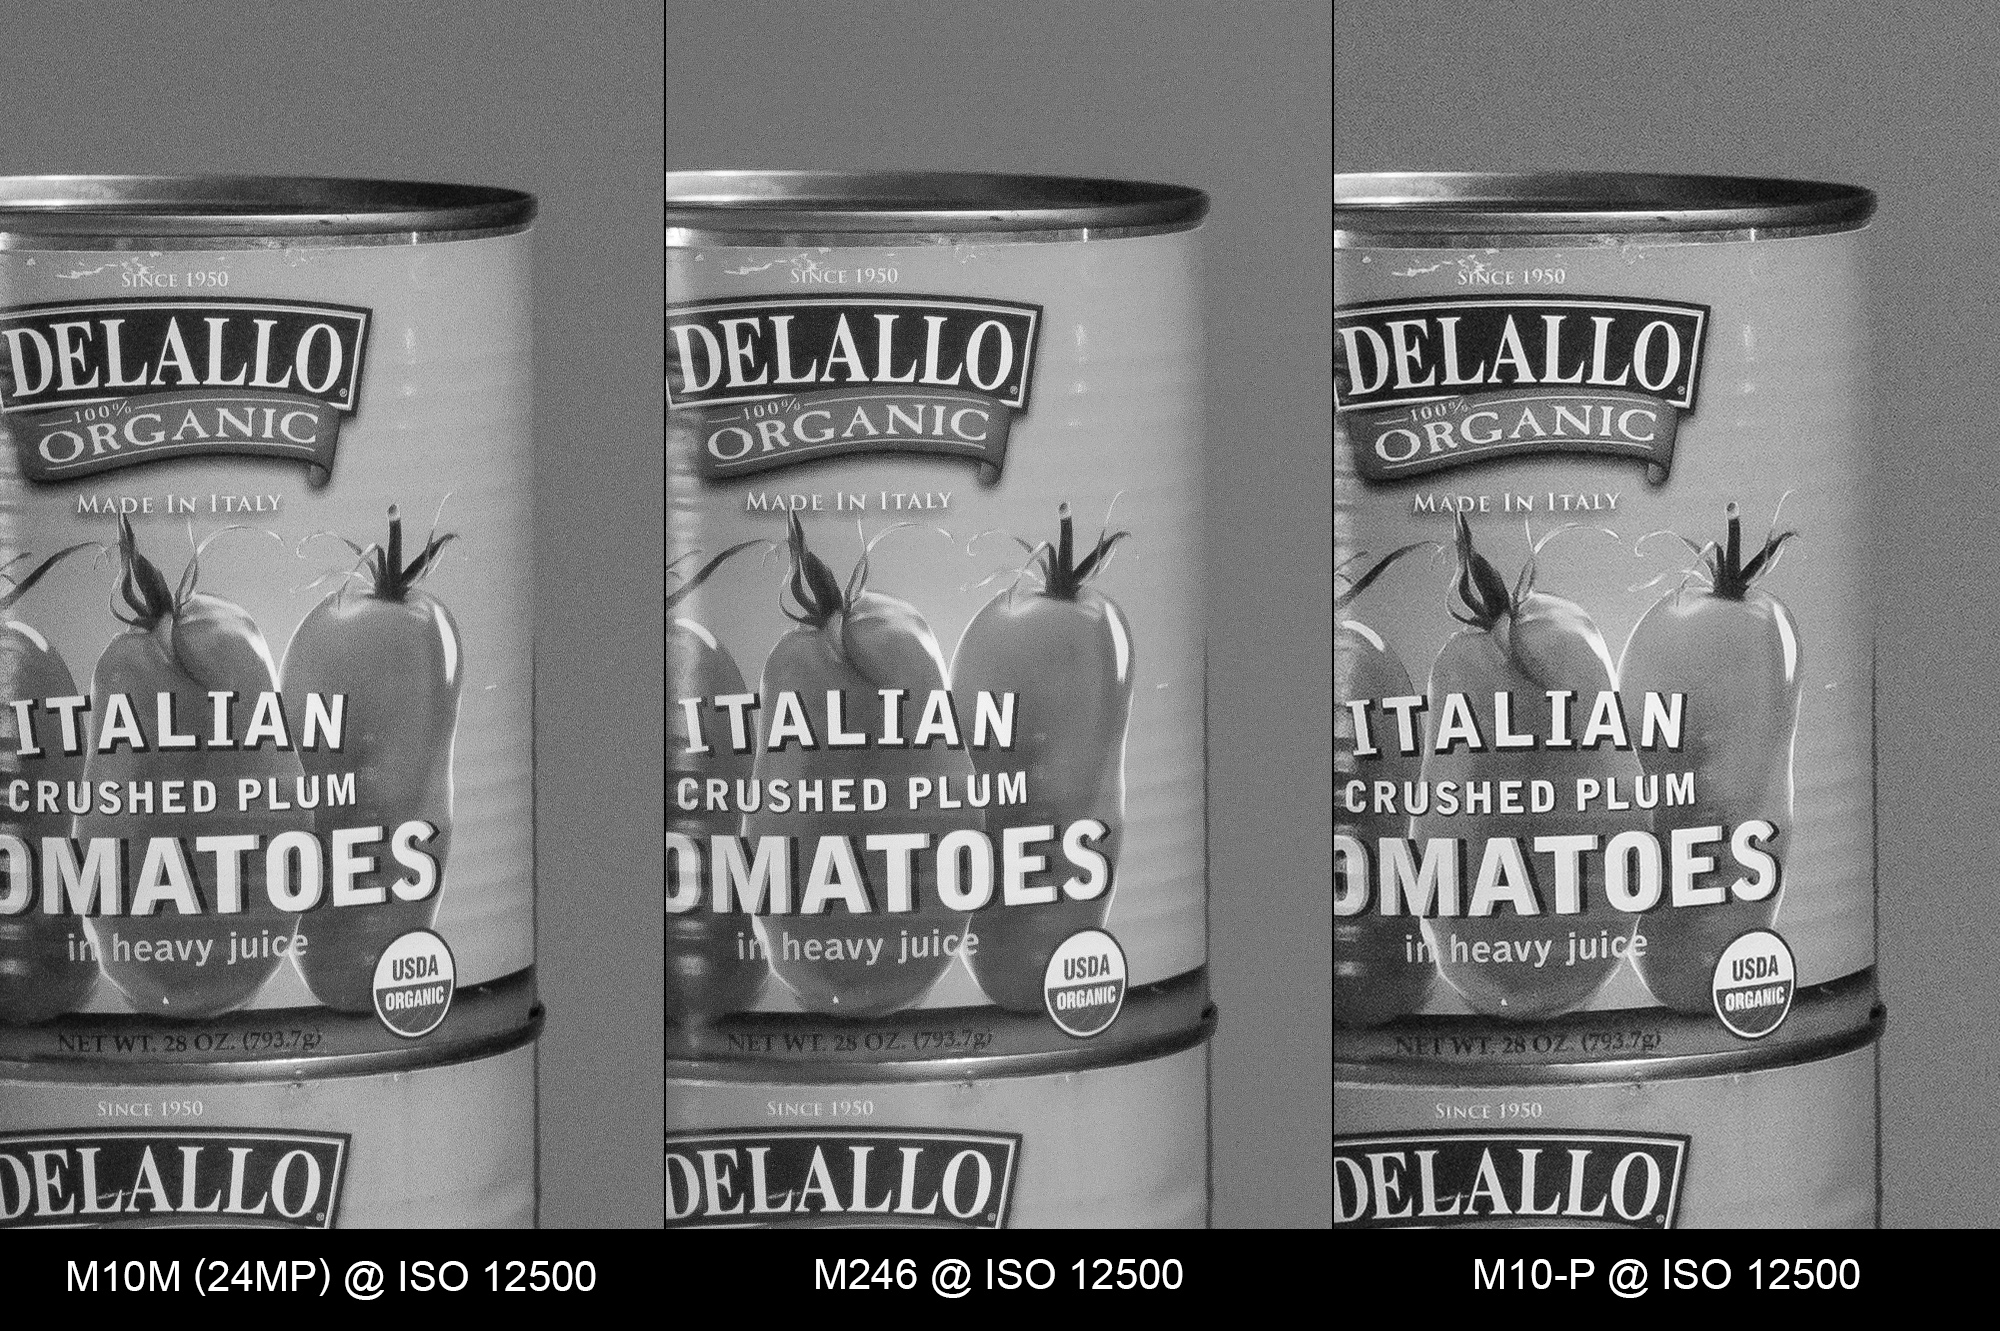
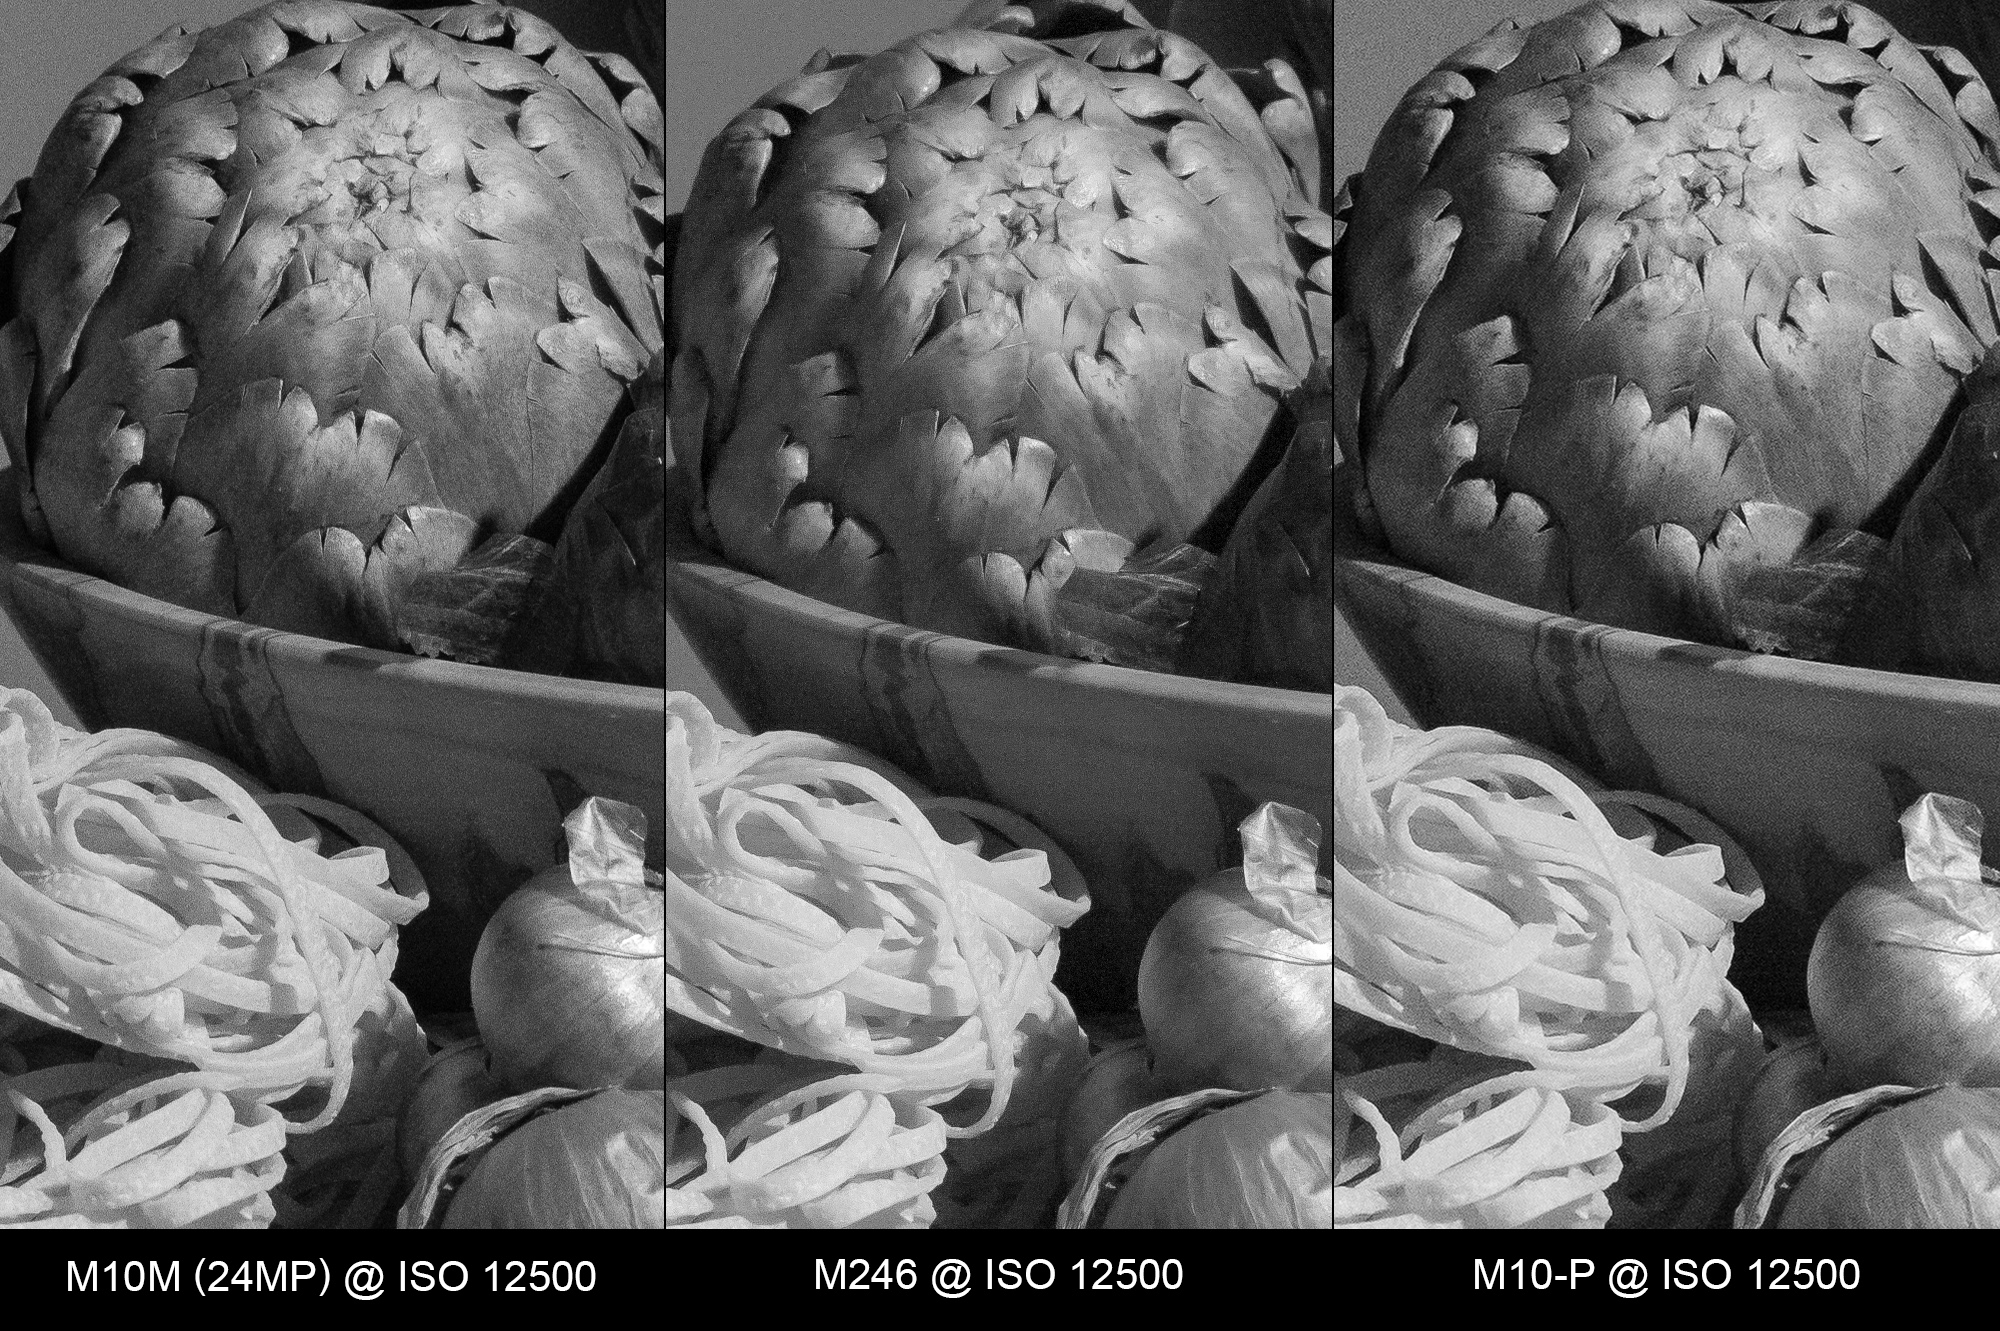
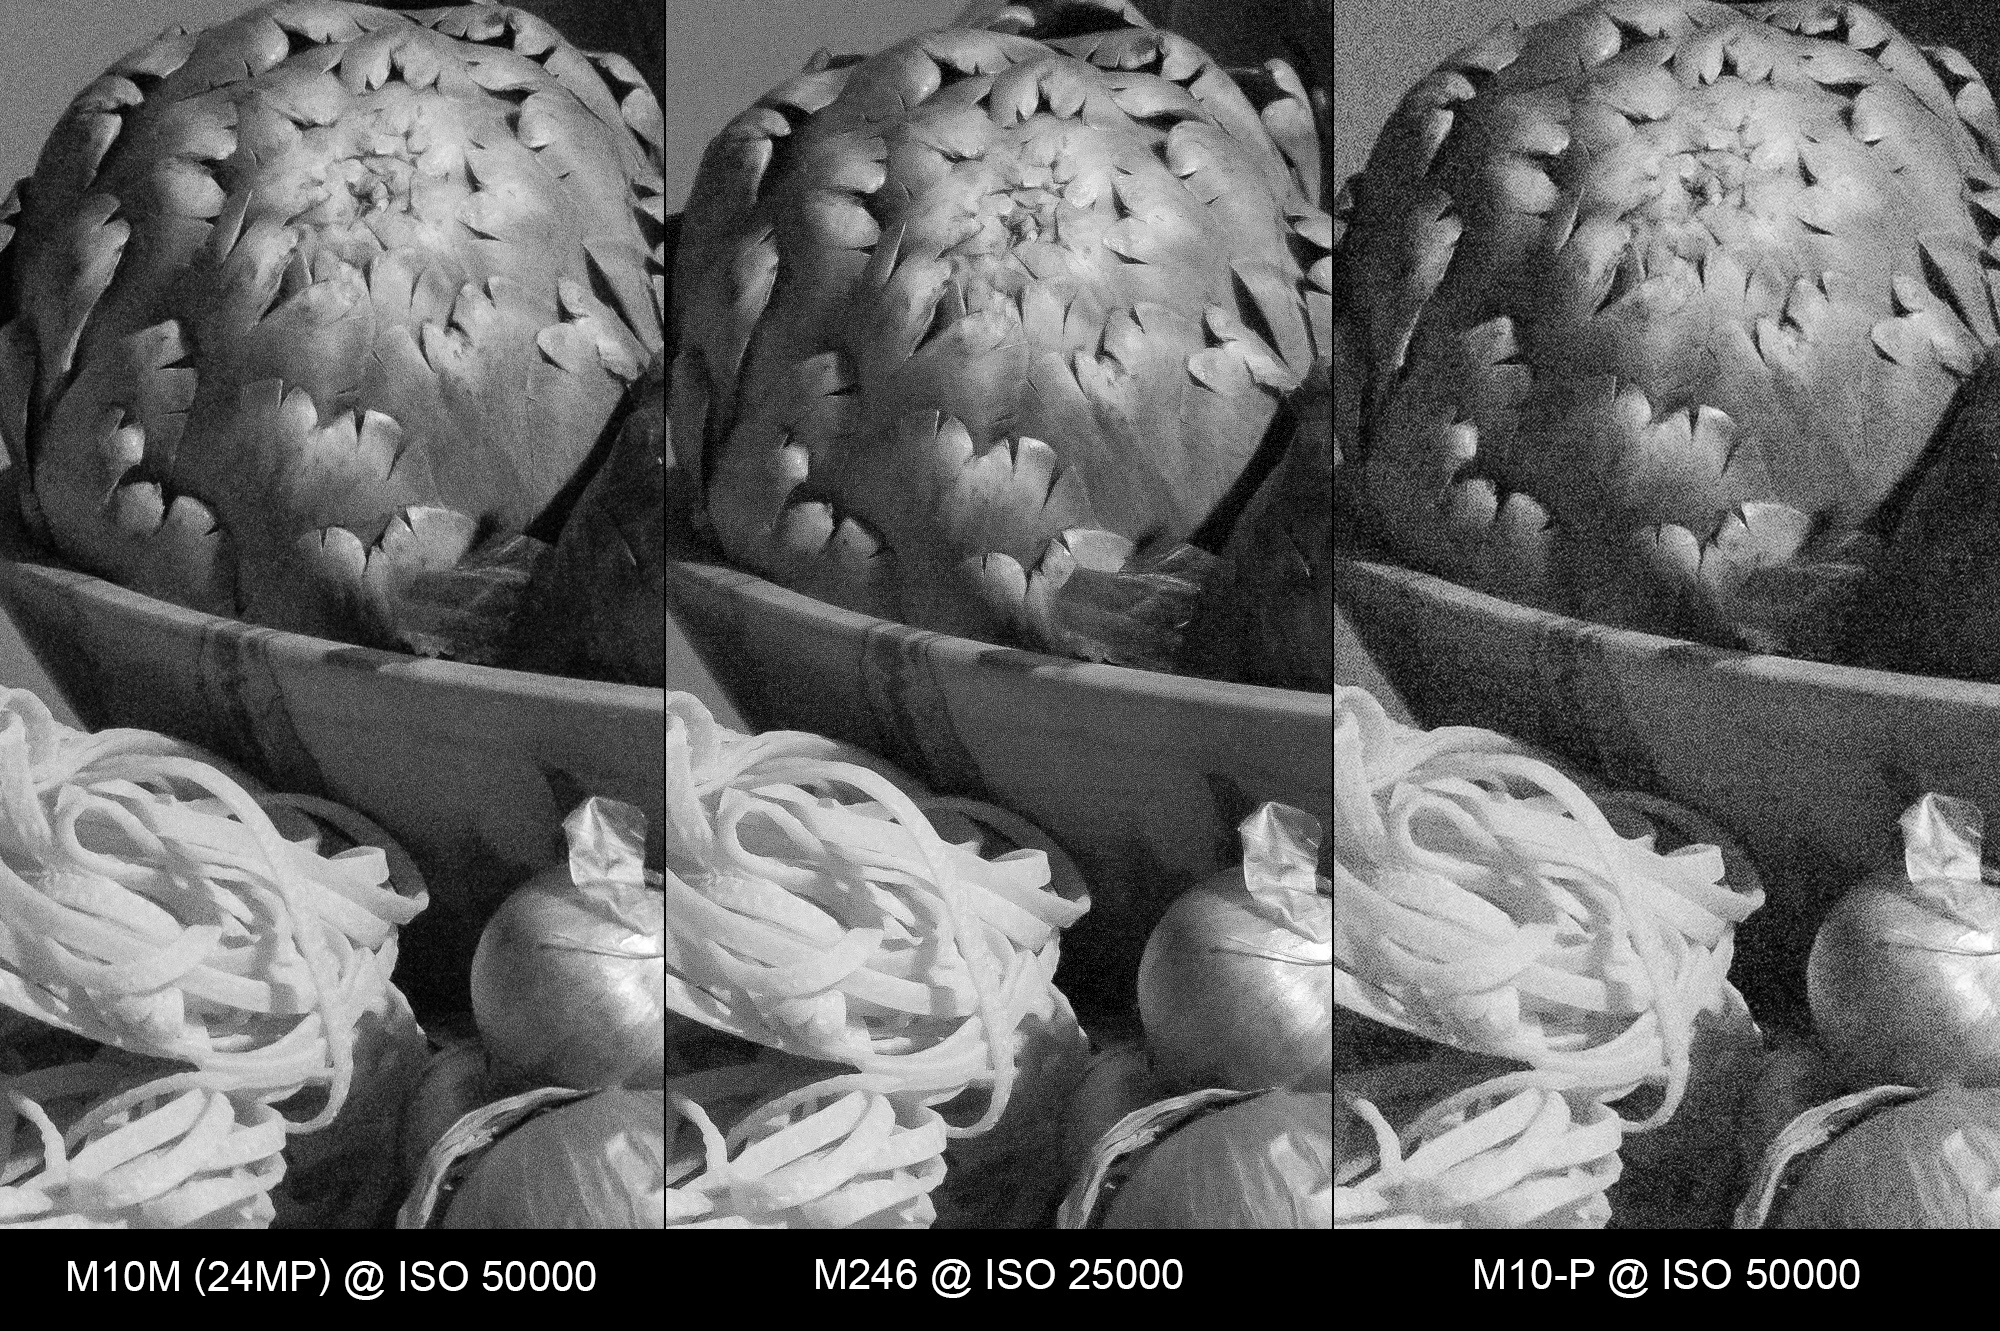
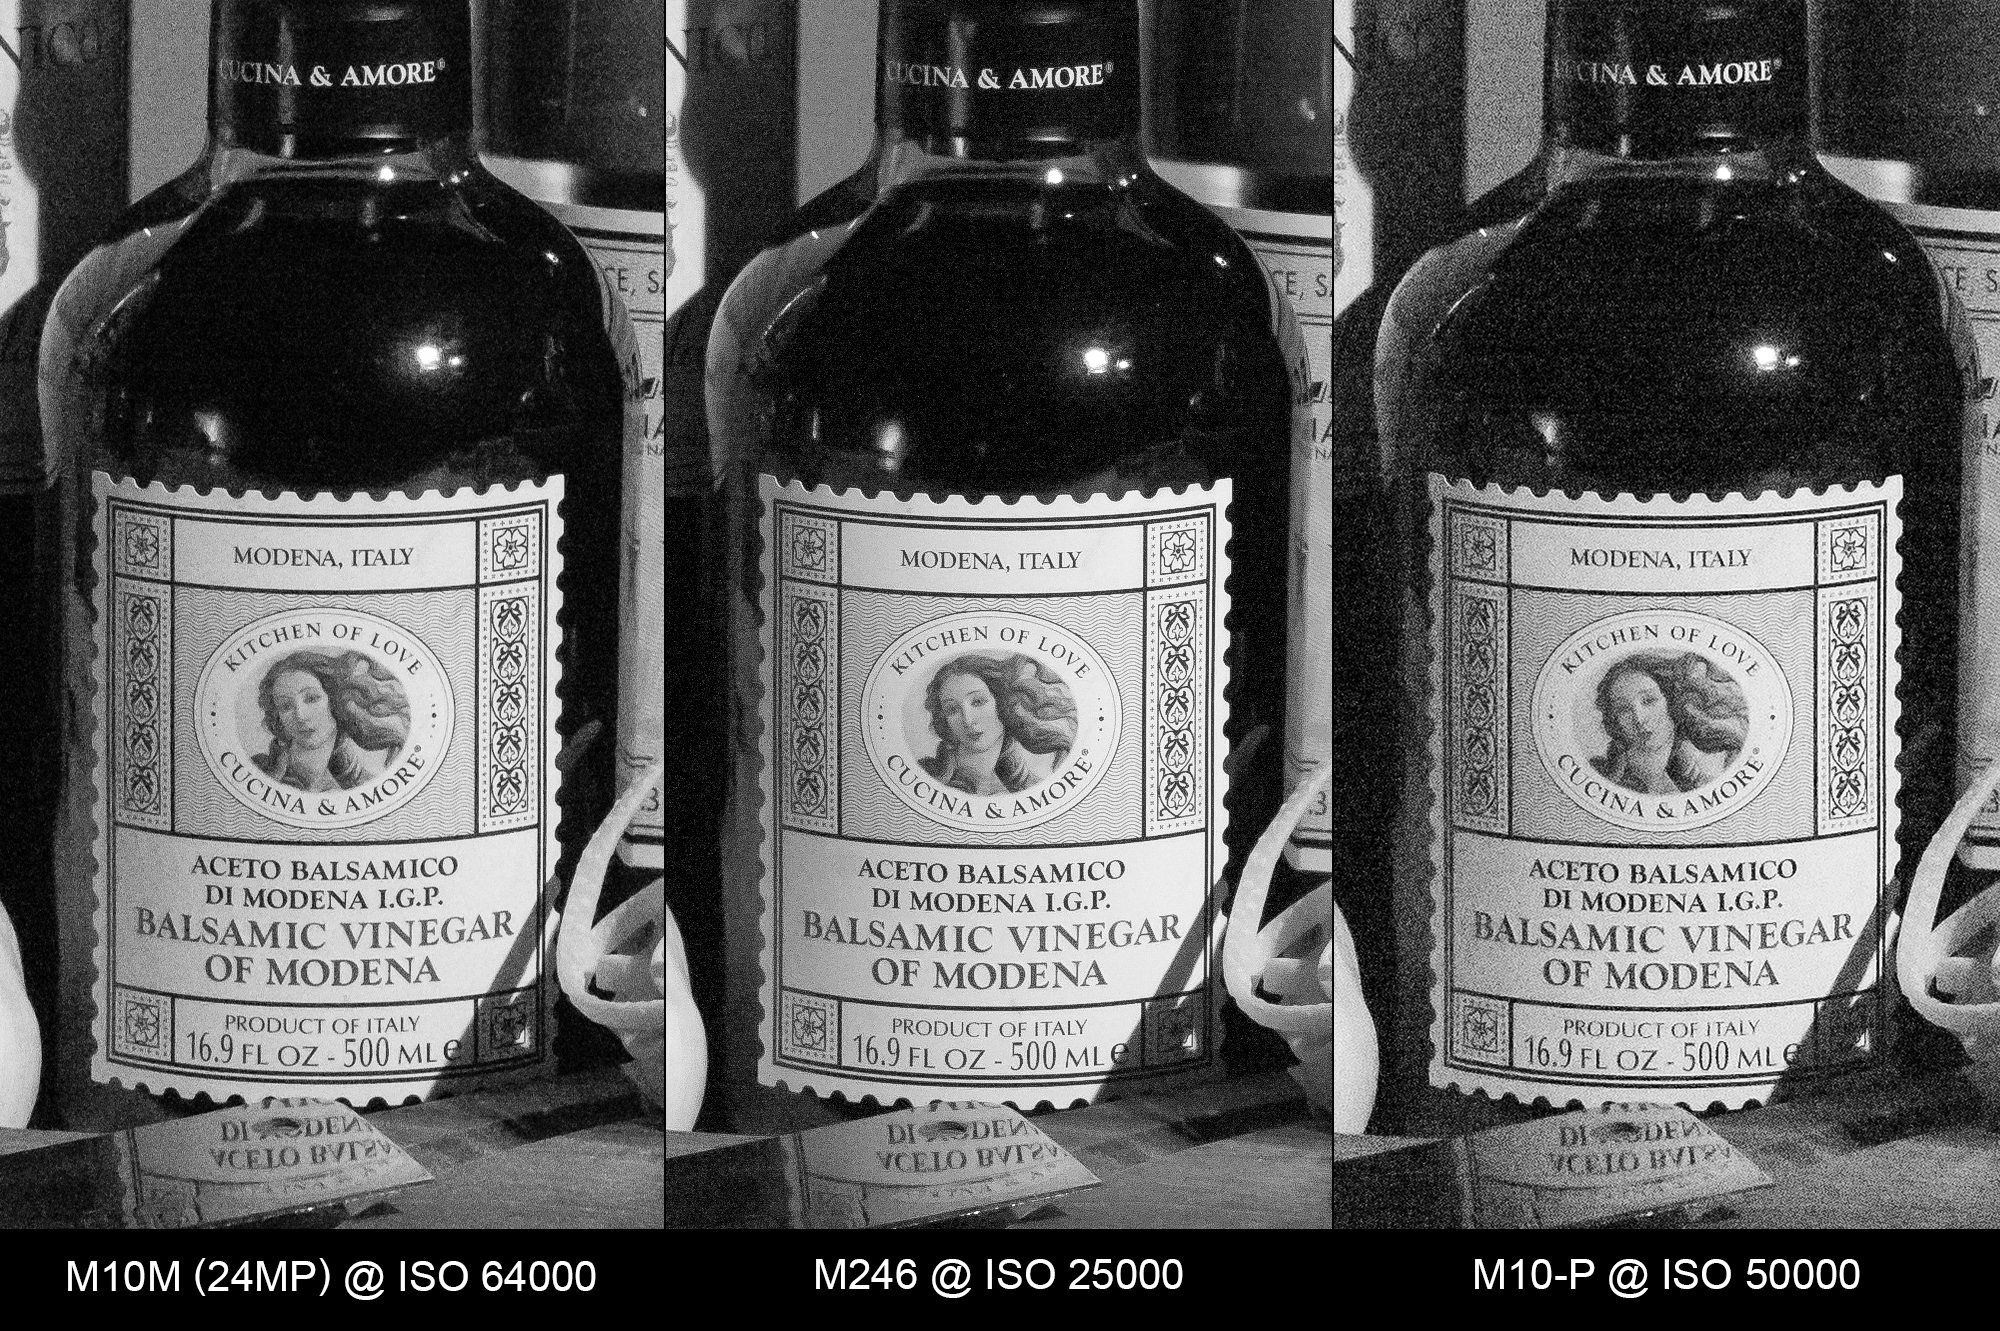
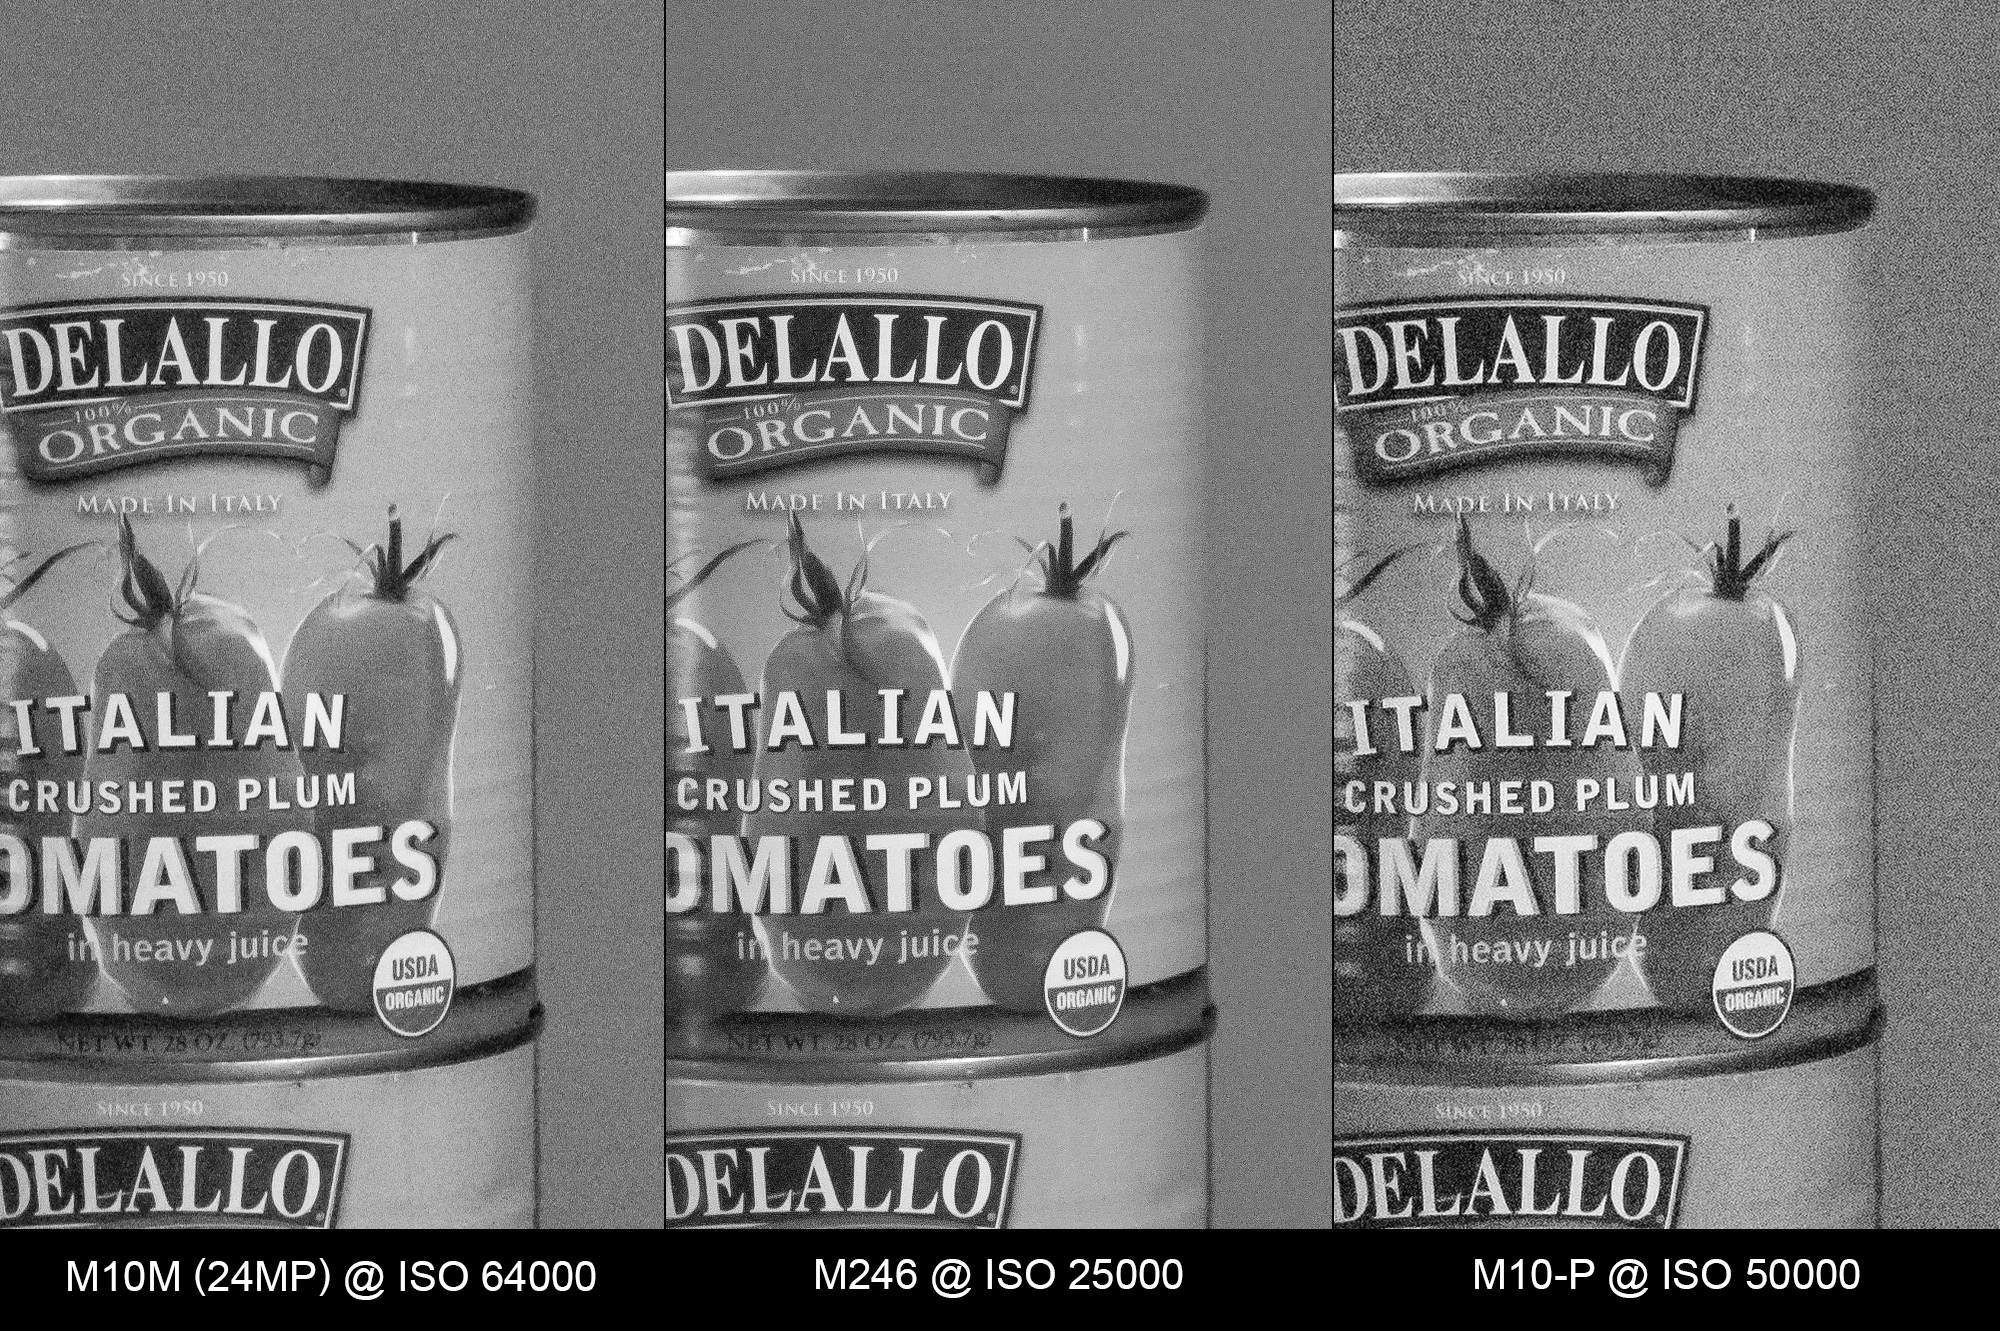
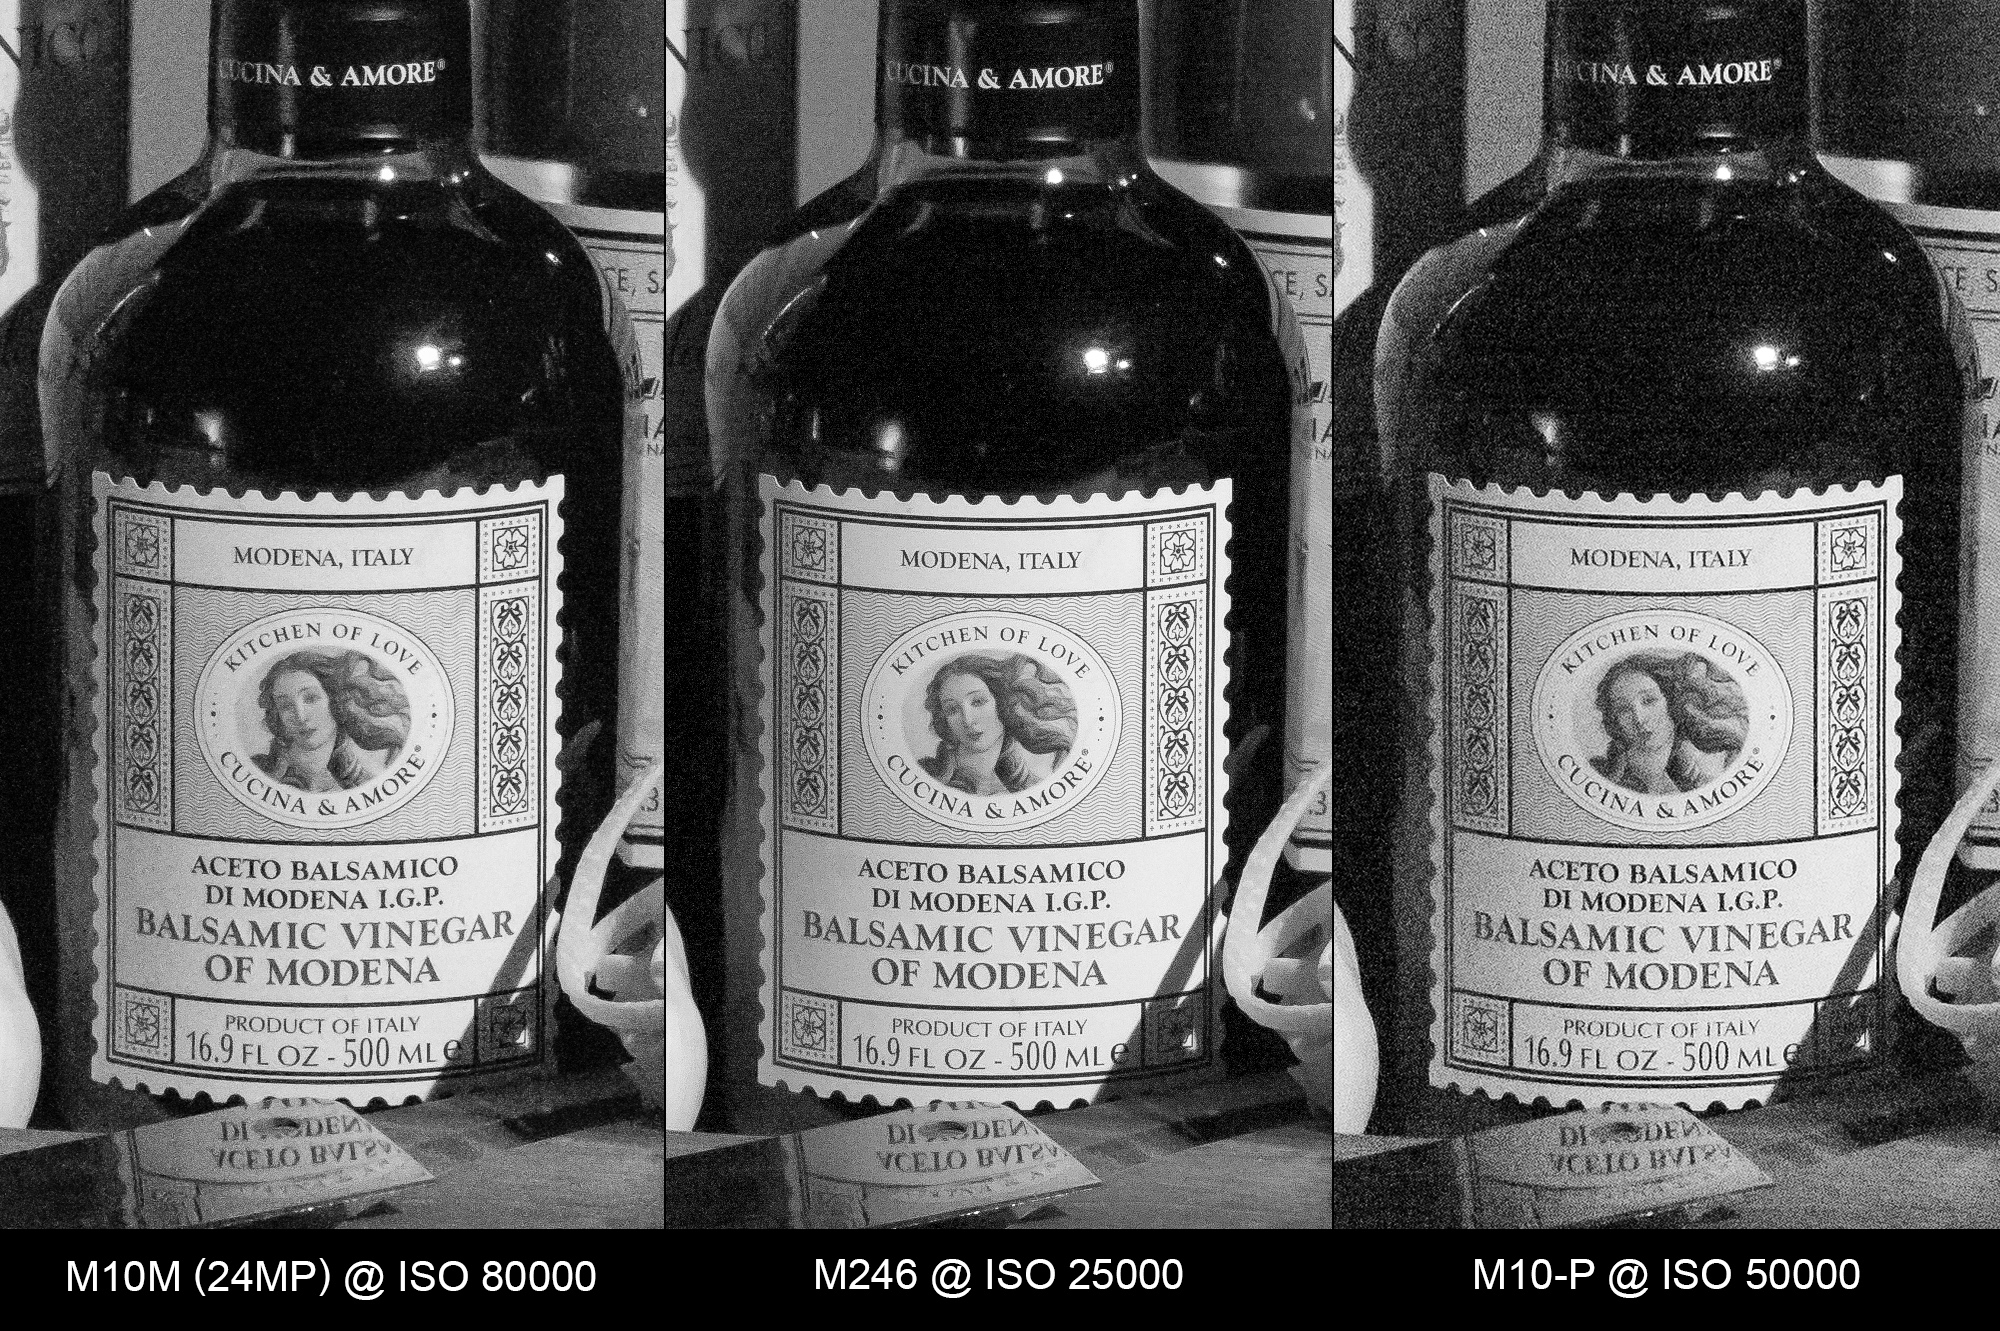
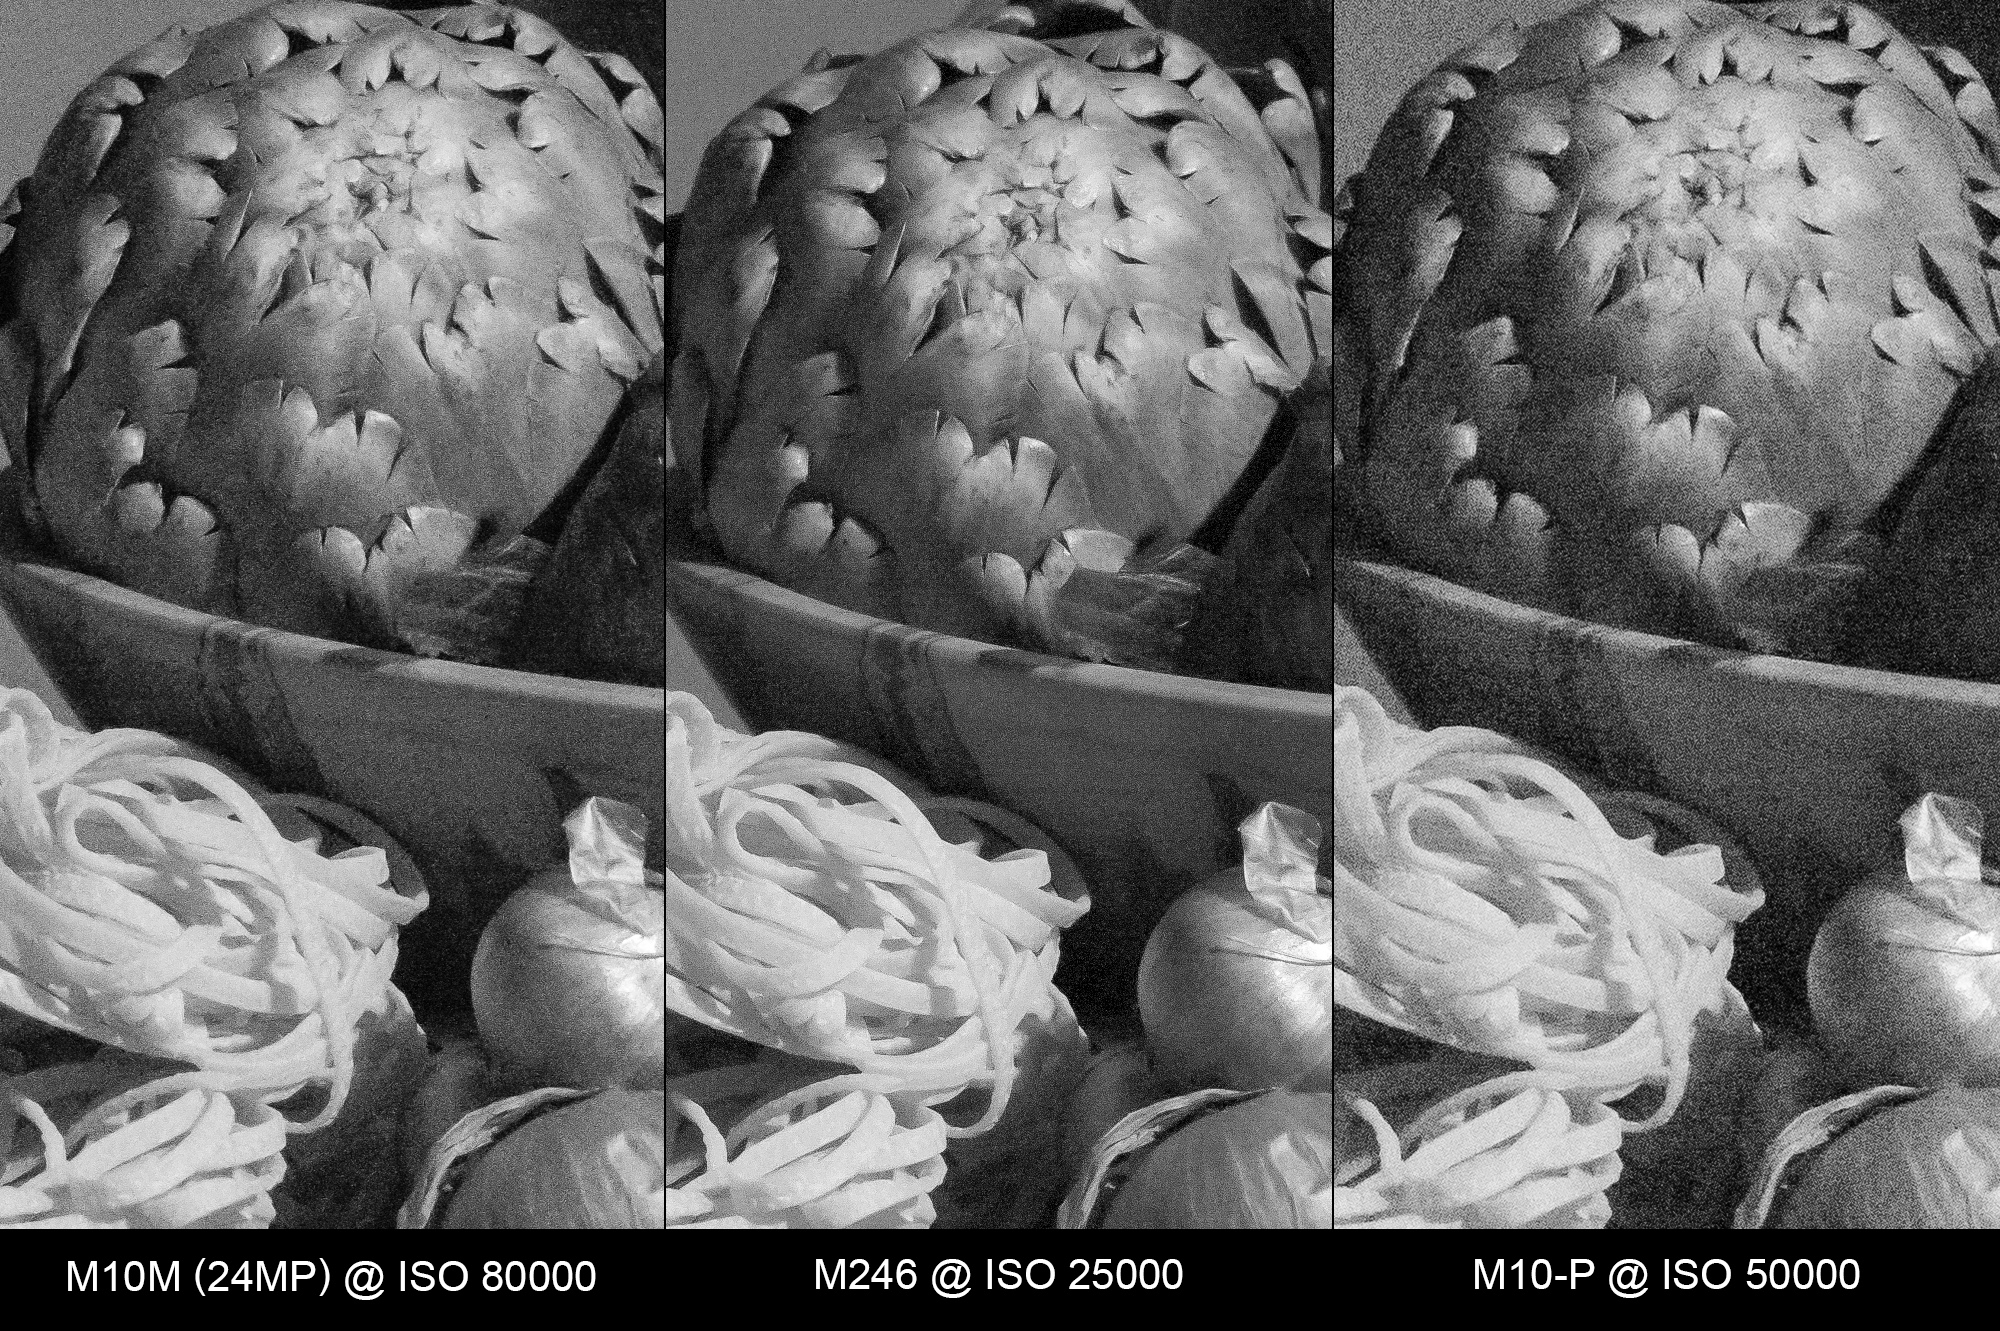
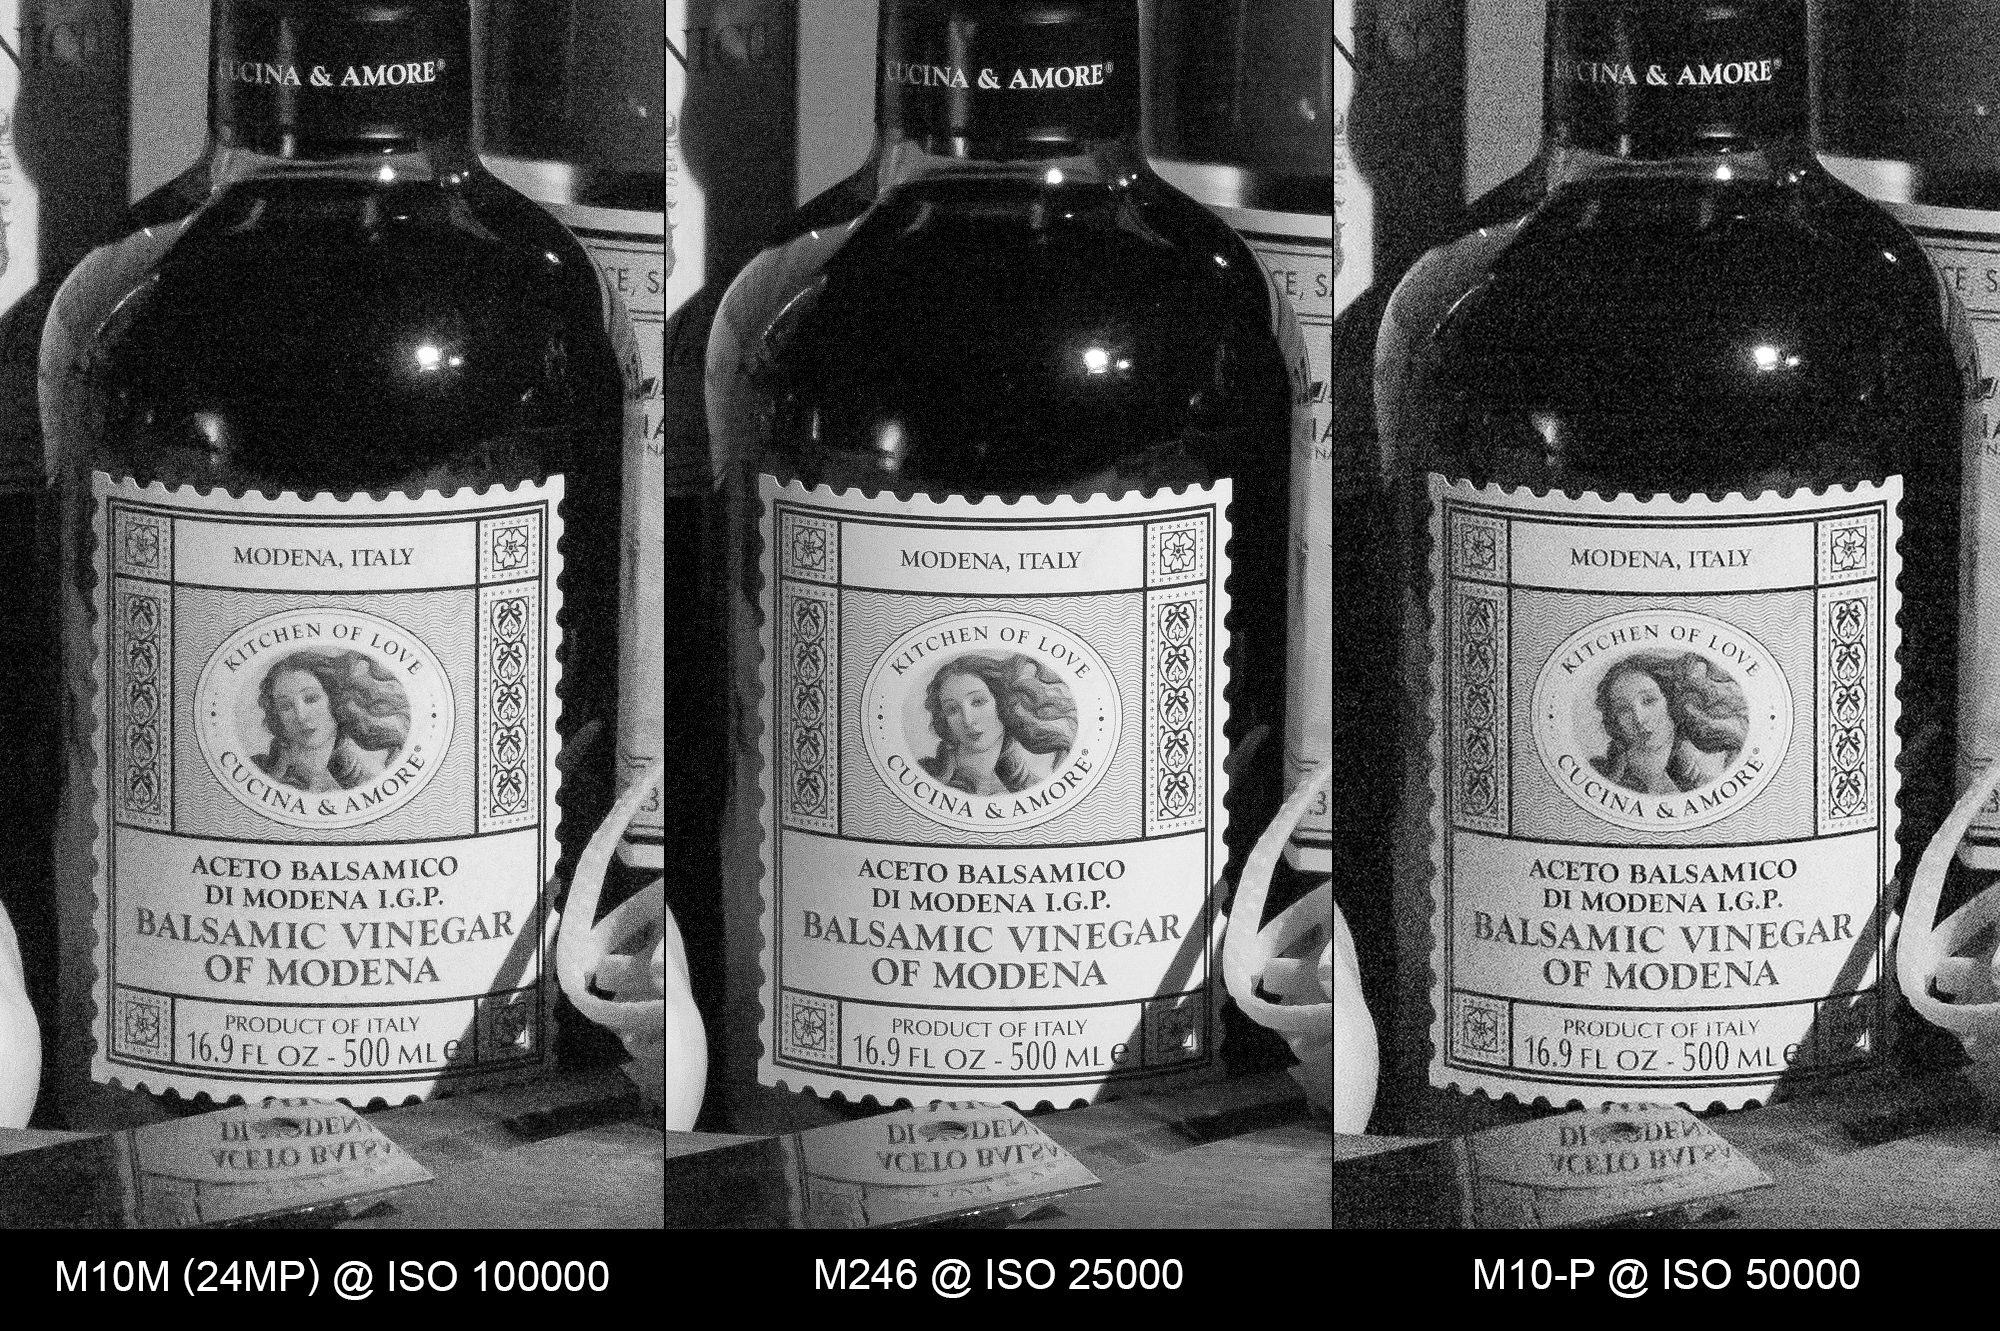
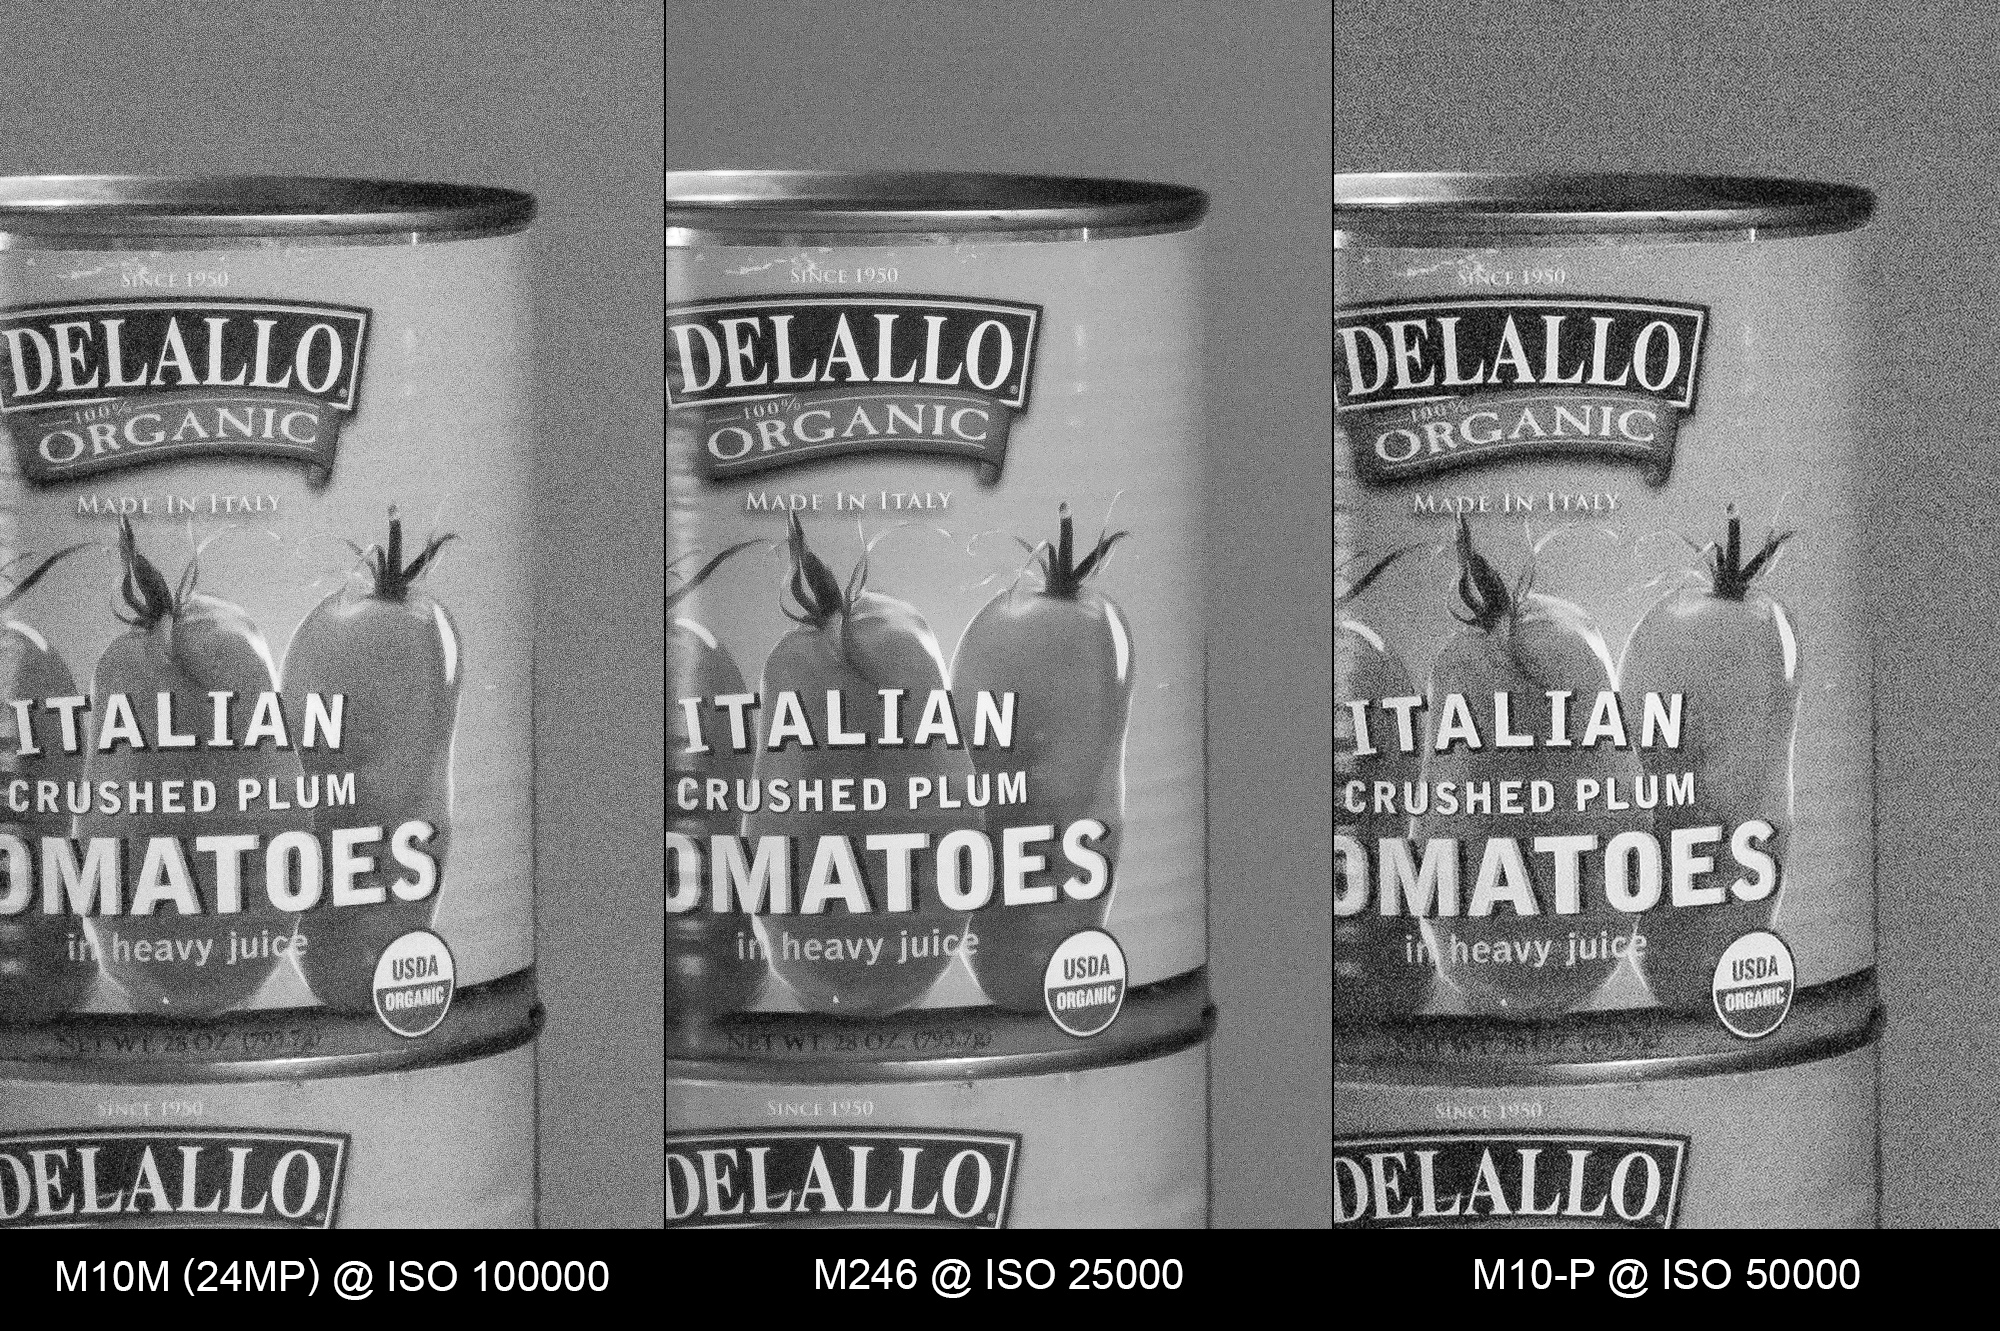
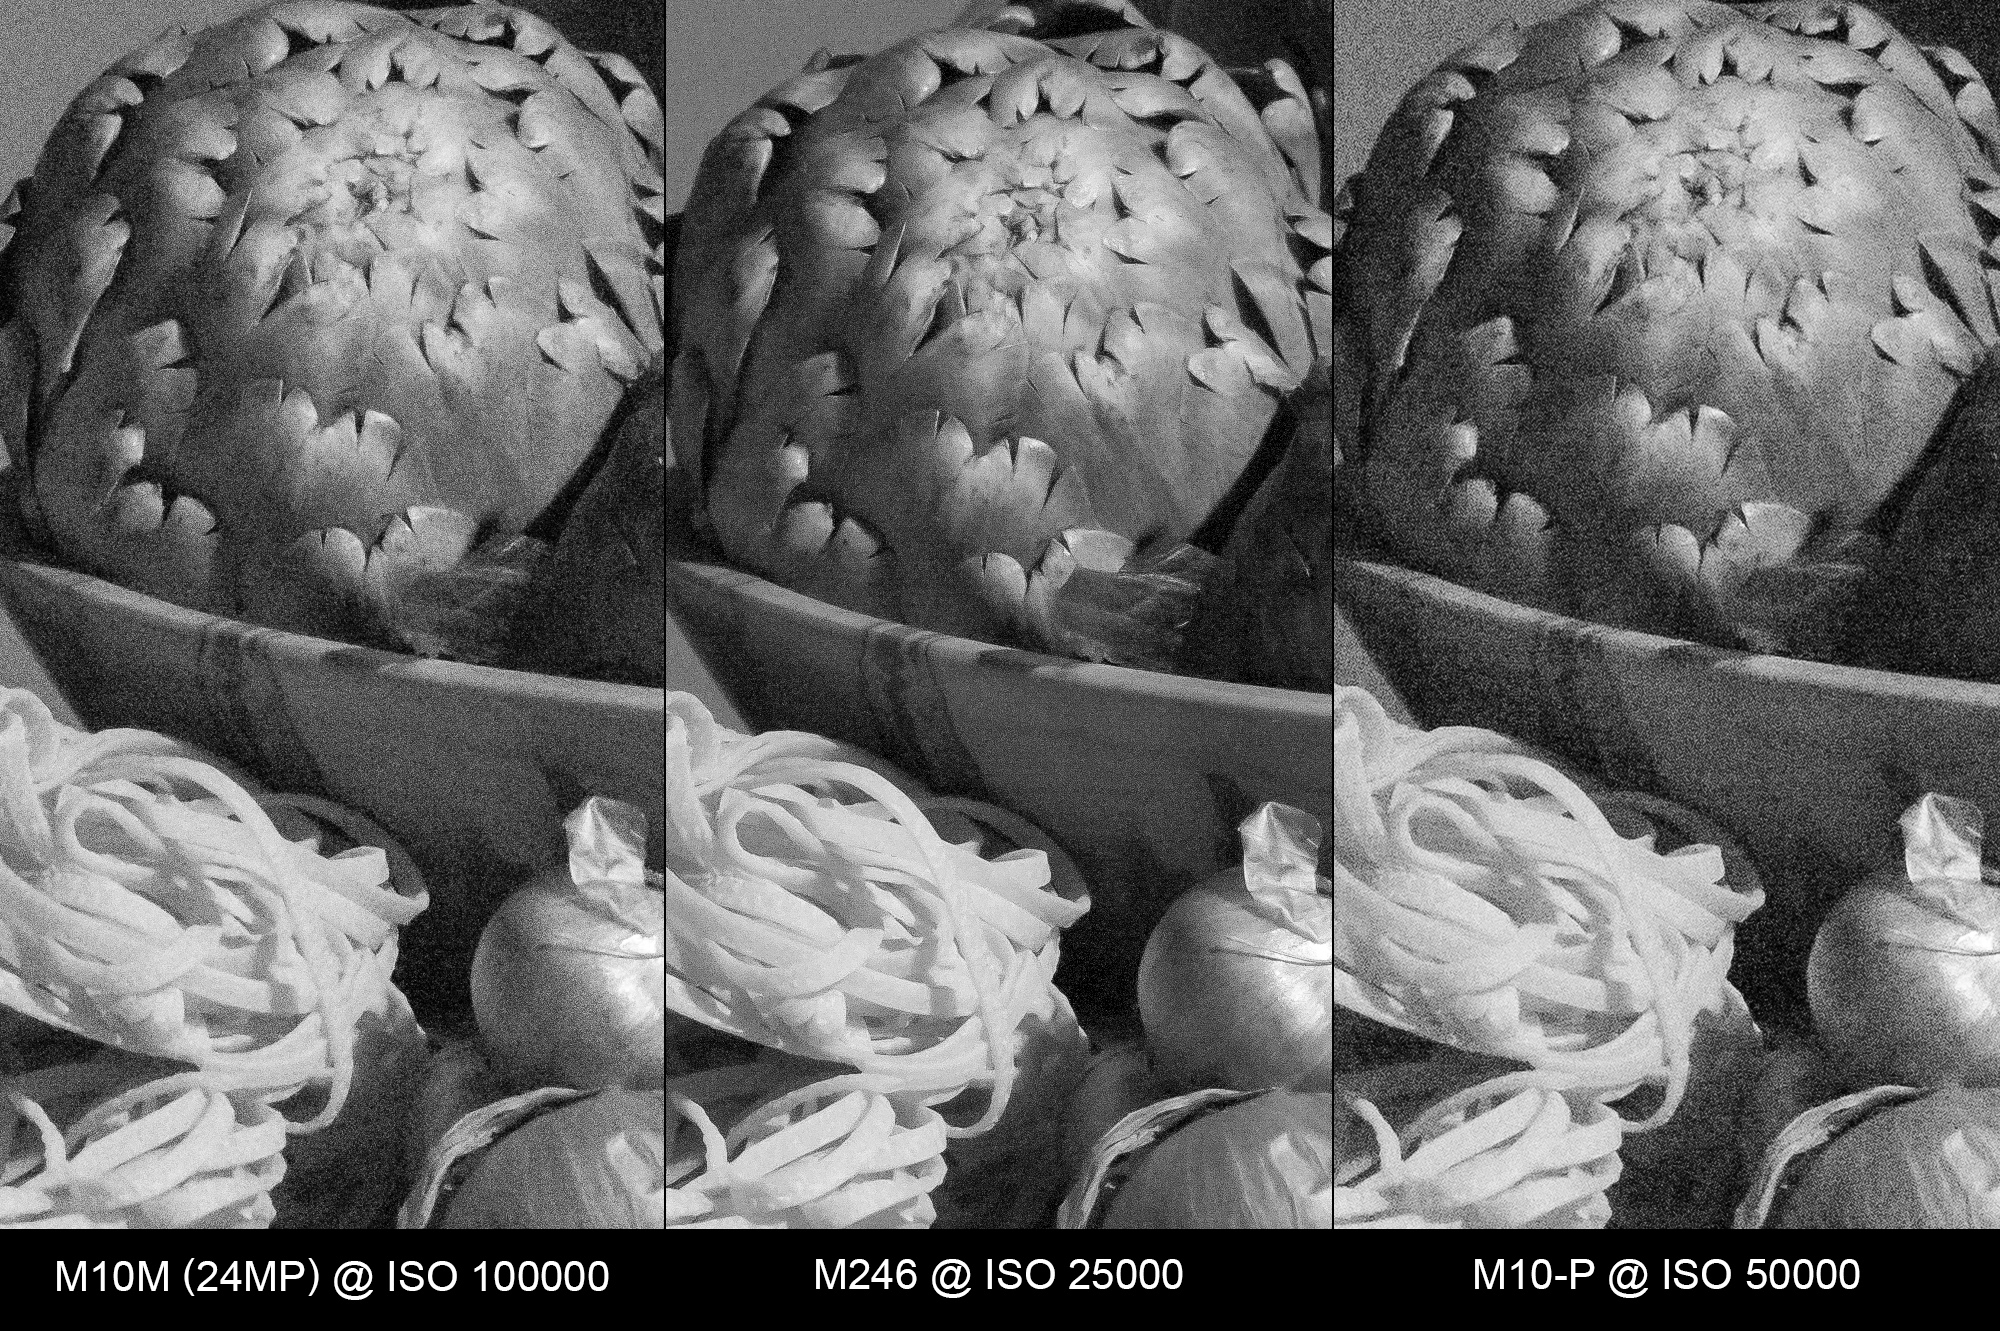
For the image crops, I selected three zones. The label of balsamic vinegar bottle was the true focal point for all cameras, and demonstrates high-contrast high-detail image areas. The artichoke and pasta highlights textural details. And the tomato can with flat background shows smooth tonal areas. There are other interesting crops that I explored as well, but there are already far too many images here as it is.
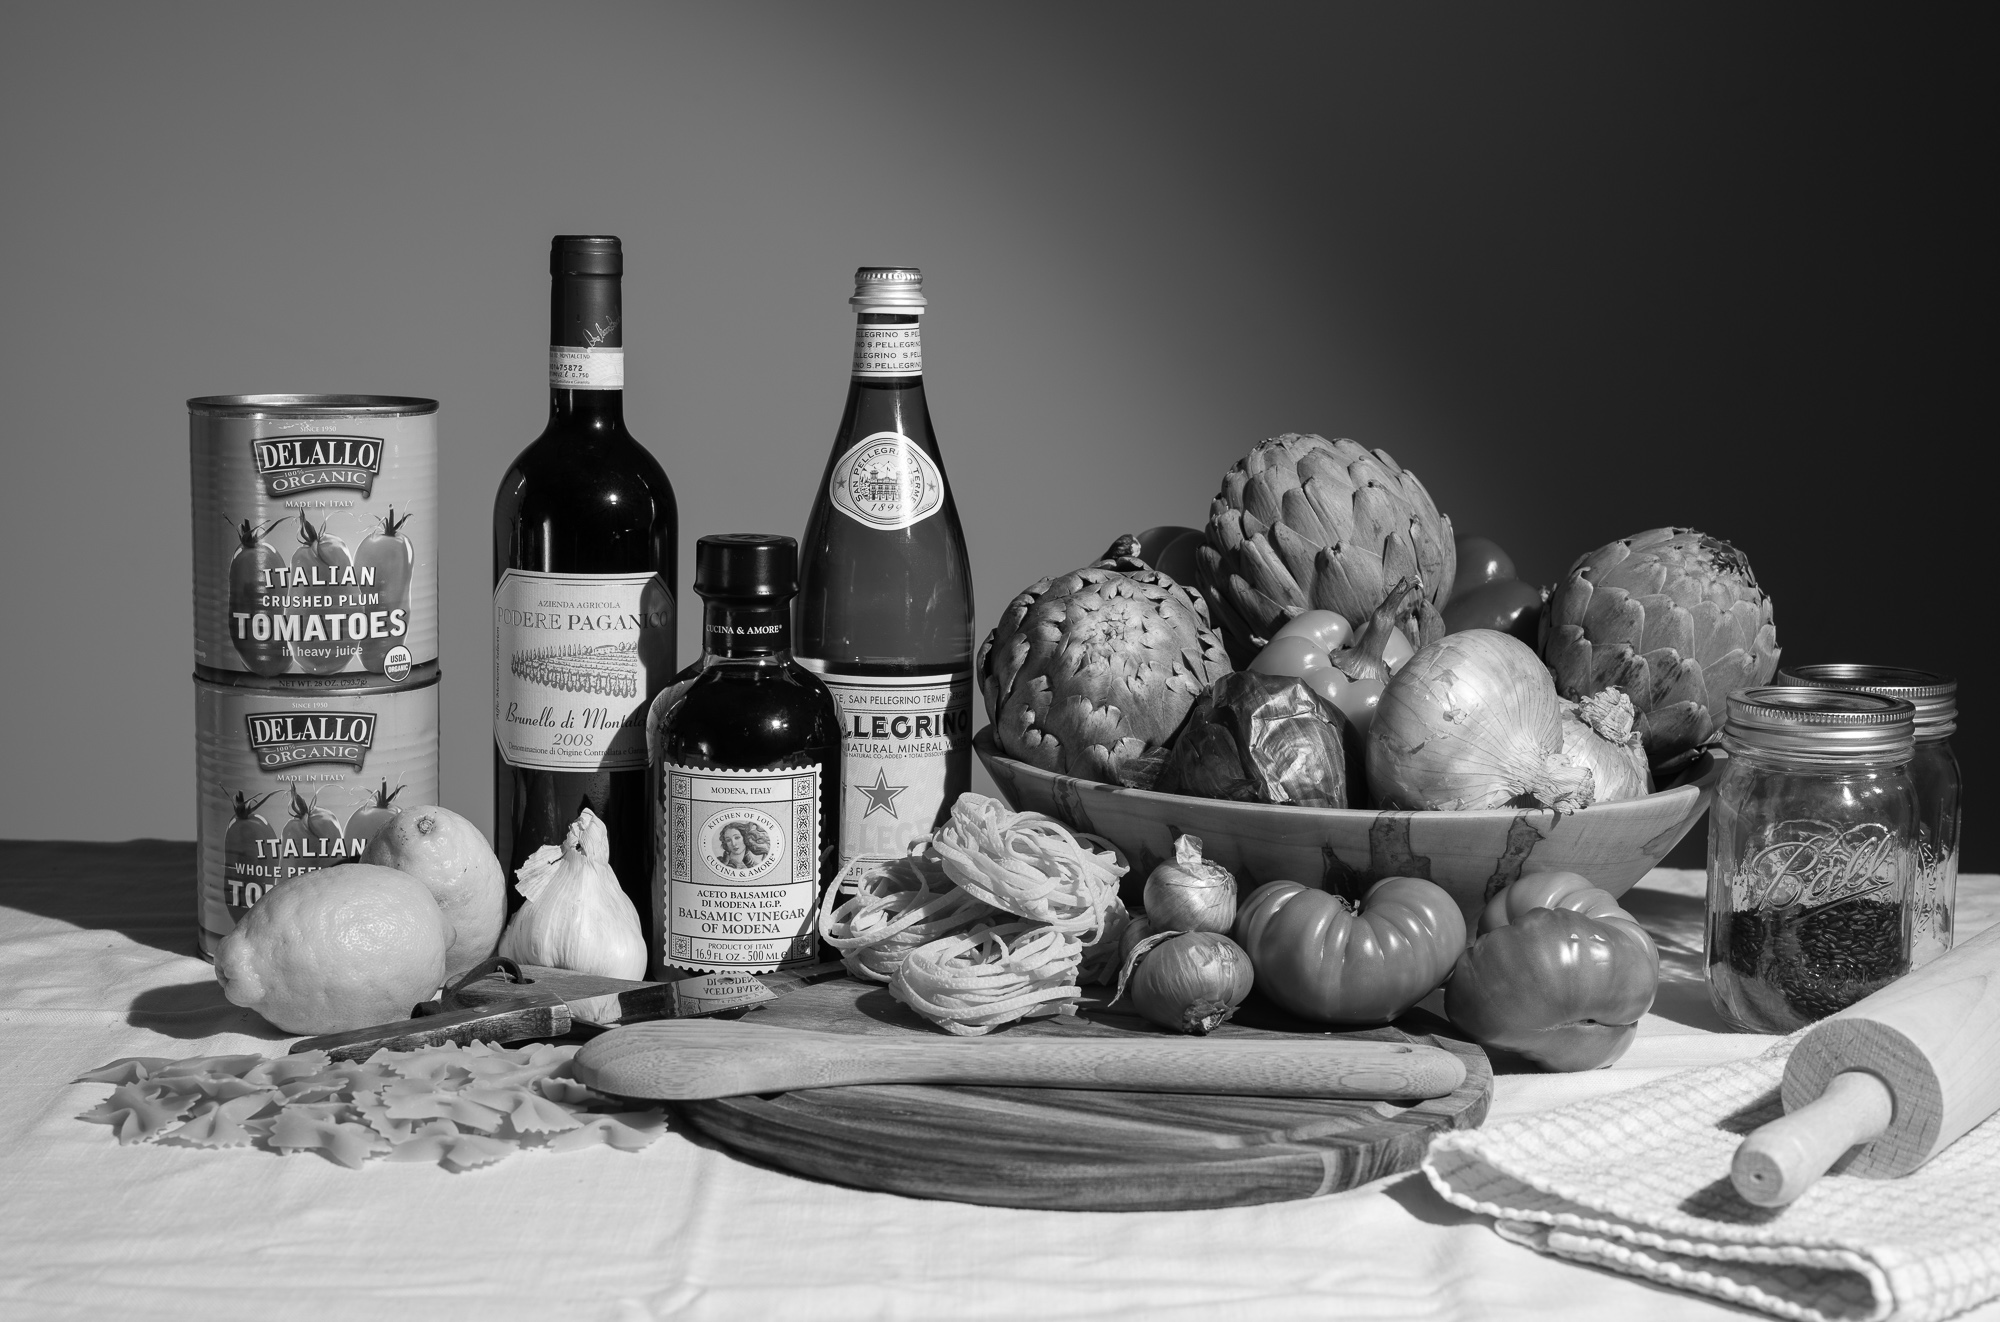
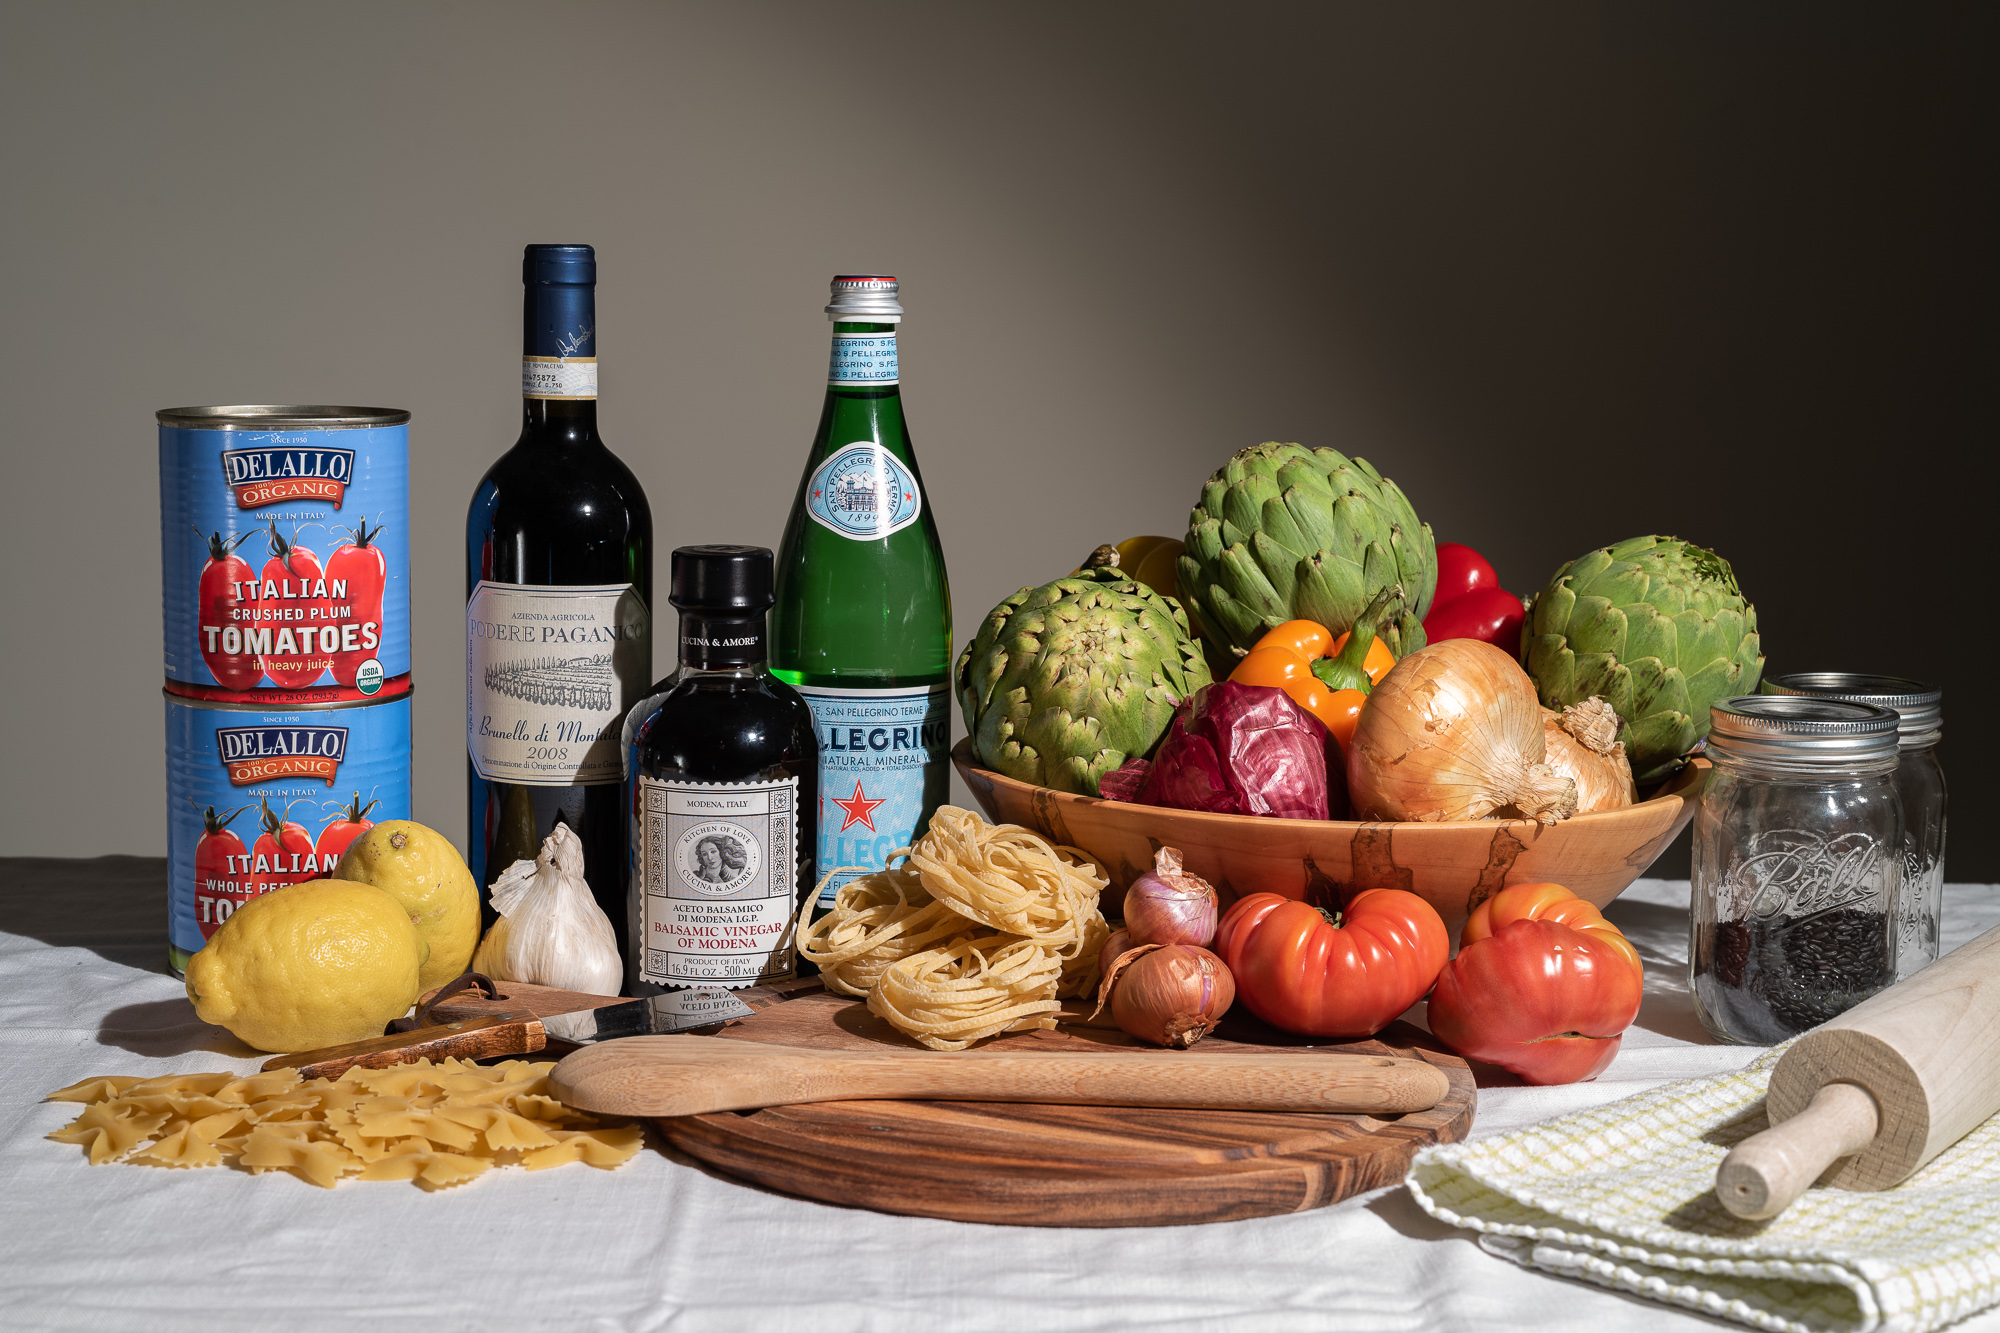
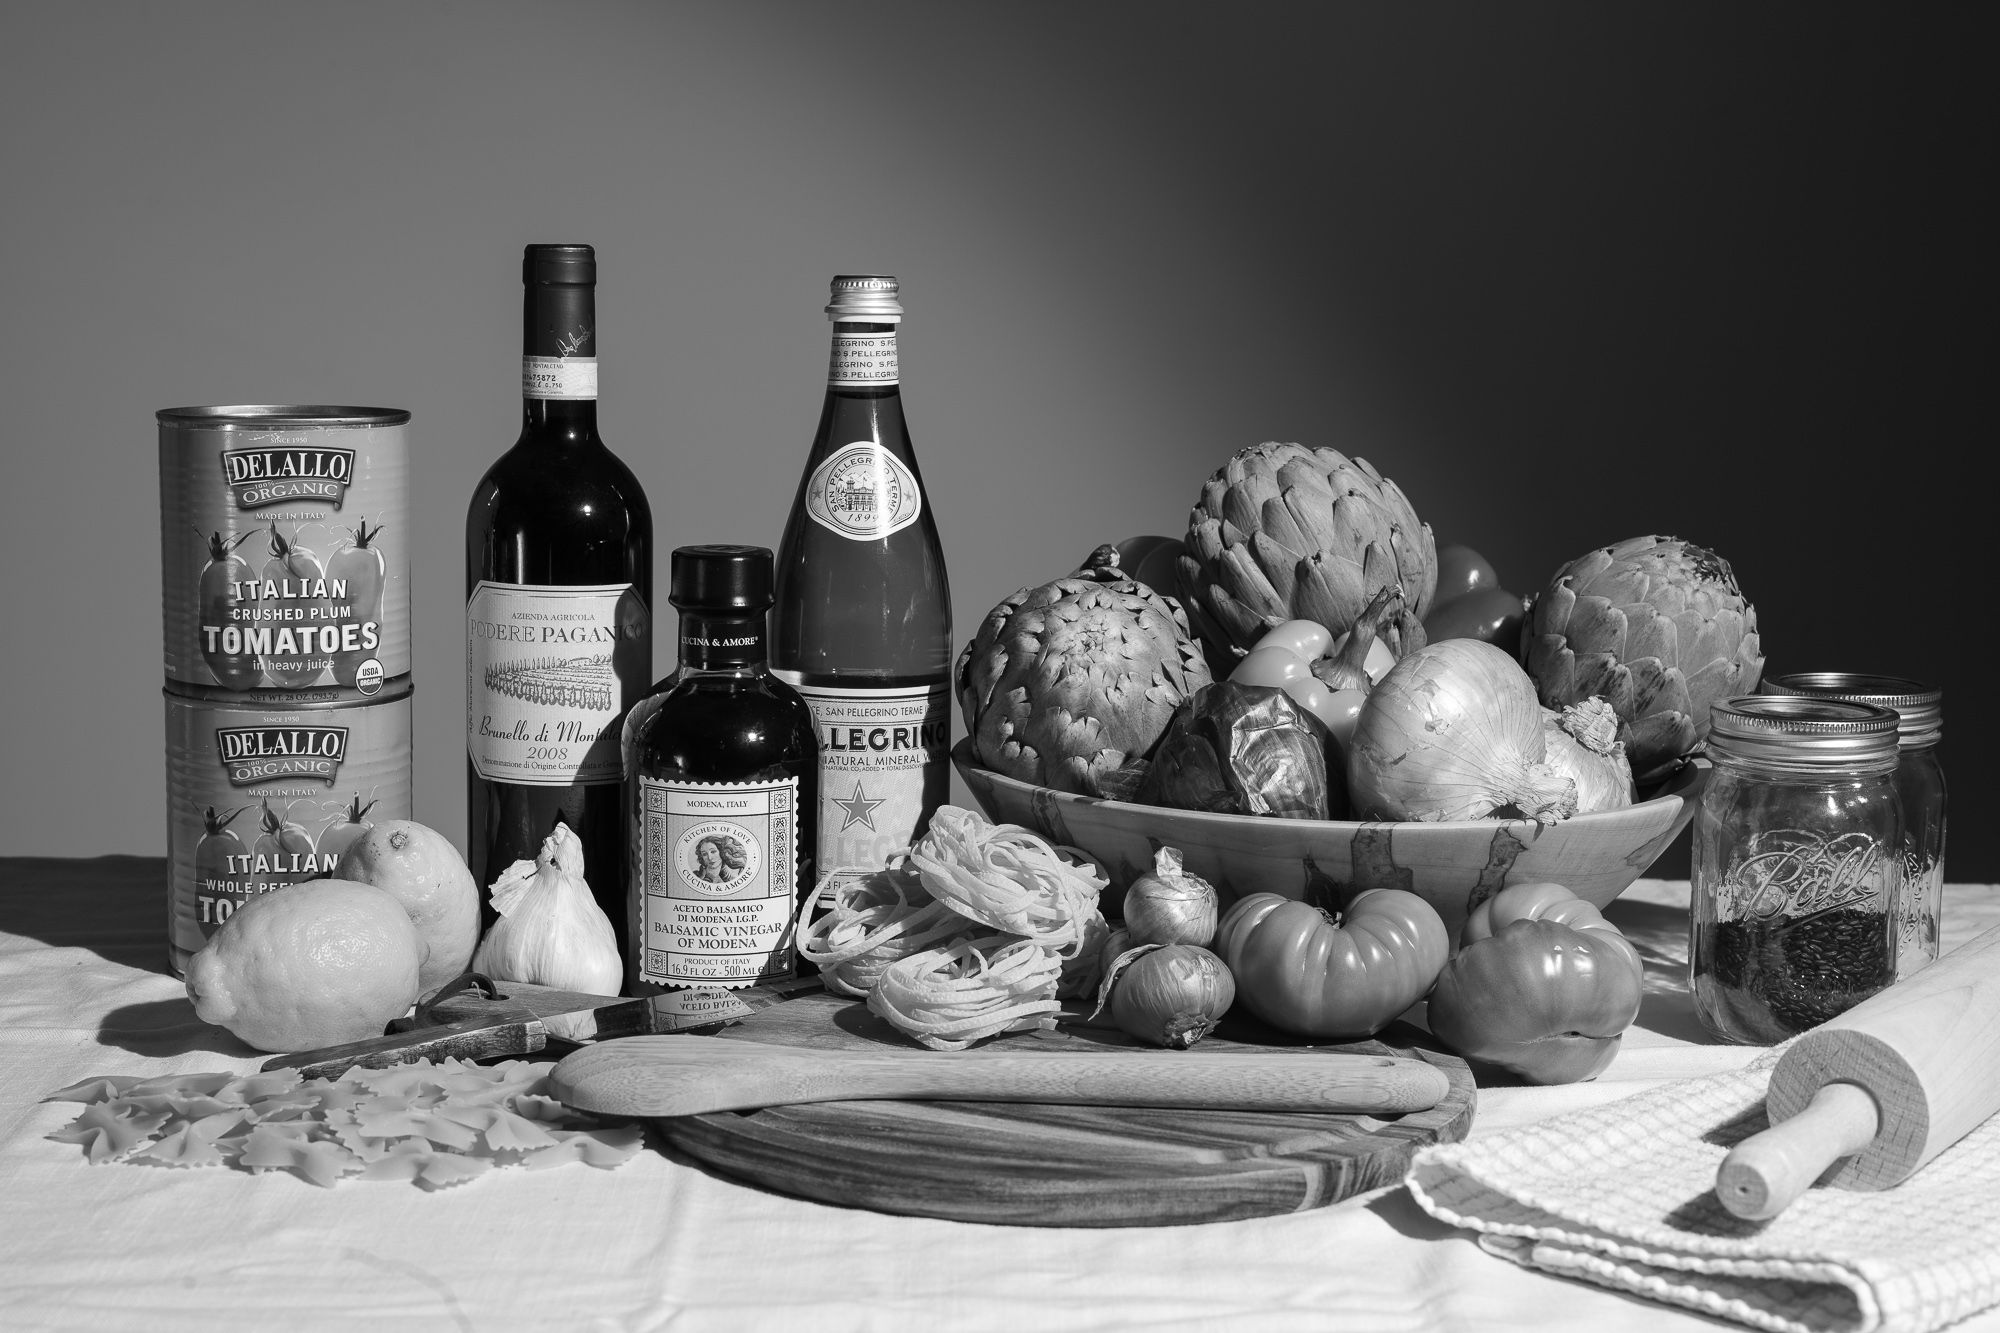
Image Processing and Noise Reduction
All the comparison images were processed using basic tone adjustments in the latest version of Lightroom Classic CC. I stayed away from any Presence tools as this would have unduly colored the results. So, no Texture, Clarity or Dehaze was used on any of the images. I also made no adjustments to exposure, as doing so would have impacted noise performance. Any variance in exposure at increasing ISO values was left in. And I didn’t modify toning on a per ISO basis. All corrections are per-camera and remain consistent for the entire ISO run.
For the color cameras, I applied Lightroom’s default Monochrome profile, dialed in basic tone adjustments, then used the Black & White Mix controls to attempt to match the overall look of the native monochrome cameras. The resulting conversions aren’t perfect, but certainly very close.
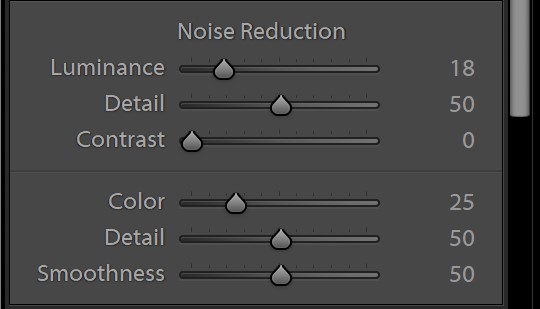
I chose to optimize noise reduction settings as ISO levels increased for each camera. At base ISO, even a small amount of default noise reduction would have diminished detail. And at high ISO, a lack of noise reduction would not have been representative of real-world usage. These are all best-case scenarios under ideal test conditions, so please view them as such.
All files were exported from Lightroom using the highest level of JPG quality (100) with the least compression, with no image resizing and no additional output sharpening. Why didn’t I use TIFF? In my experience, there is no visible difference in a highest quality JPG and a TIFF. These processed images were then brought into Adobe Photoshop as full-size layers, composited for comparison, then output for web with a JPG level of 11. If nothing else, in preparing for the results, I did manage to create the largest Photoshop file I’ve ever worked with, at over 31GB in size. Yes, for single file.
How to Properly View the Comparisons
One final note before we get into the comparisons: these images are output to 2000px on the long side, with 1:1 pixel rendering. Be sure to click on each crop set to view the larger image. When viewed with no onscreen scaling, one pixel on your monitor will display one pixel from the camera. This is complicated somewhat by Retina-type displays that do pixel resampling. Applications like the latest versions of Photoshop and Lightroom have the option of running in non-scaled, 1:1 mode, but the pictures will appear smaller on screen.
If your monitor resolution is less than 2000px across, like on an iPad or a laptop, be sure to right-click on the image and select Open link in new tab (be sure to select link not image). This will open just the image, allowing you to view it at the correct size once you click to magnify. Or, even better, right-click to Save link as… and view in Photoshop. Unfortunately, with technological innovation comes its own set of challenges. Retina and 4K/5K displays look stunning, especially for text, but are sometimes less than ideal for image comparisons as they employ pixel doubling and no longer show 1:1.
M Cameras Compared: M10 Monochrom vs. M Monochrom (Typ 246) vs. M10-P
For this M-System matchup, we’re comparing the new M10 Monochrom, the previous generation M Monochrom (Typ 246) and the M10-P, with its color file converted to black and white. As I stated above, the M10 Monochrom’s 41 megapixel files have been downsampled to 24 megapixel, matching up to the other two. For more explanation on my reasoning, please see the resolution section above. If you want to see the resolution difference you can scroll past the 3-way comparisons, and I have a native resolution match-up between the M10M and the M246.
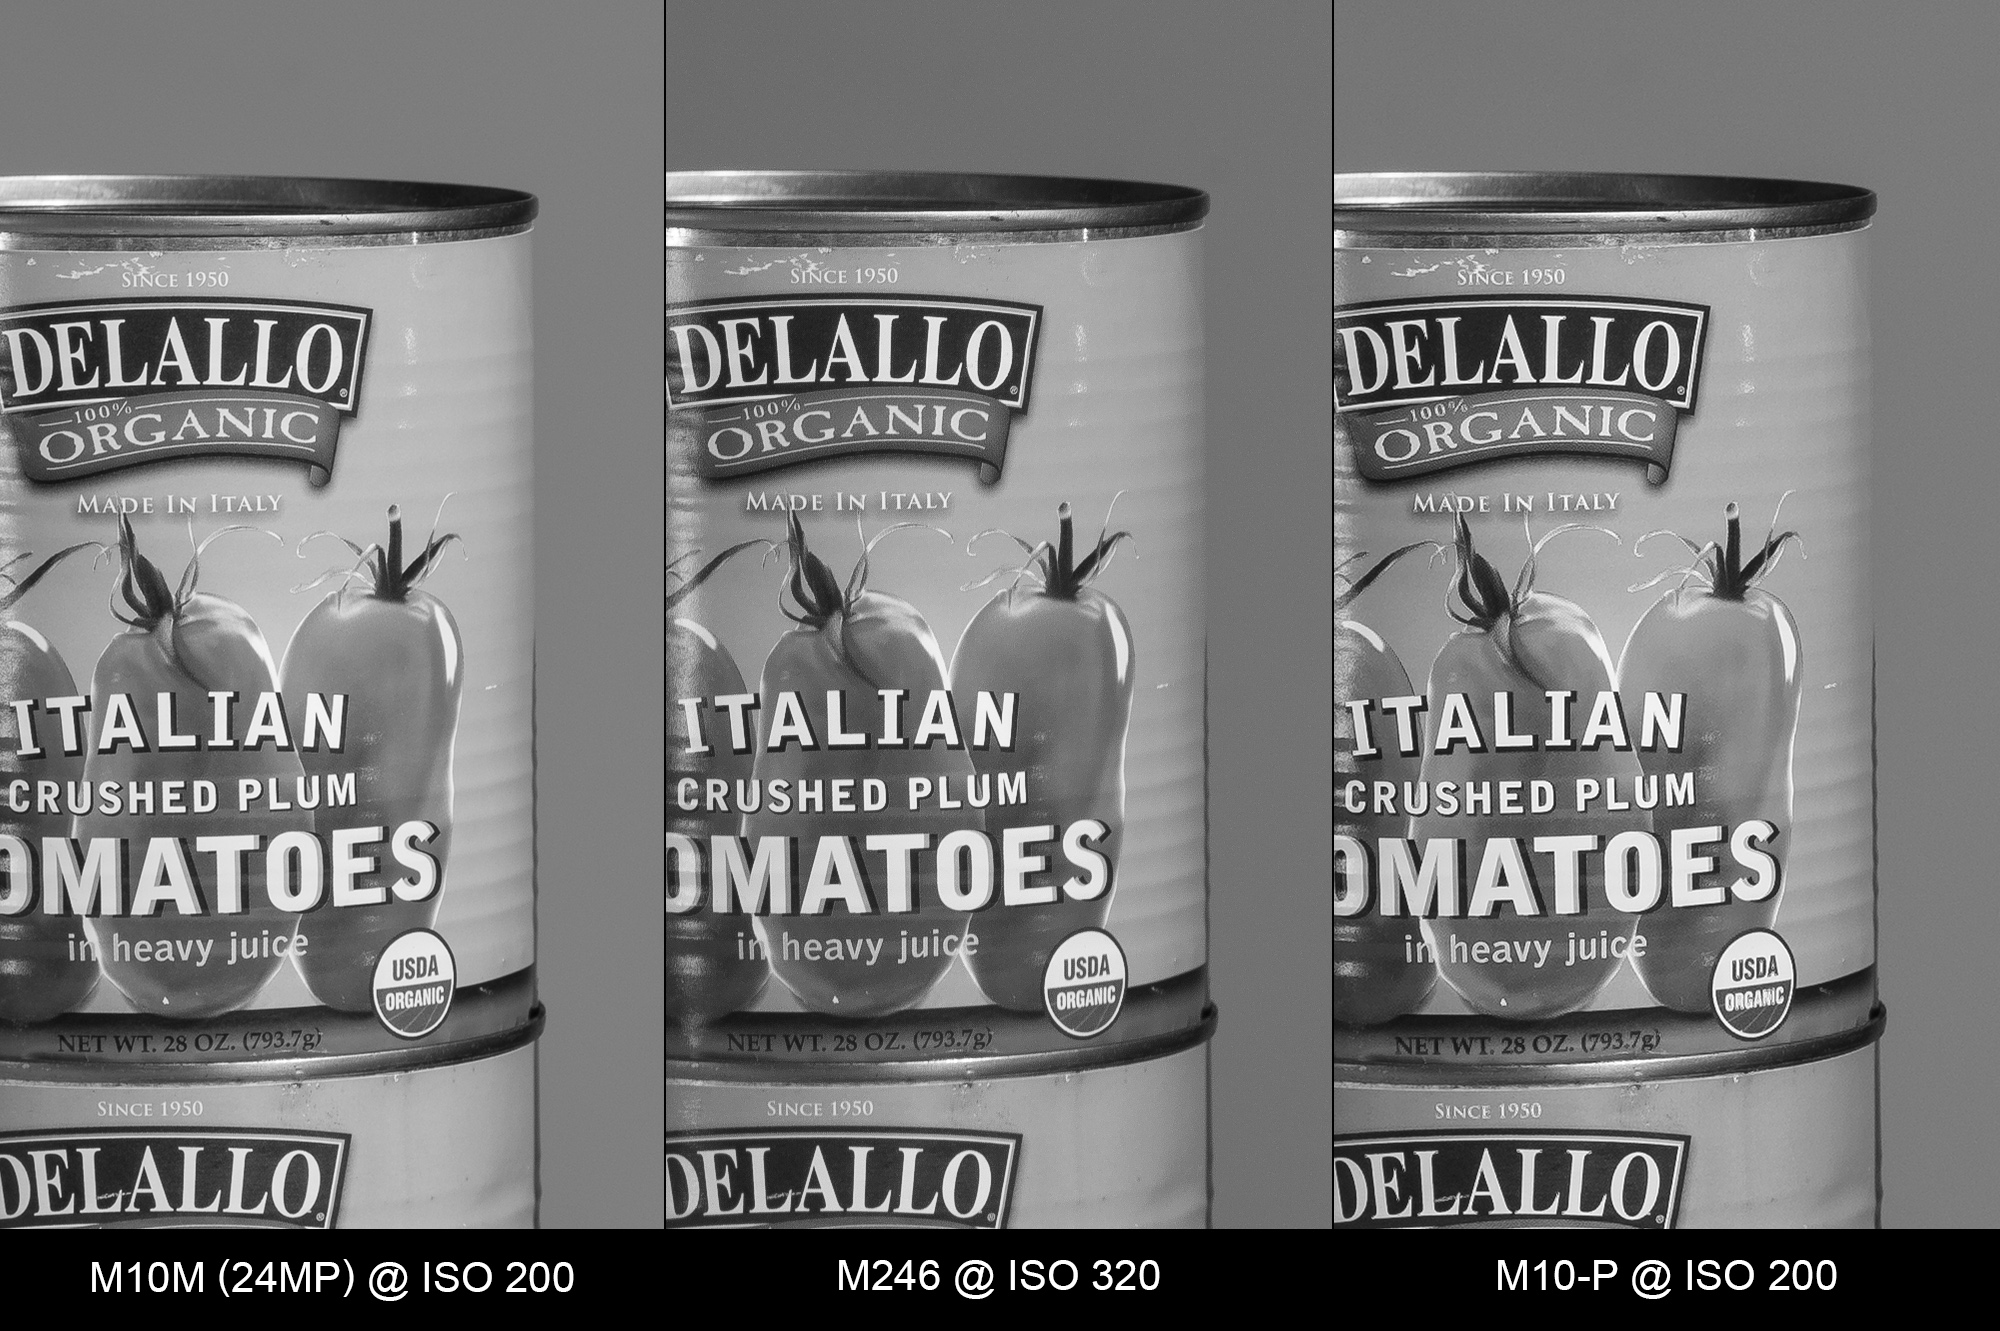
ISO 200
To start things off, we’ve got all the M cameras at low ISO. While the base ISO of the M10M is ISO 160 and the M10-P is ISO 100, the M246 doesn’t go below ISO 320. So, 200 for the newer cameras and 320 for the previous Monochrom is a bit of a compromise. And really, there is no visual difference. All are exceptionally good.


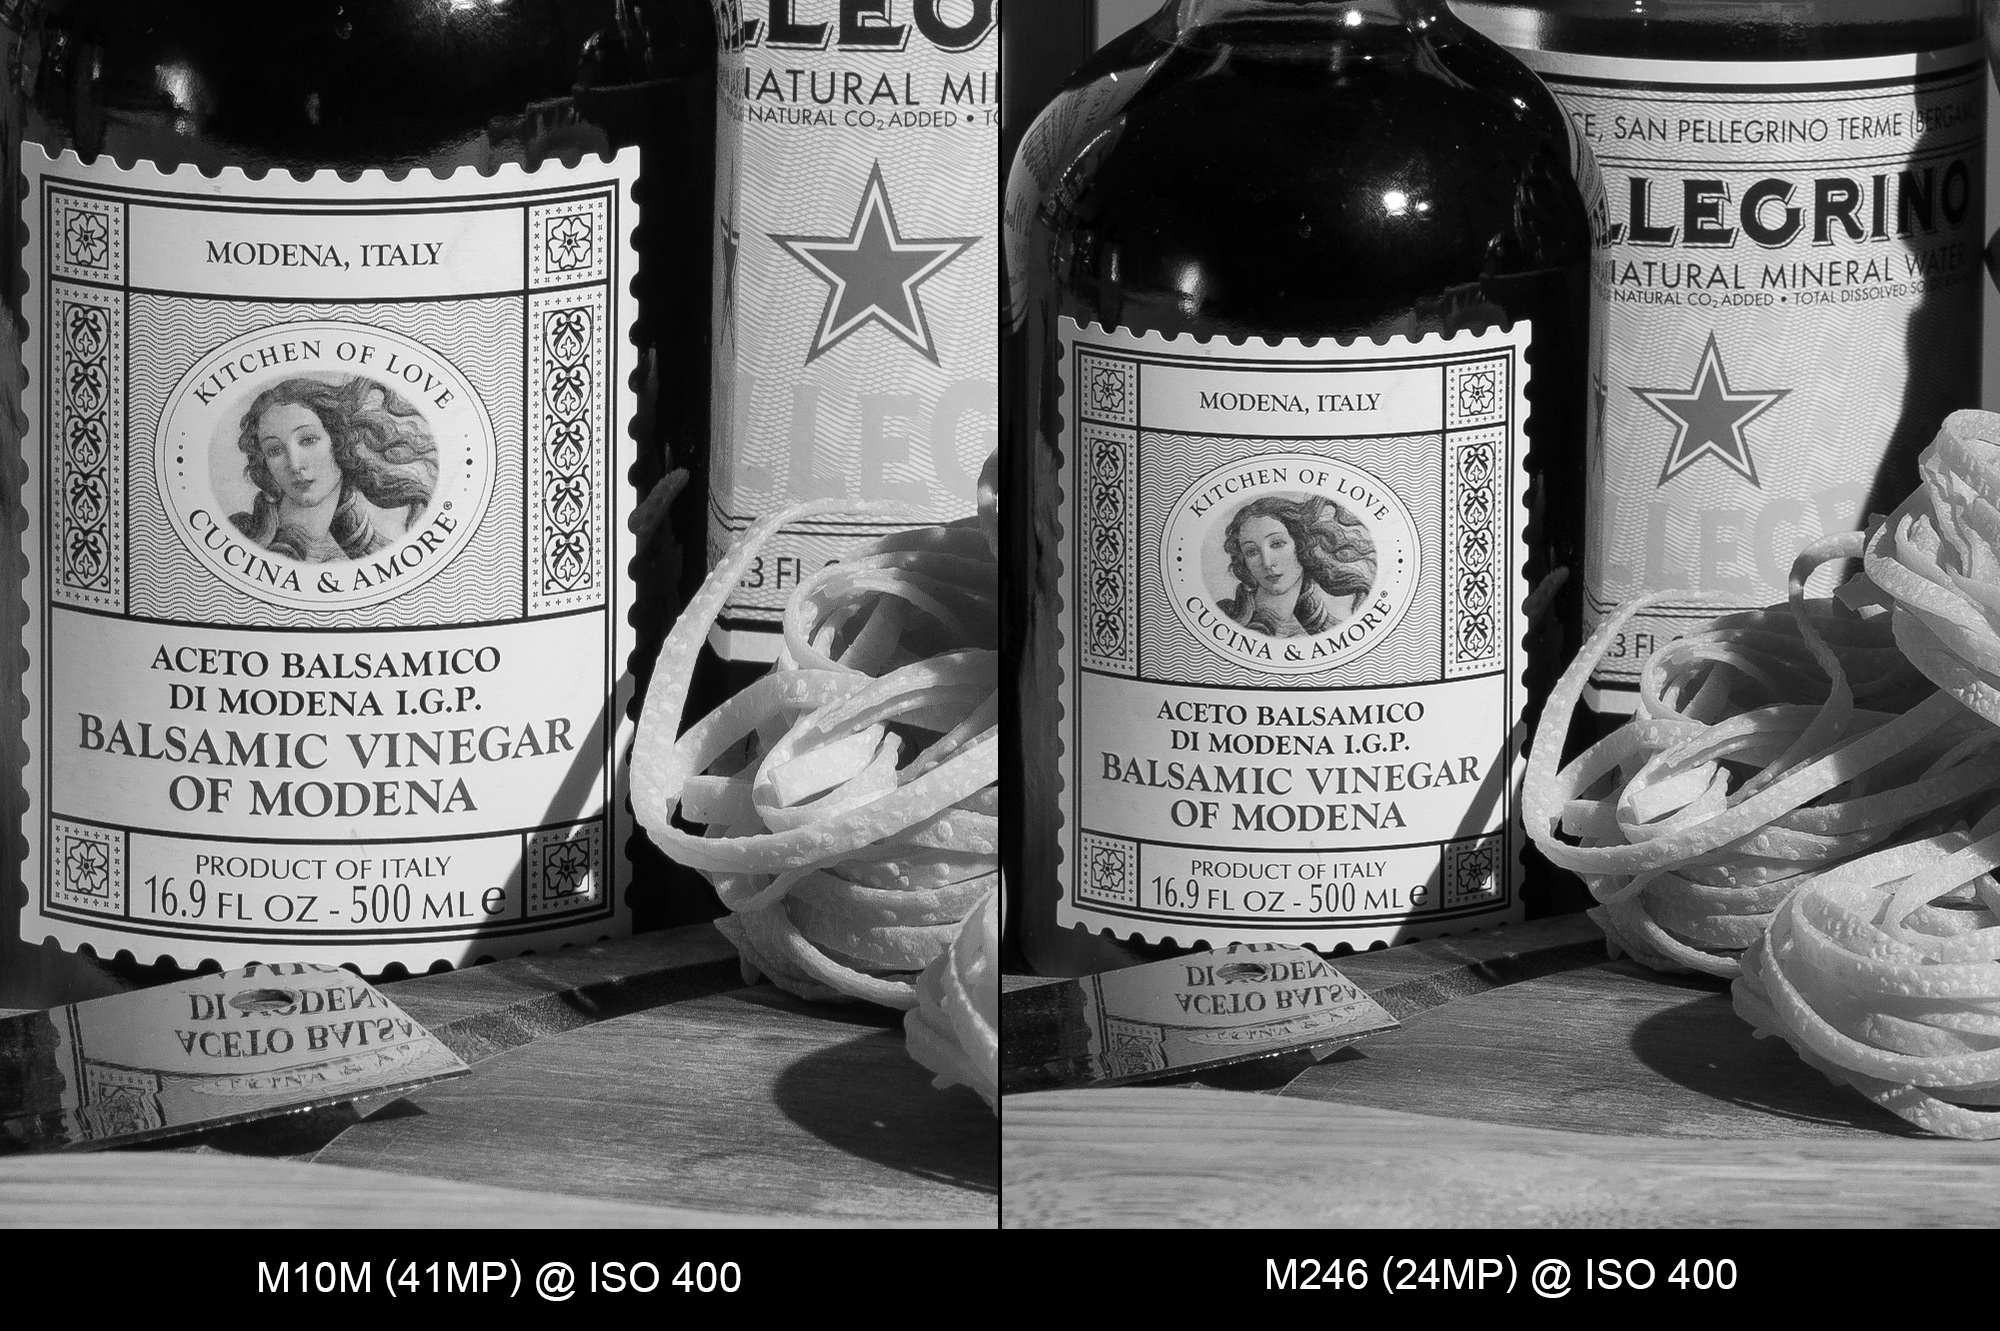
ISO 400
At ISO 400, all are still perfect. Detailed, smooth.

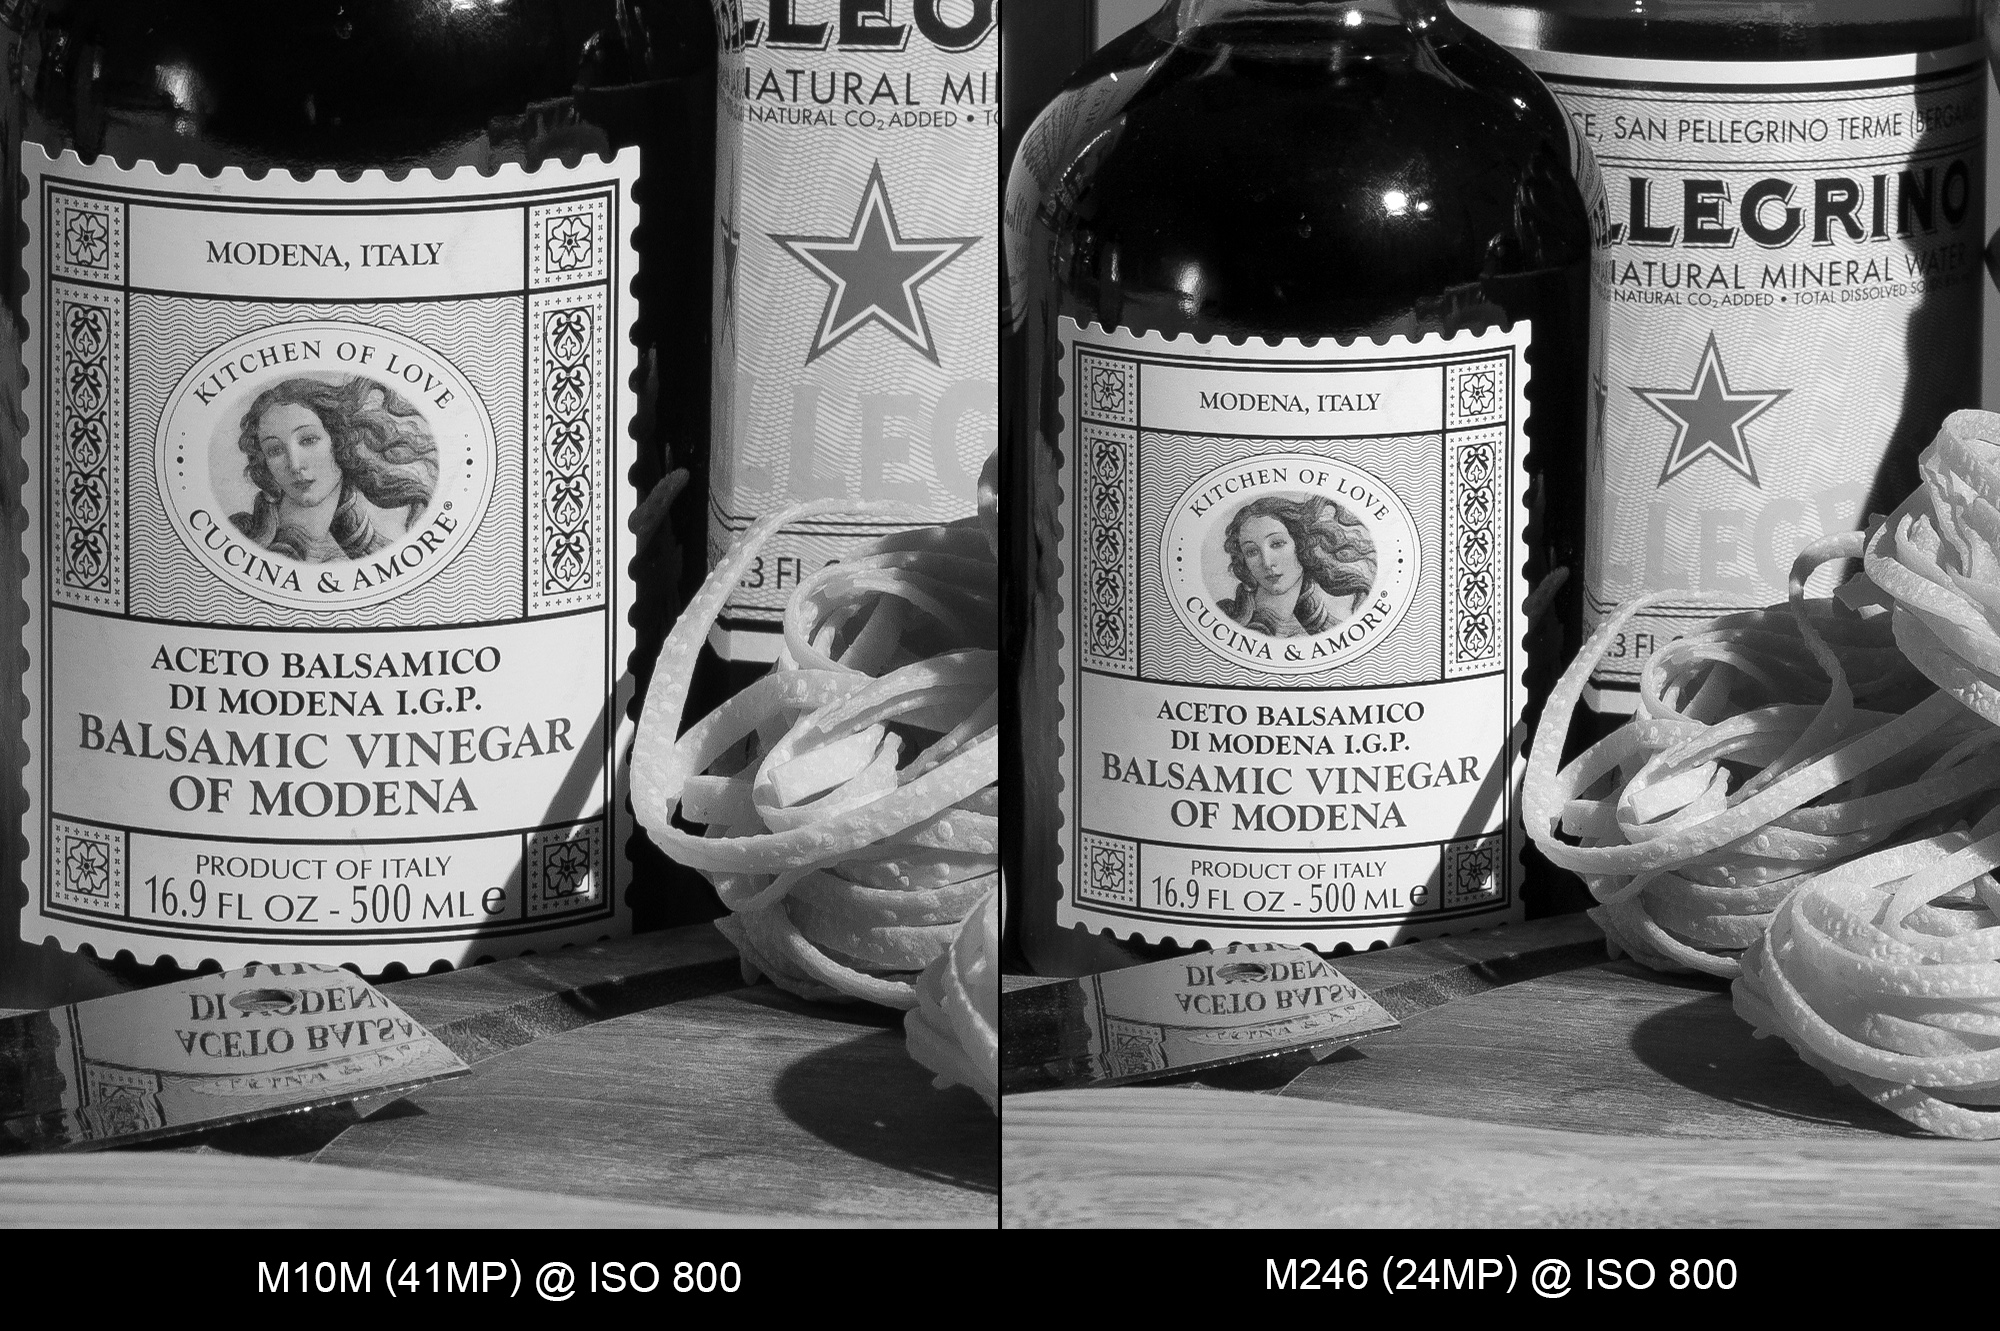
ISO 800
Same story at ISO 800. Almost no discernable loss of quality for any of the M cameras.
ISO 1600
Just the tiniest amount of noise is starting to be visible in the background. Interestingly, the M246 is the smoothest here.
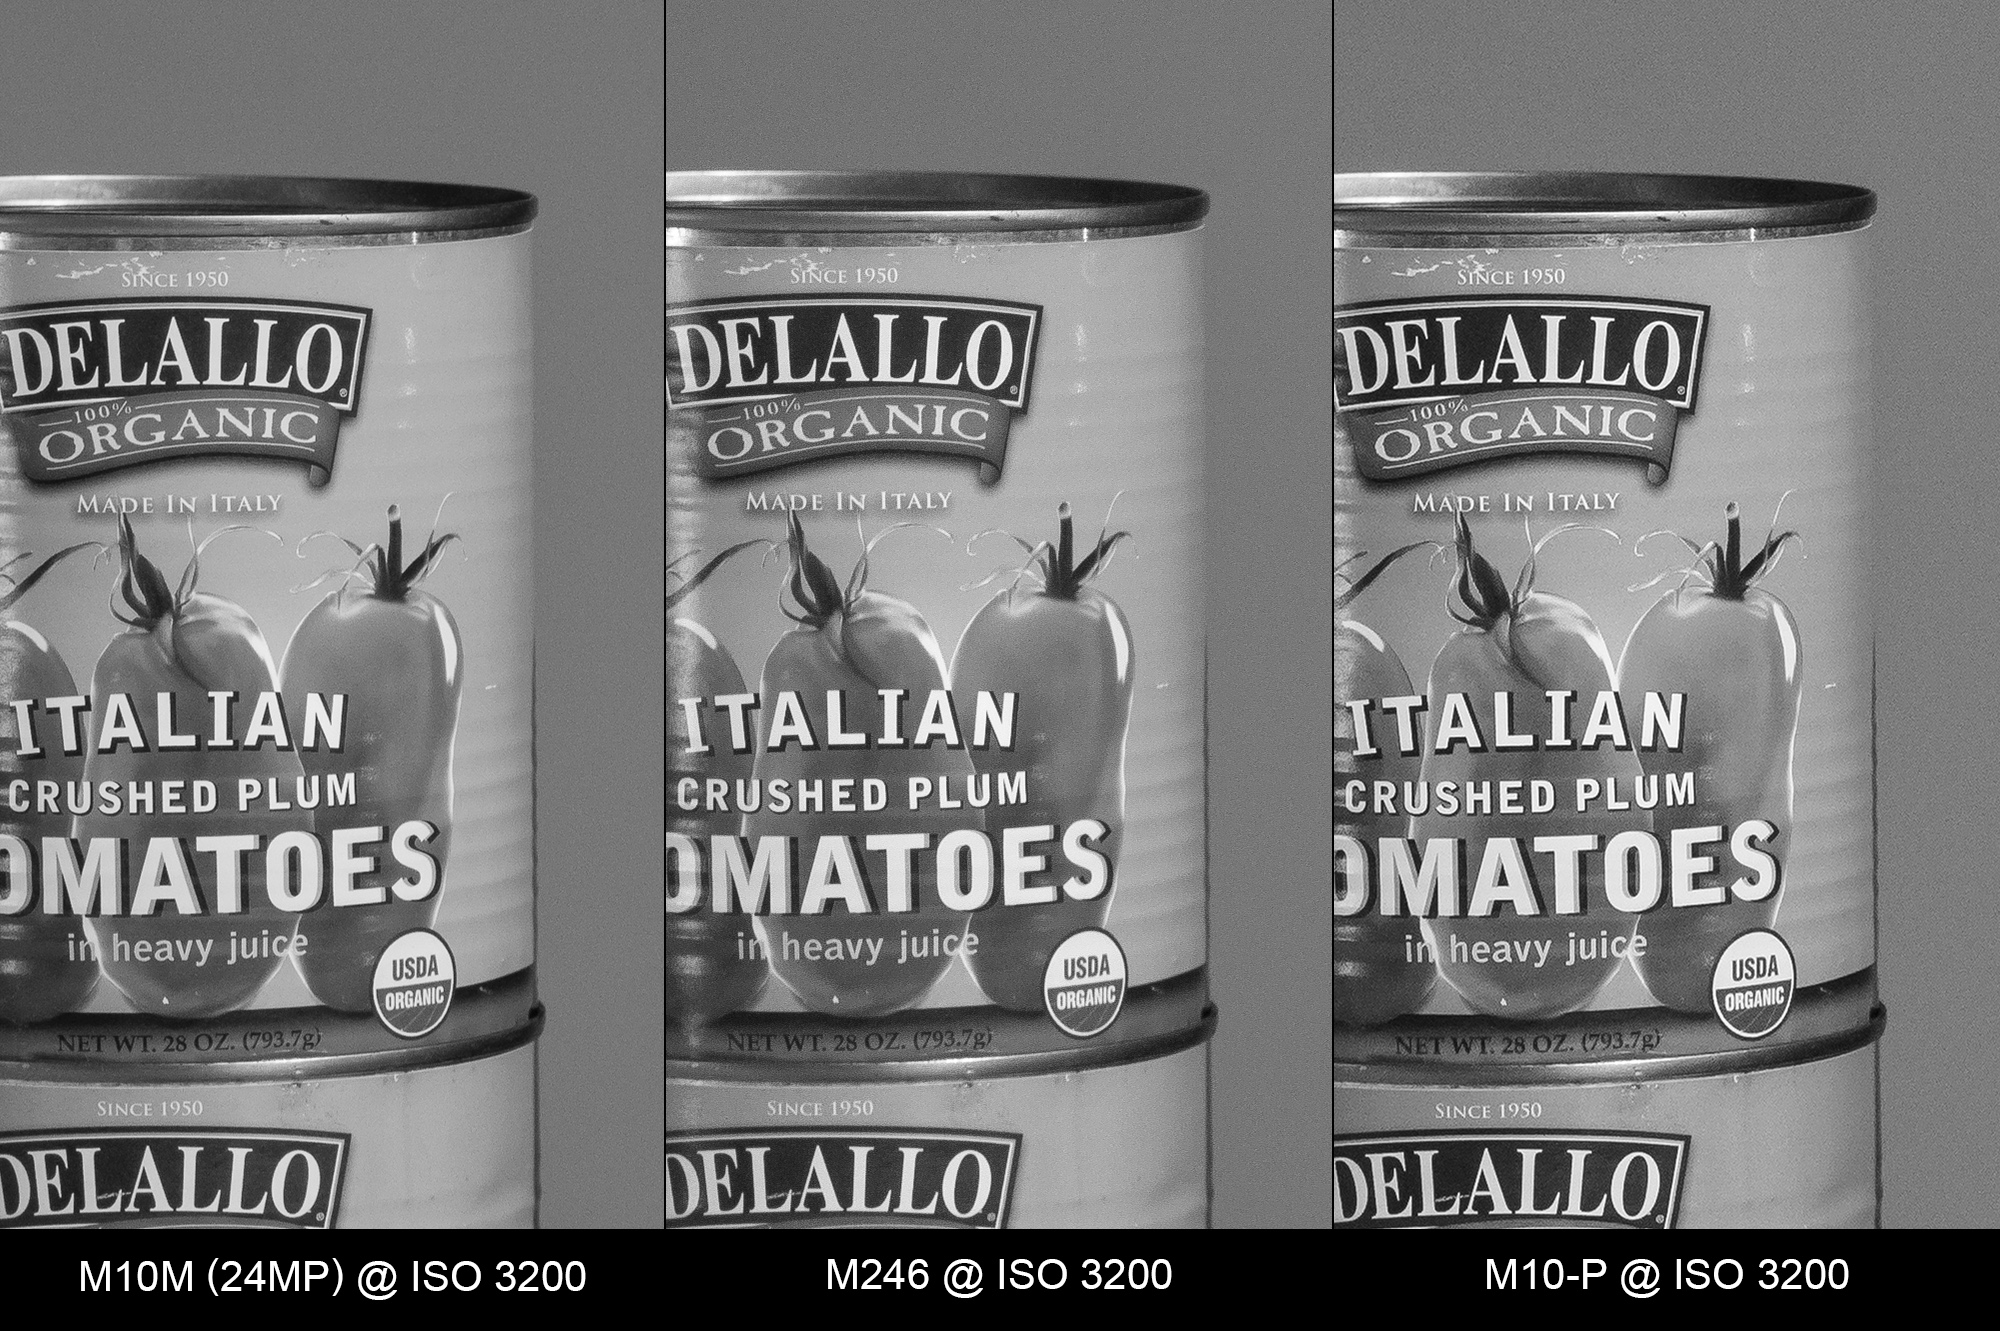
ISO 3200
One stop higher and the advantage seems to have shifted to the M10M’s favor. Detail resolution and overall crispness looks just a bit better than on the M246, but still, the differences are minor.


ISO 6400
All the M cameras are doing really well here. Both Monochroms are still roughly on par, with the M10M continuing to resolve more detail. The M10-P is just starting to fall off from the other two.


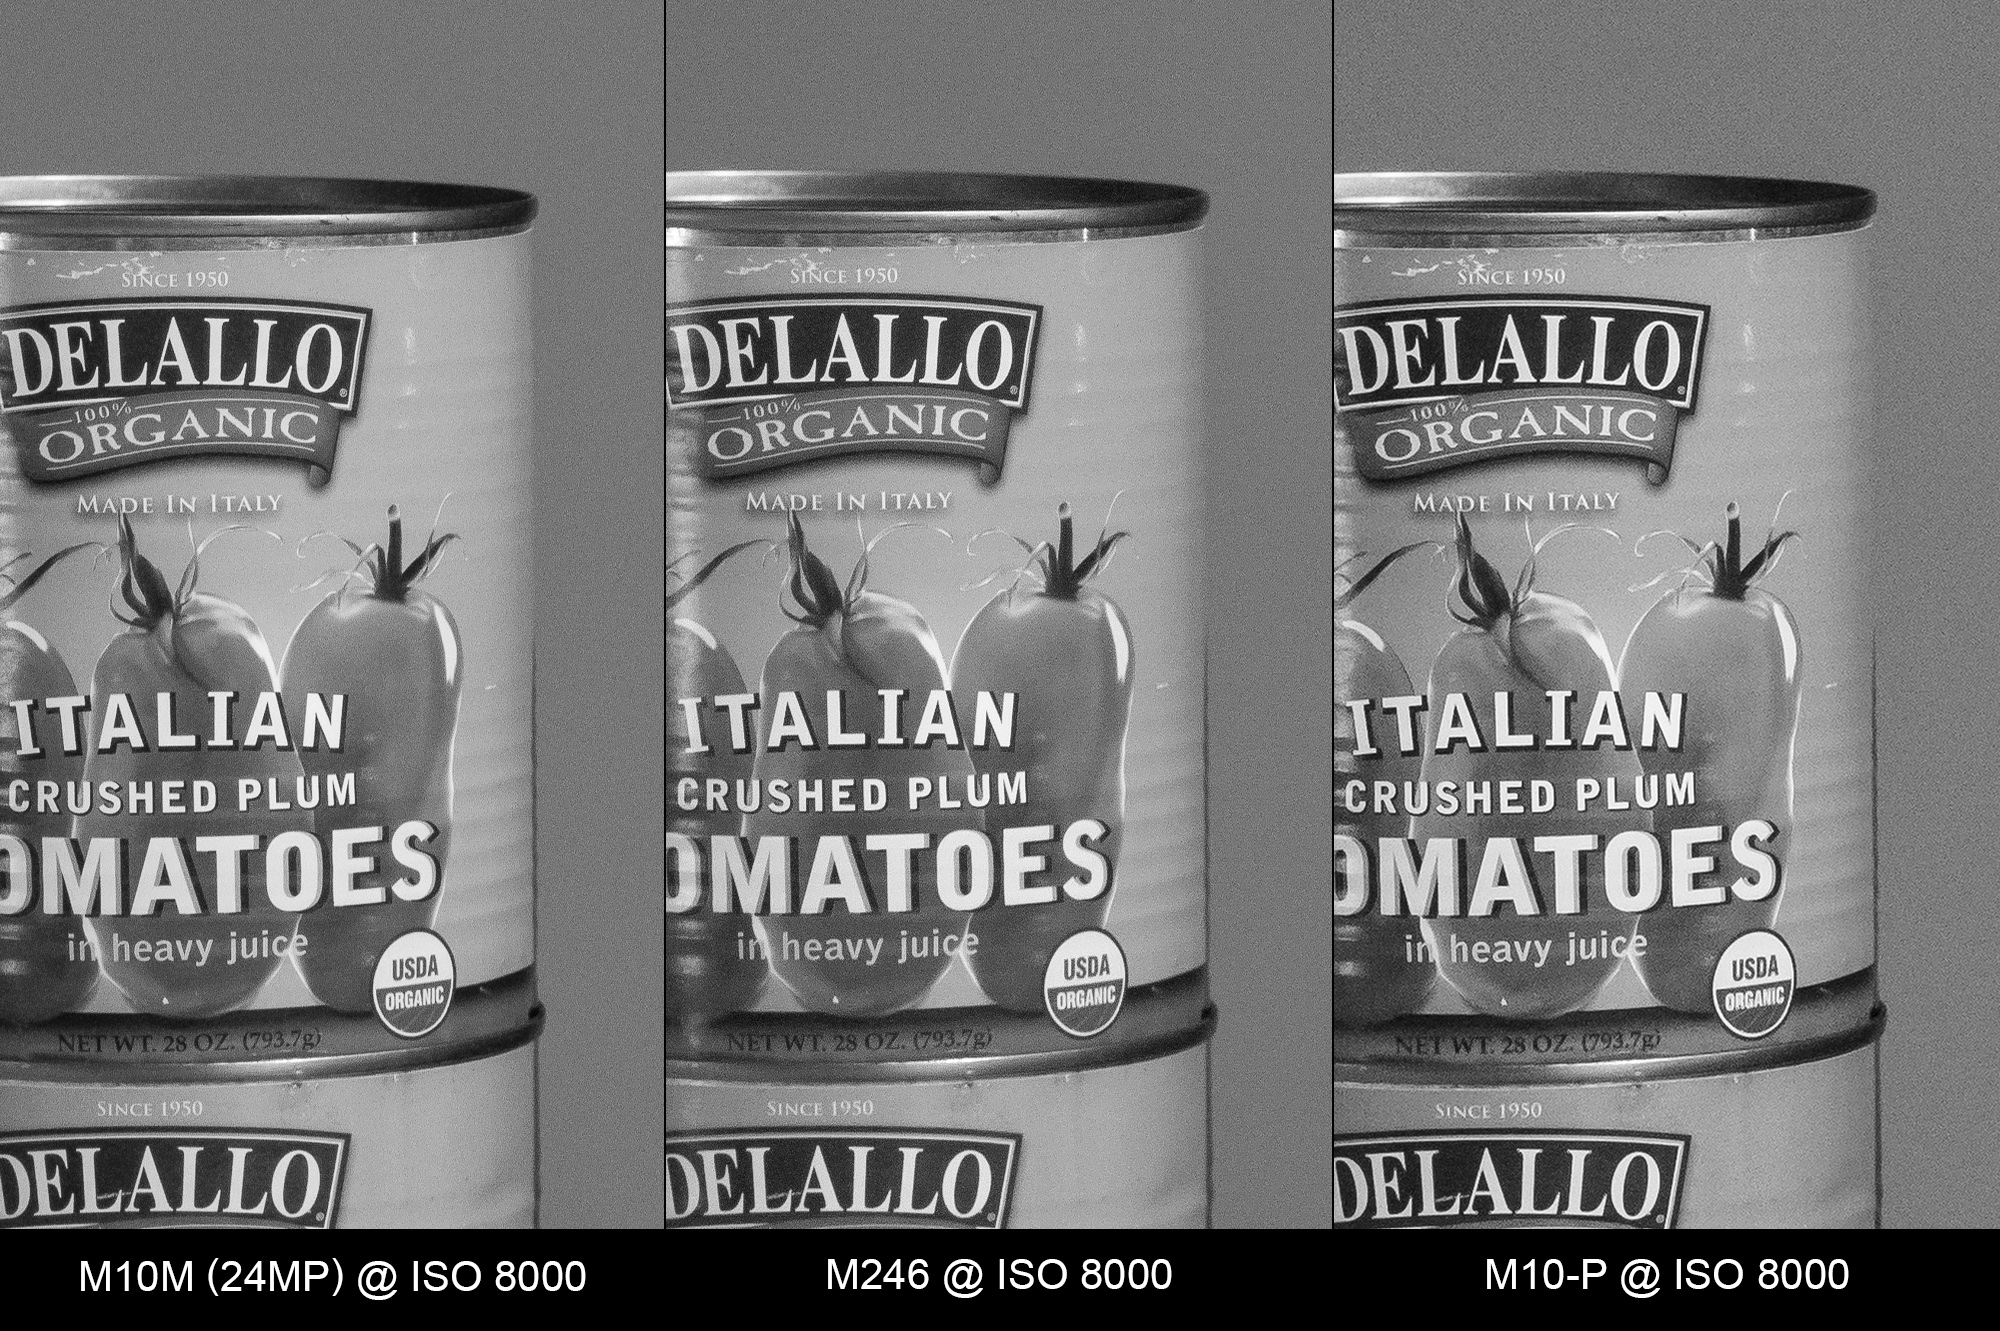
ISO 8000
Let’s slow things down a little. Instead of whole stops, we’ll evaluate at 1/3 stop increments. The image quality will degrade much quicker now, so it’s good to really get a feel for the limits on each camera.
At ISO 8000, noise is tightly packed for all cameras, but more visible on the M10-P. The M10M is very slightly in the lead.


ISO 10000
The M246 appears to overtake the M10M with slightly less noise, but at the expense of some detail. And while the M10-P is picking up incrementally more noise, details are still sharp.

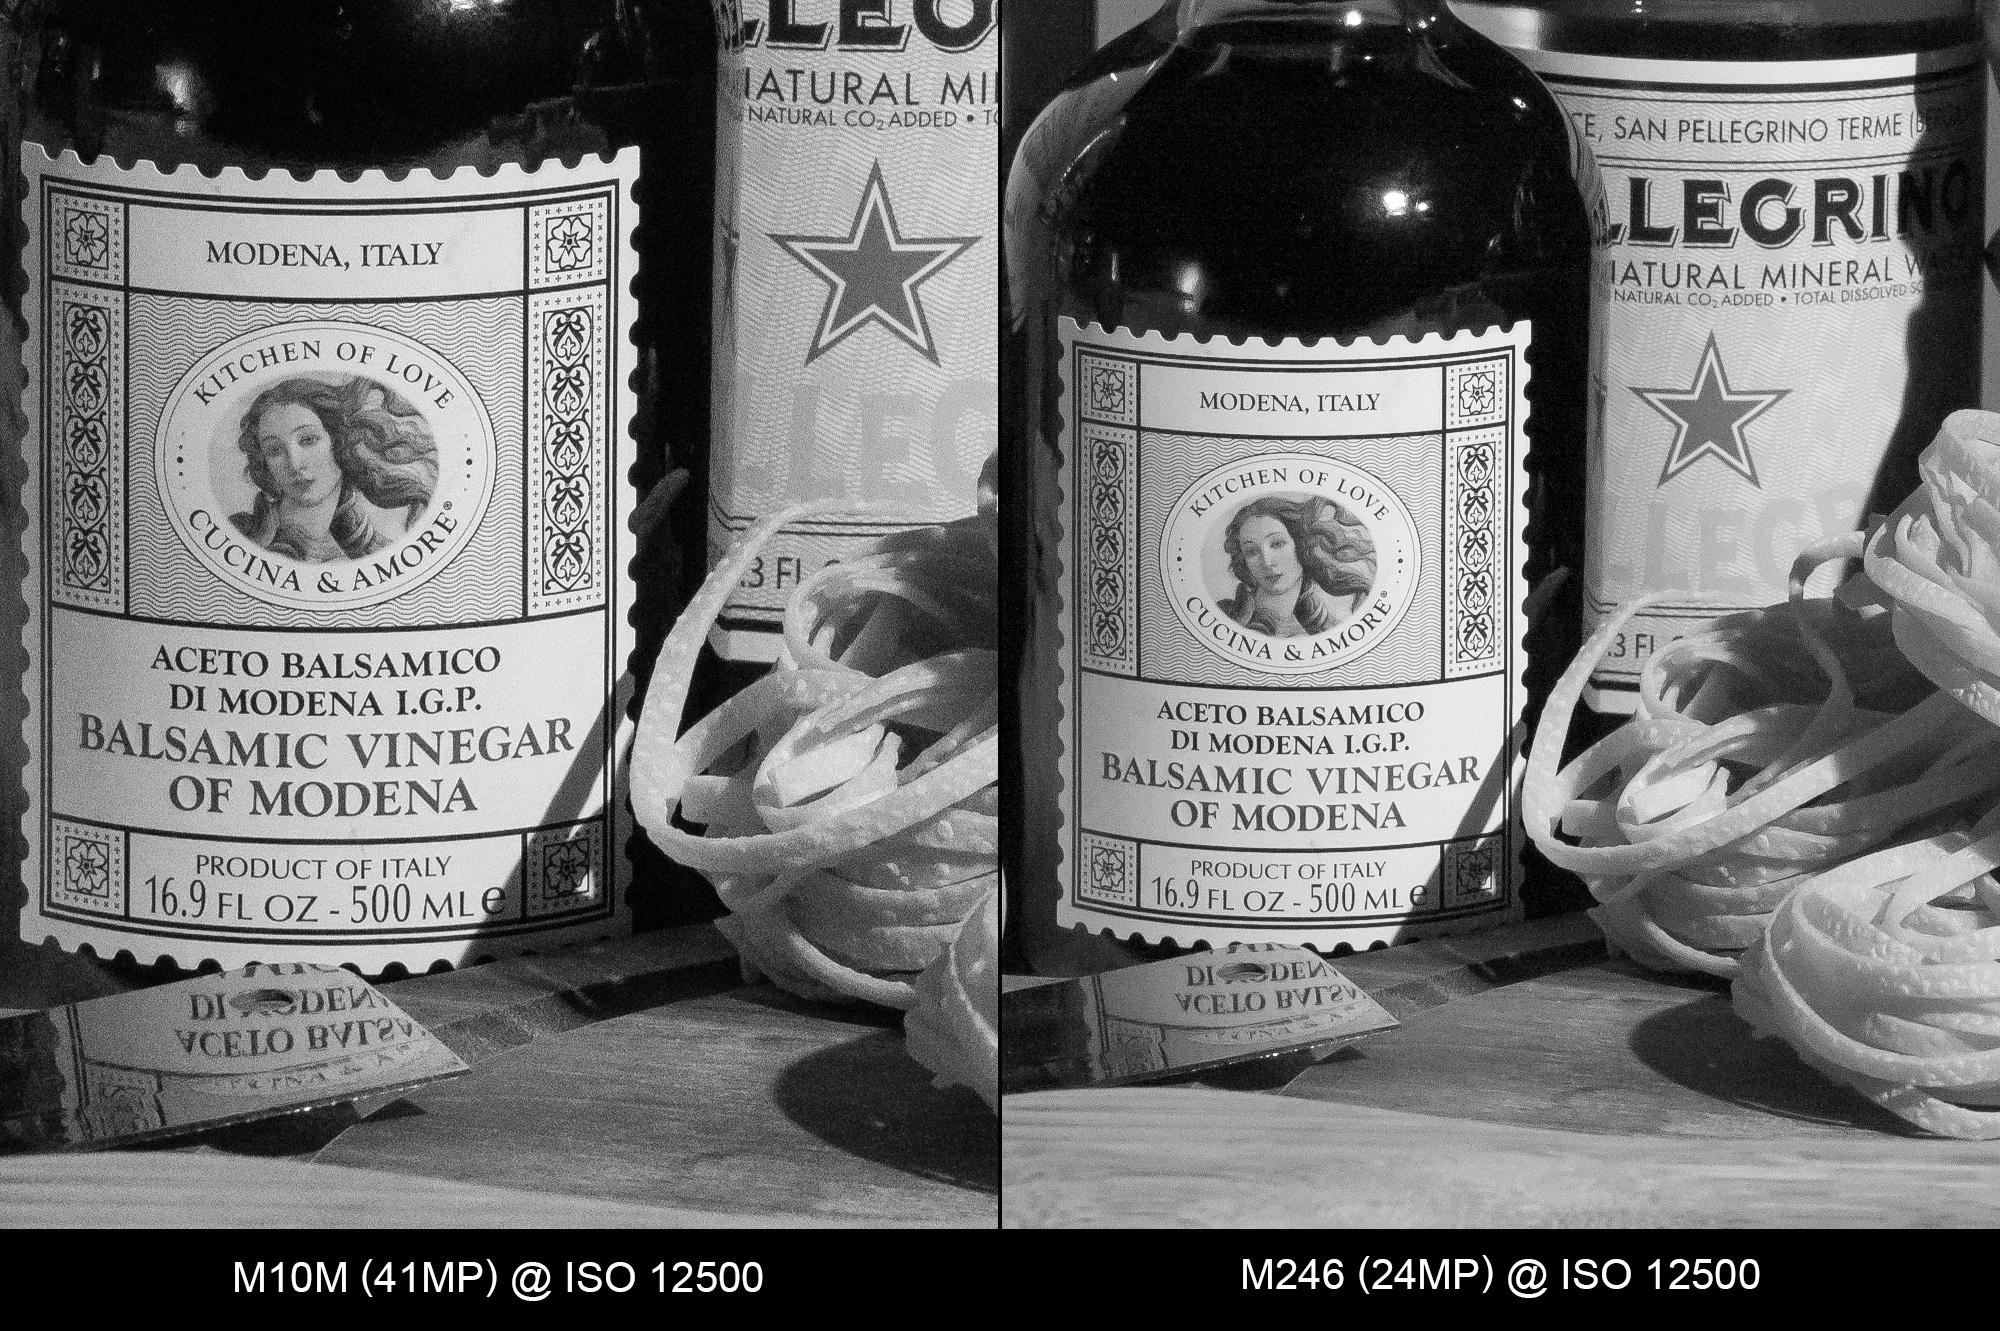
ISO 12500
Almost the same story as ISO 10000, but the M246 seems even better. Could the older M246 actually be besting the newer M10M?
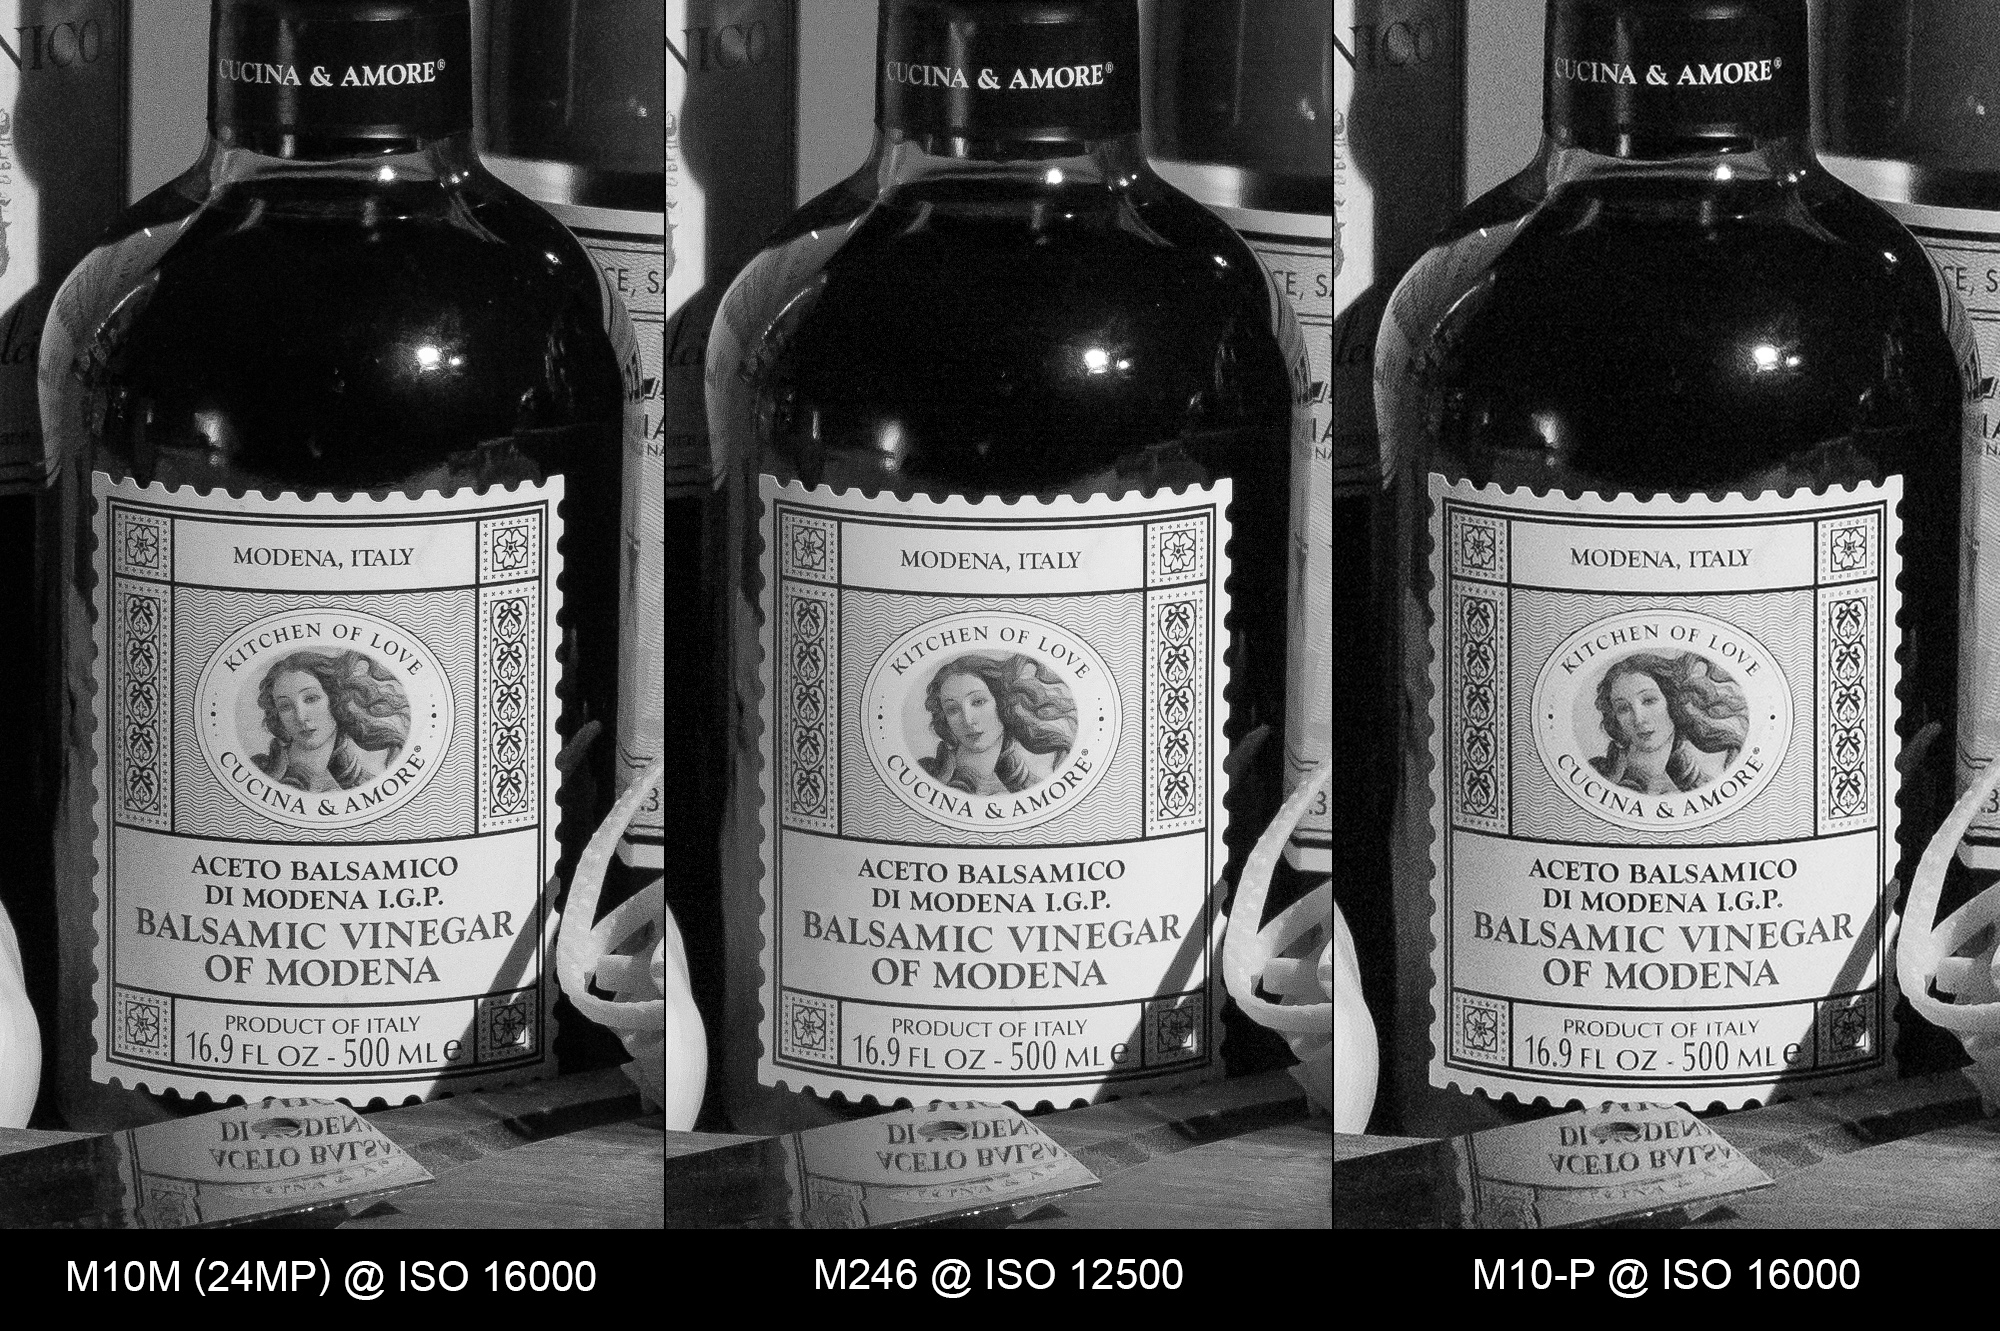
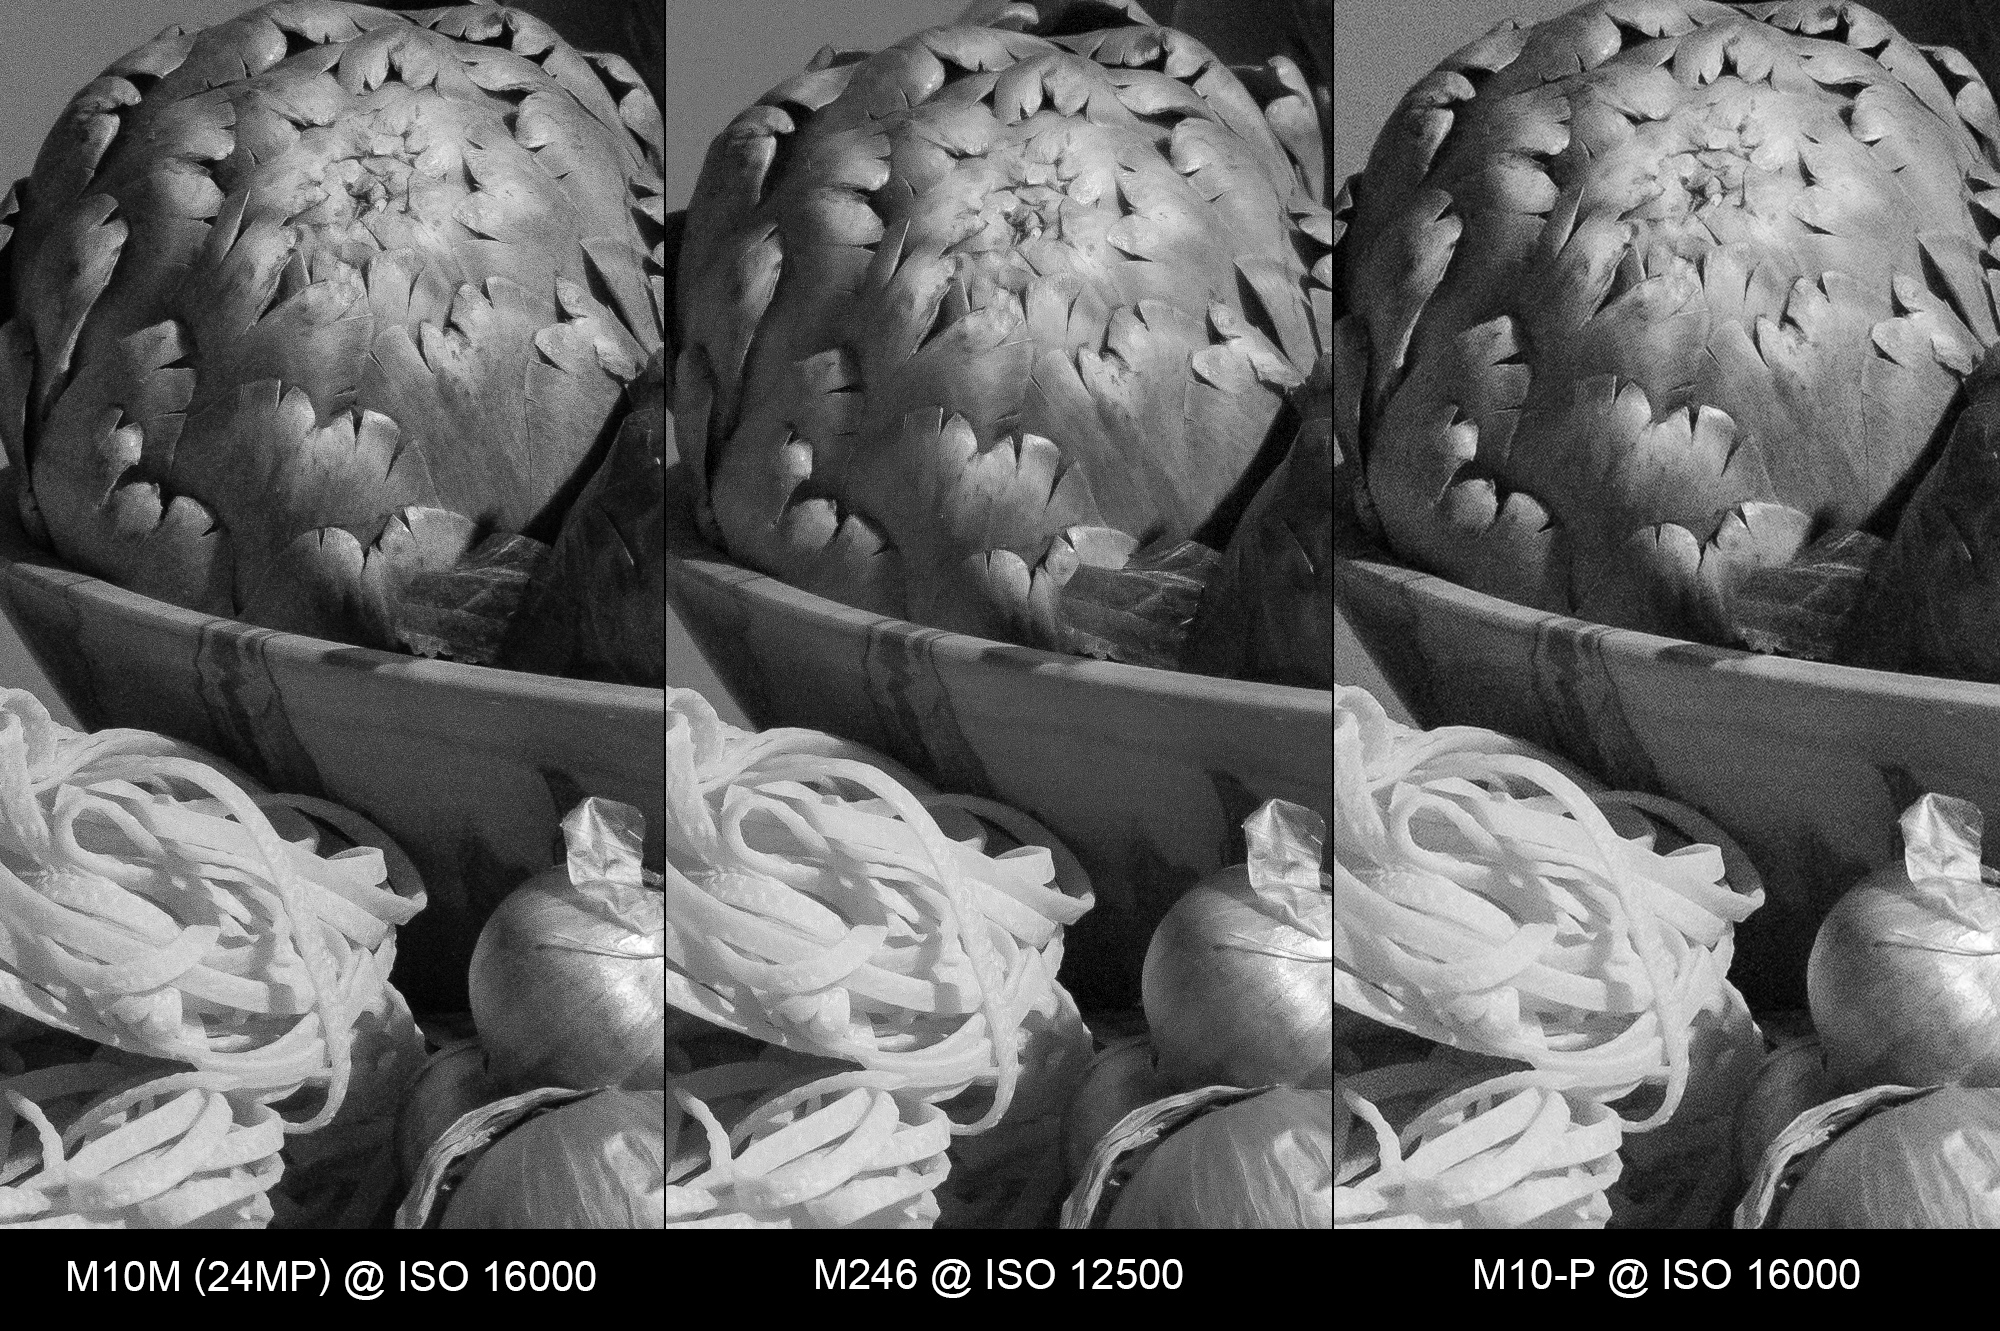
ISO 16000
Unfortunately, the M246 has no 1/3 stop increments between ISO 12500 and 25000, so for 16000, we’ll compare the M10M and M10-P to the M246 at ISO 12500.

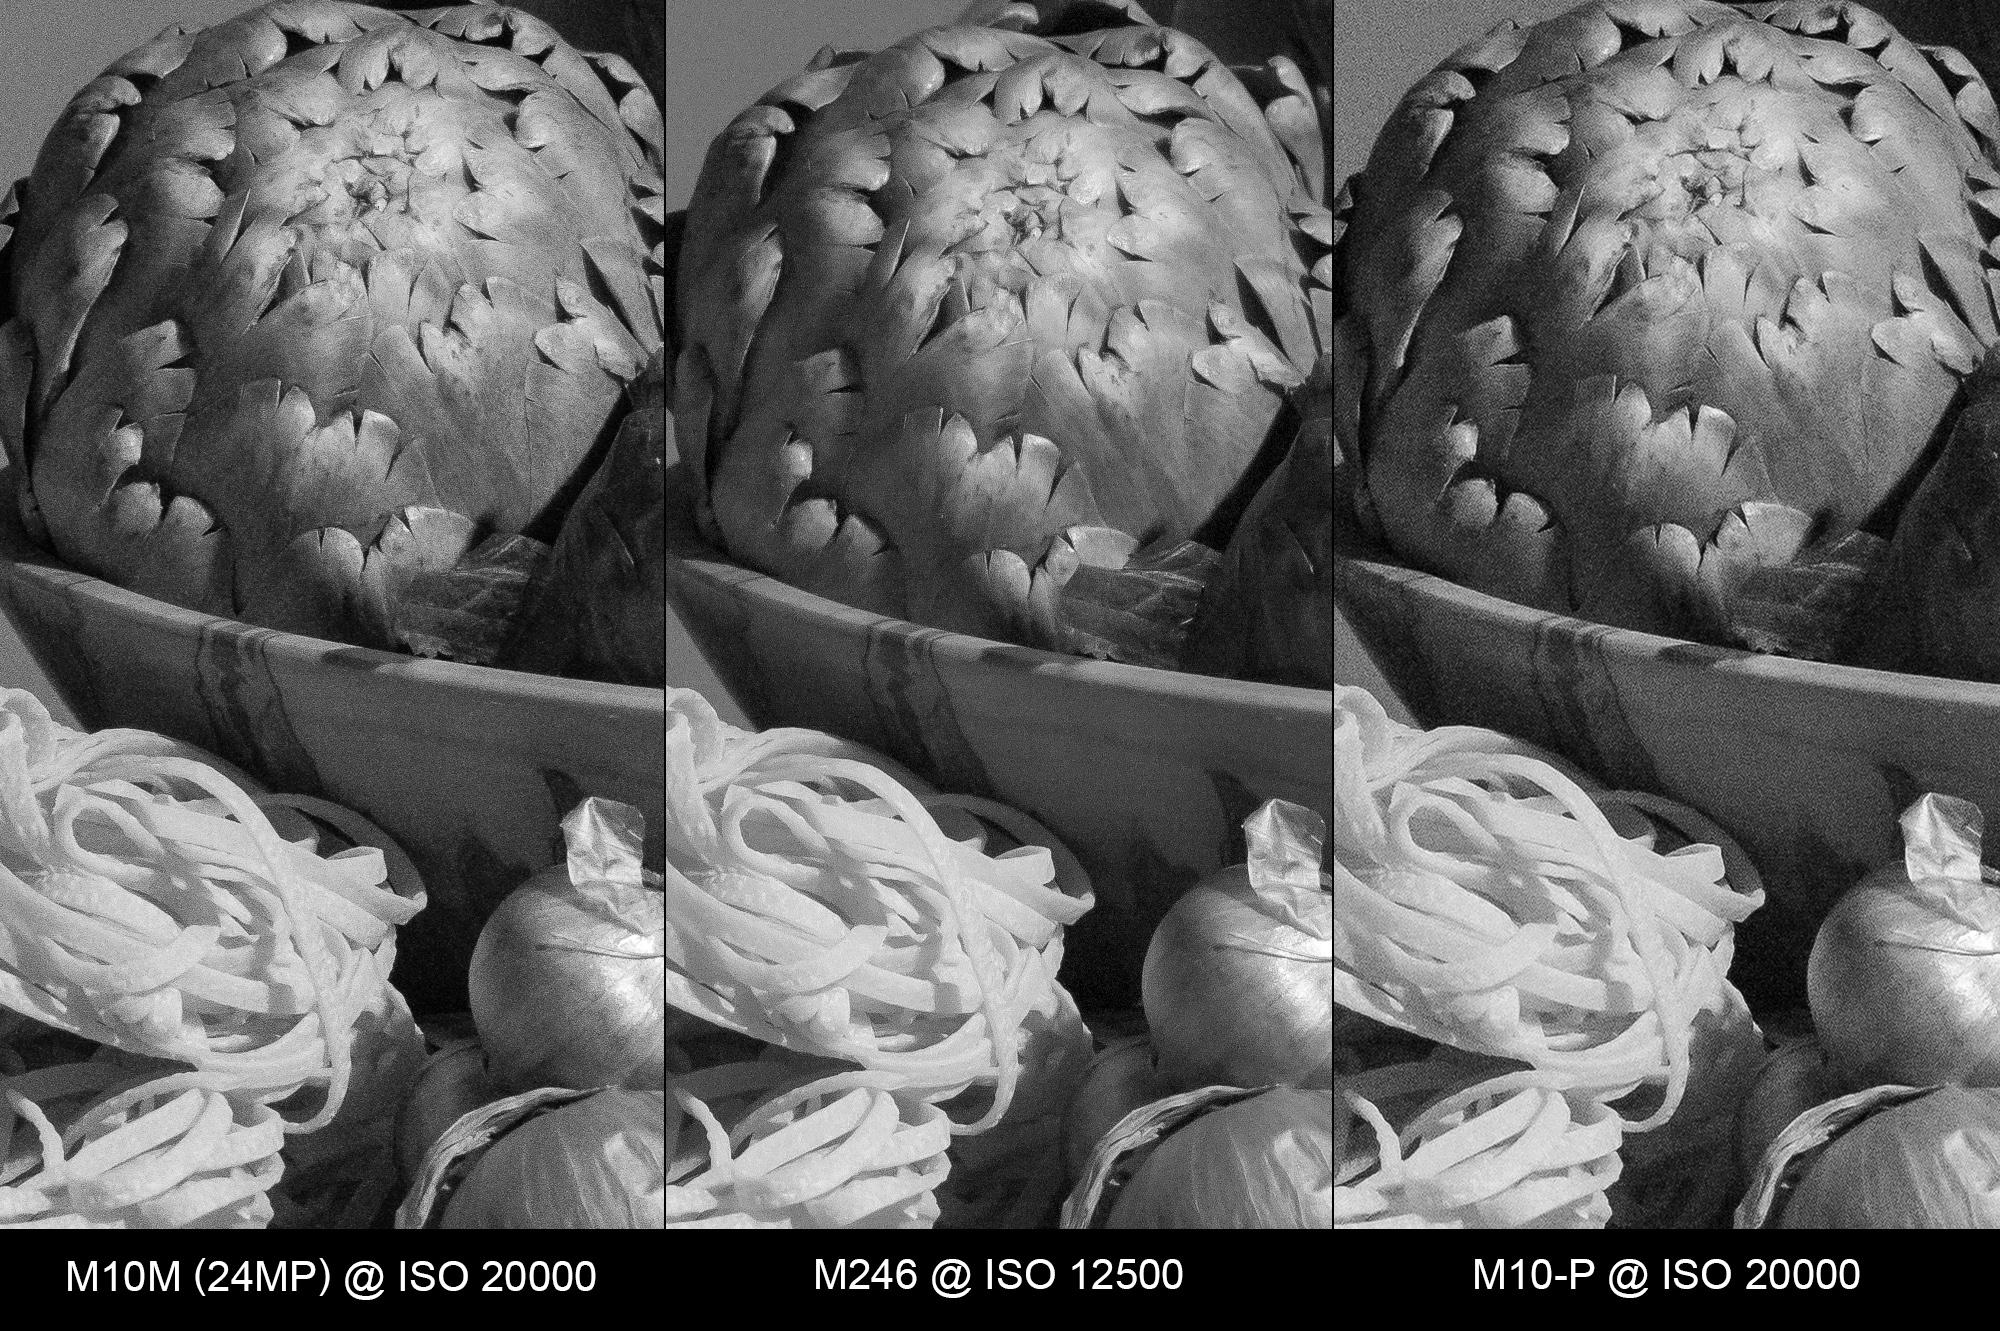
ISO 20000
Just as in the last match-up, at ISO 20000, we have to compare to the M246 at ISO 12500. The M10M seems to be holding steady, but the M10-P seems to be displaying more noise.


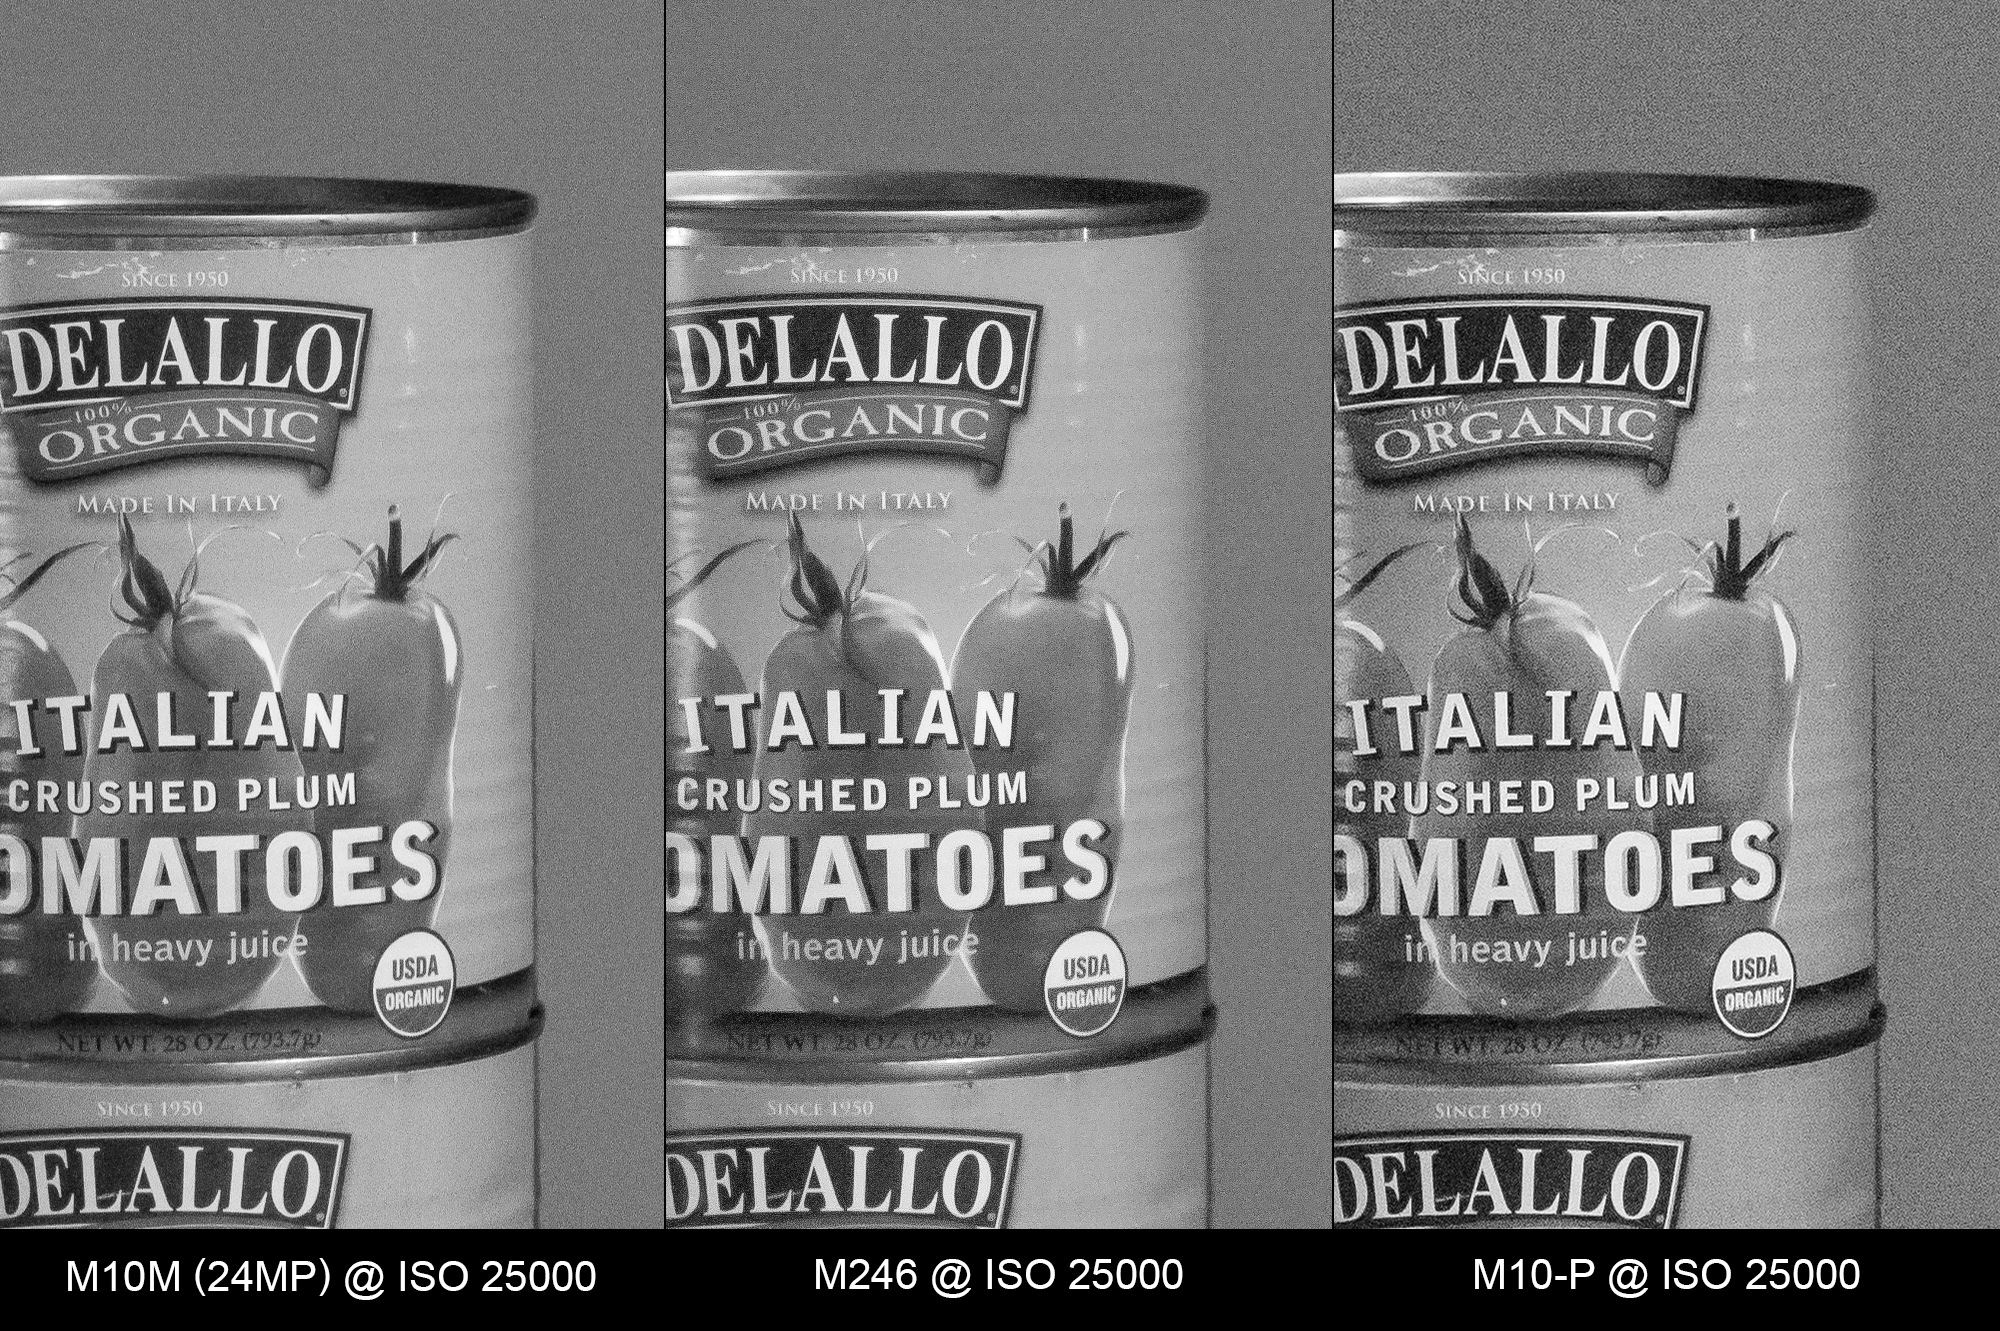
ISO 25000
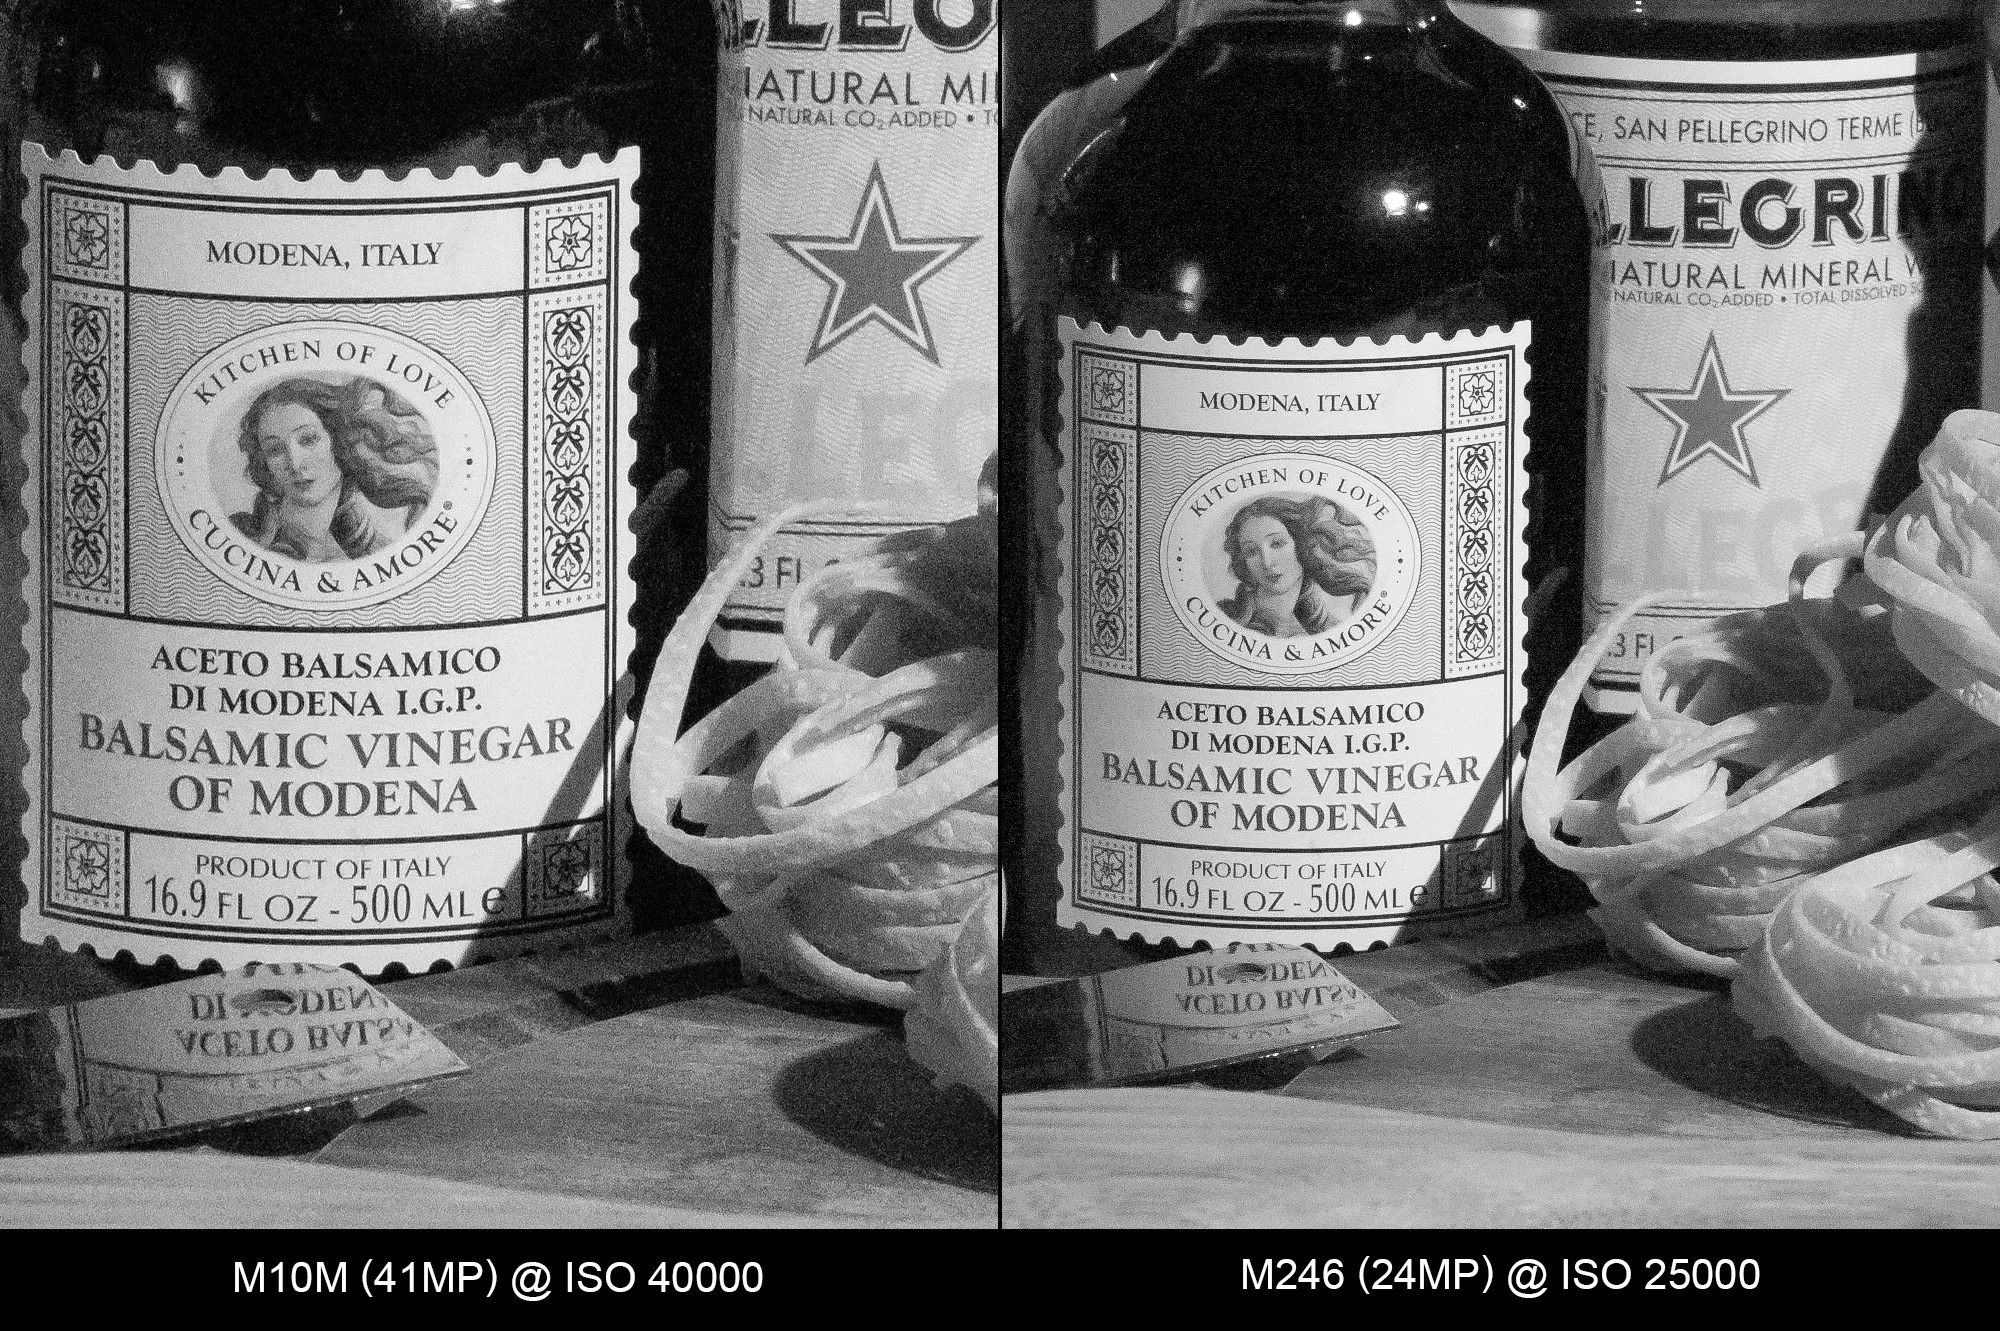
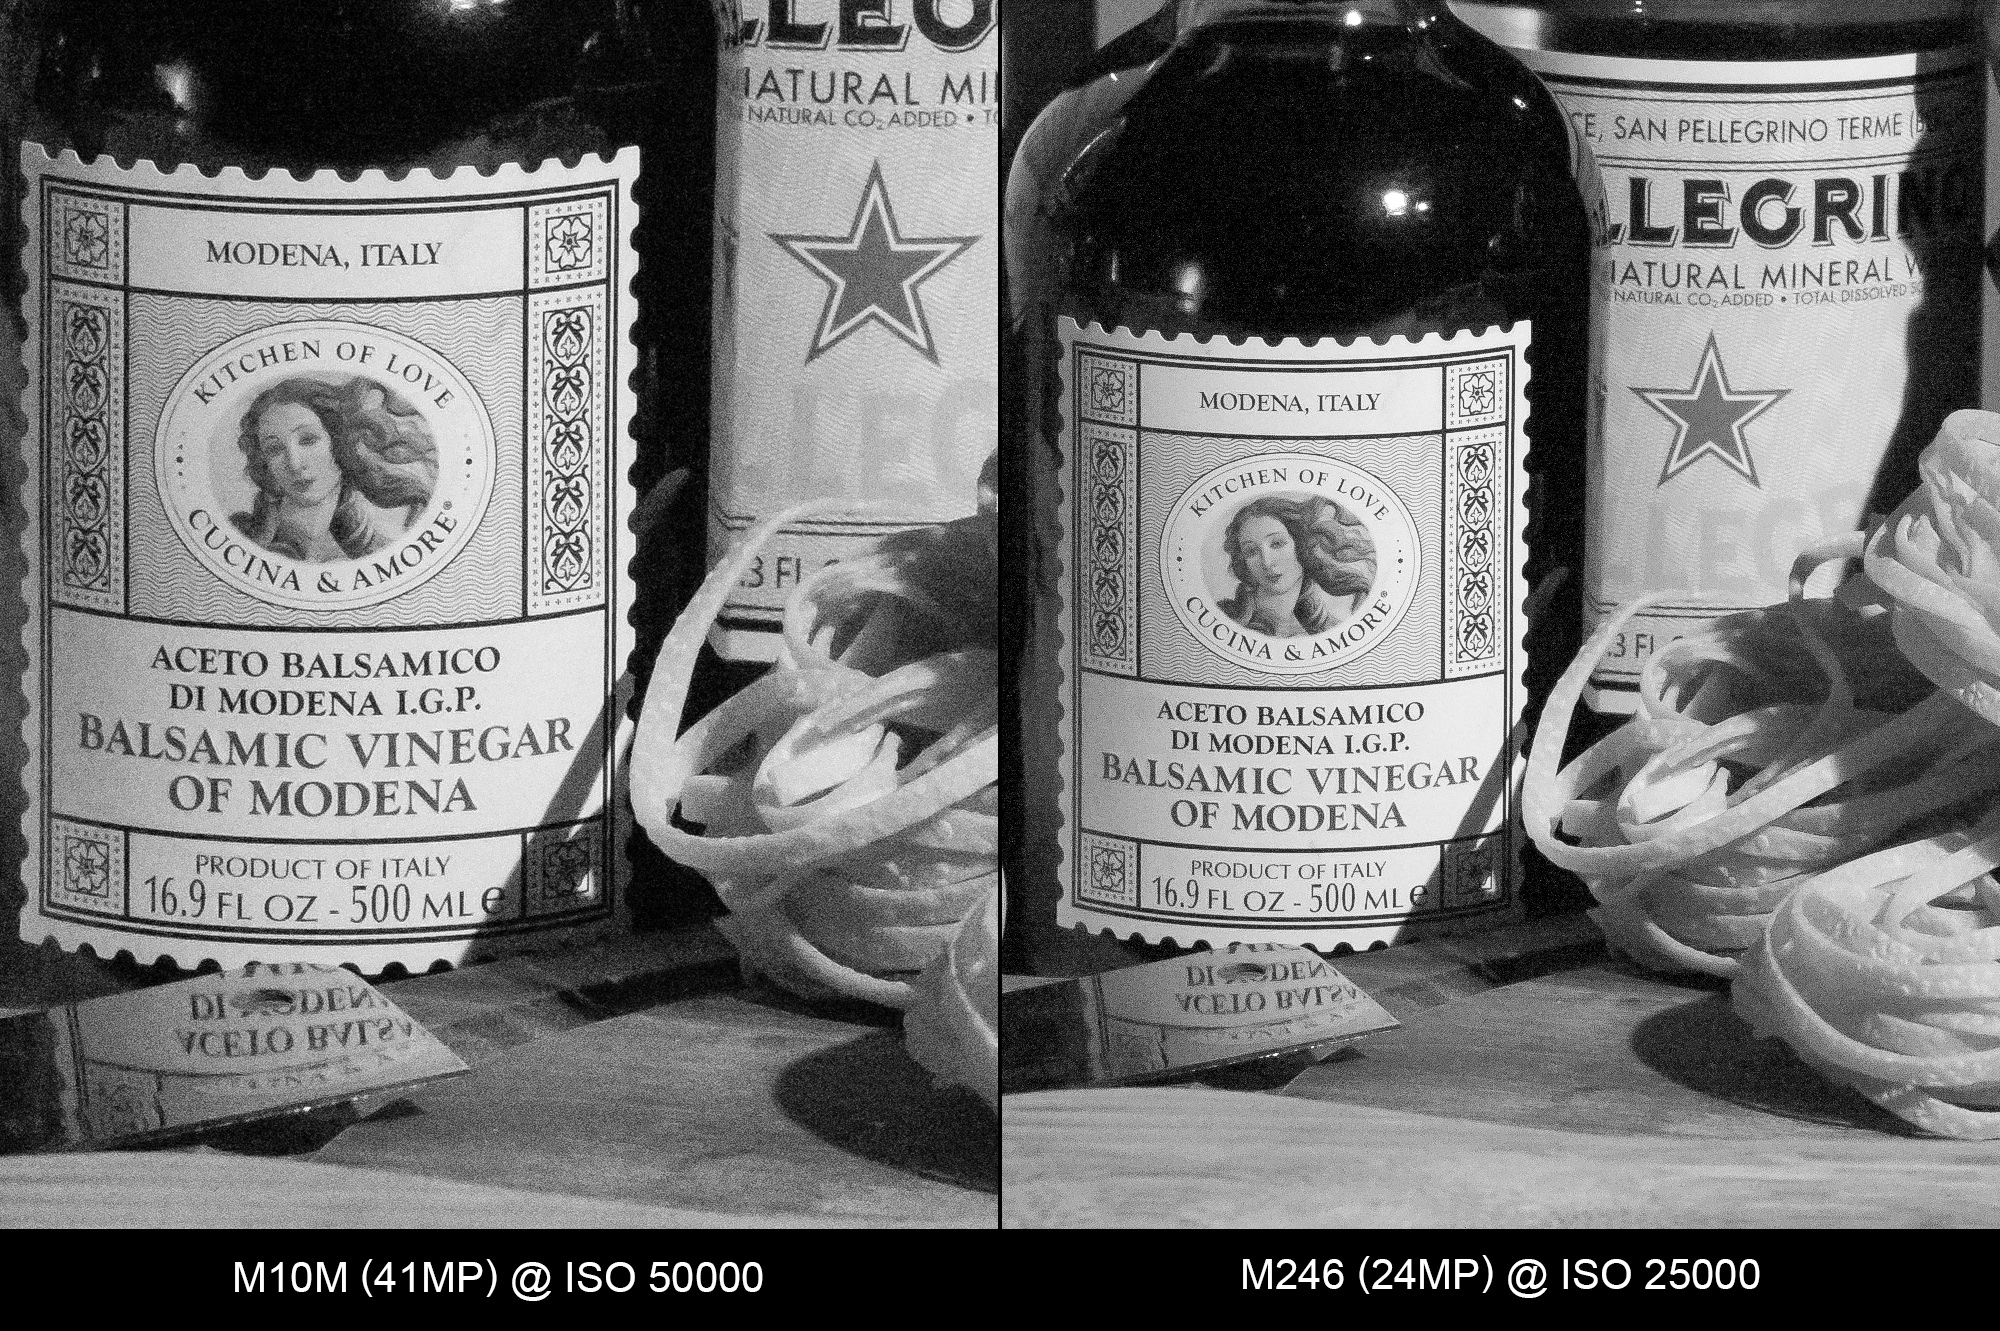
We’ve hit the top of the ISO range on the M246, but still have one more stop on the M10-P and two stops more on the M10 Monochrom. From here on out, the max 25000 setting will be displayed for the M246. This will help us see how much improvement the M10 Monochrom actually has.
Now, we’re starting to see some really interesting differences in how these cameras perform near or at their limits. The M246, while still exhibiting a very clean image, is doing so at the expense of detail. Image contrast has also dropped, resulting in a dull appearance. The M10-P, on the other hand, is maintaining contrast and detail, but at the expense of more pronounced noise. The M10M takes the best of both, with low noise and amazing detail clarity.


ISO 32000
The M10 Monochrom still looks great at ISO 32000, even compared to the M246 at ISO 25000. The M10-P seems to have more left but is getting very noisy compared to its Monochrom cousins.


ISO 40000
Now, we’re finally starting to see the M10M pick up some noise, but detail resolution is still excellent, better than the M246 at ISO 25000. Noise is now quite significant on the M10-P.


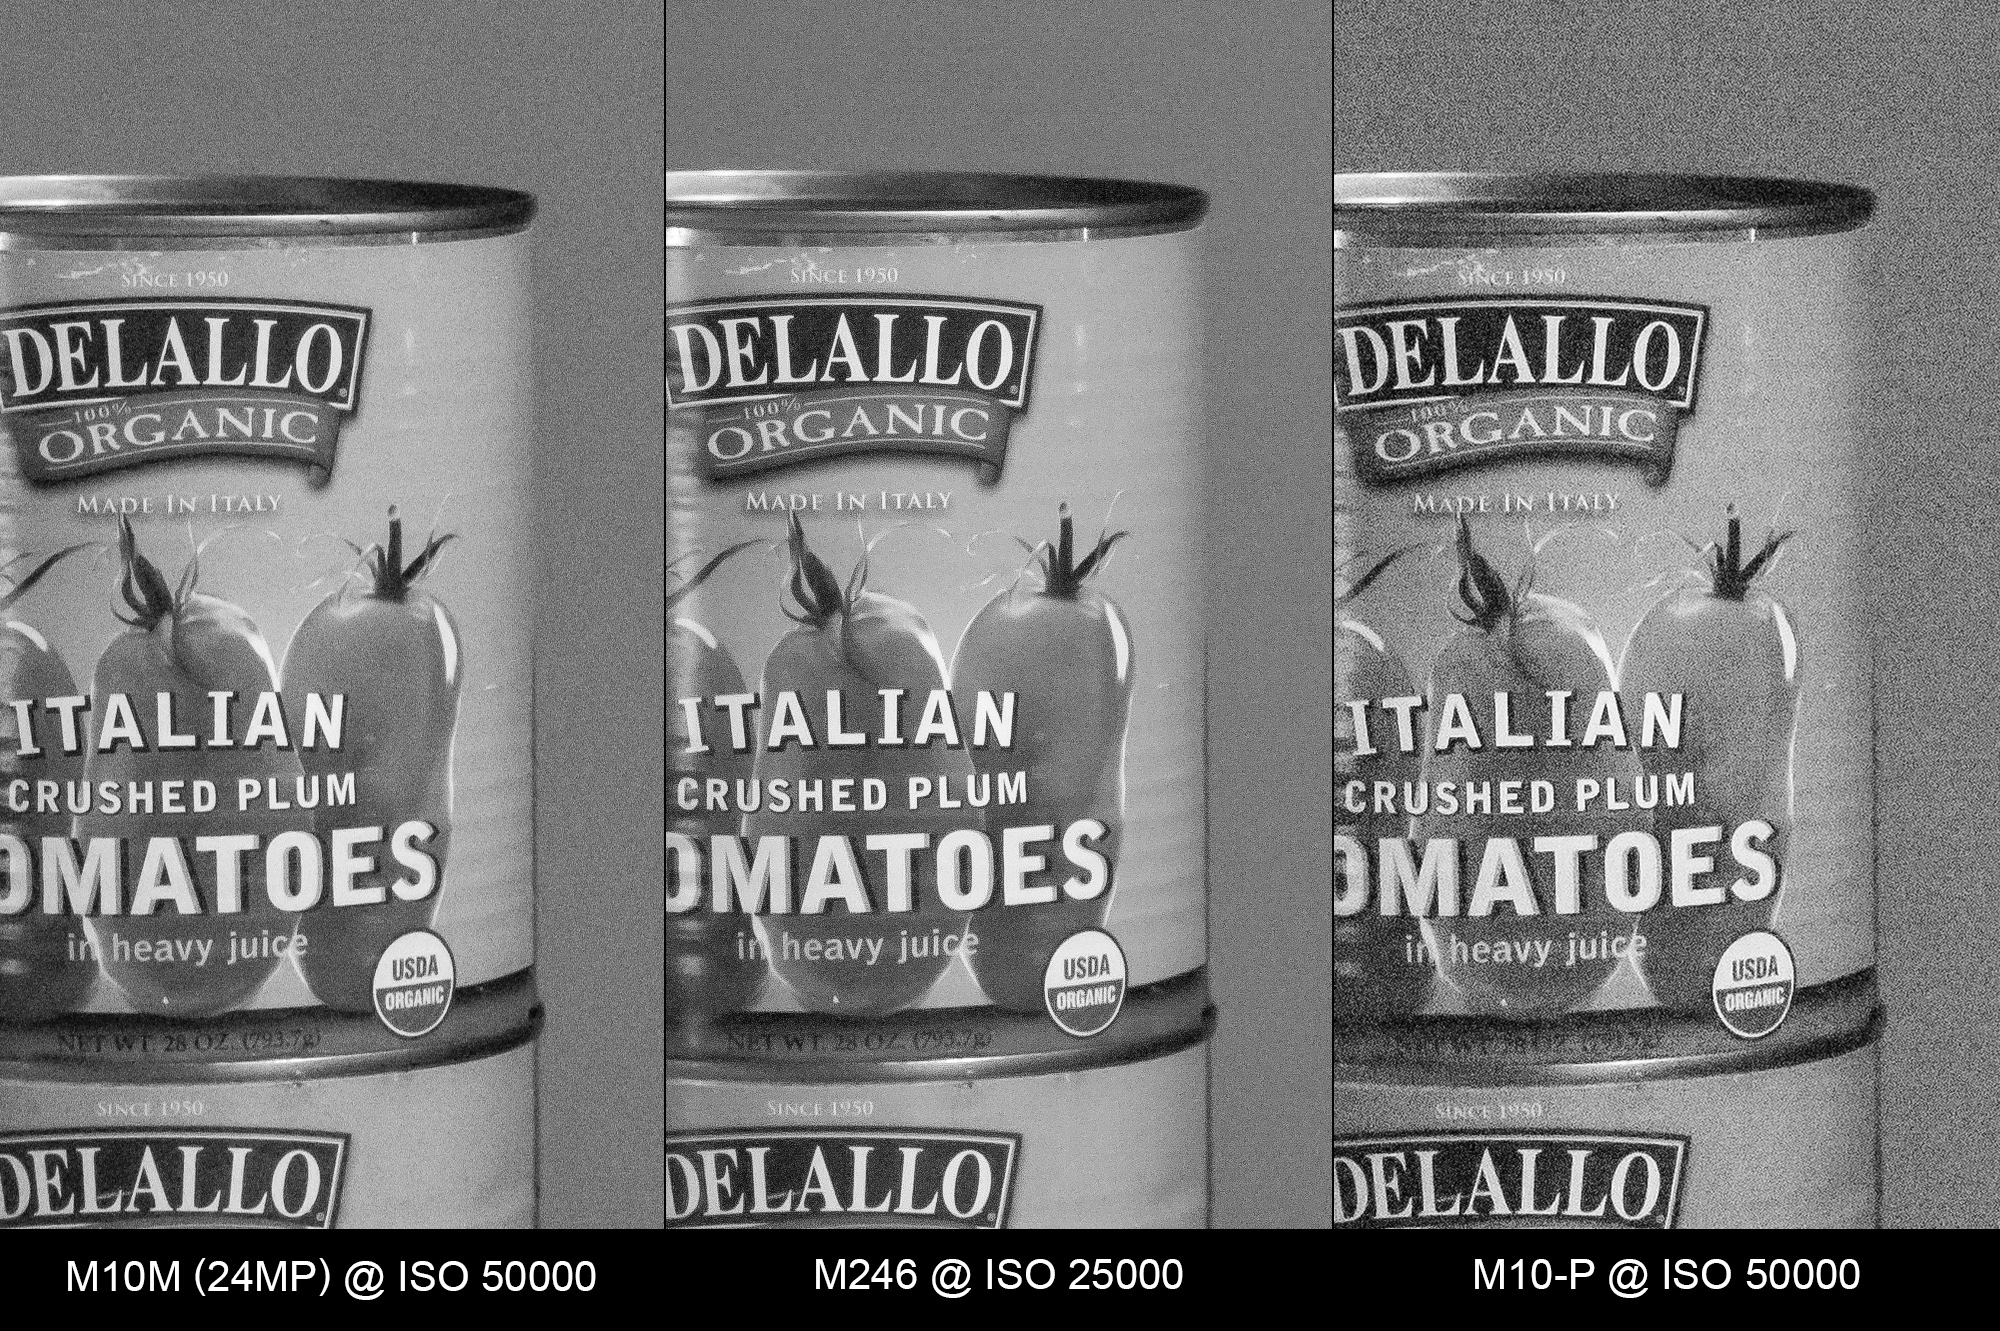
ISO 50000
At ISO 50000, we’ve hit the upper limit on the M10-P. The M246 is a full stop behind at ISO 25000 and the M10M still has another stop in the tank. Really impressive showing by the M10M as the noise:detail ratio seems to hold fairly steady.

ISO 64000
At ISO 64000, we’ve ventured past the native ISO ranges of both the M10-P and the M246, but the M10M keeps on going strong.

ISO 80000
The M10M image is picking up more noise and losing some midtone and shadow detail, but high frequency info is still retained.

ISO 100000
At 100000, the M10M is at the top of its ISO range, a full stop faster than the M10-P and two stops more than the M246. It’s noisy, but the pattern is tightly packed and uniform. There’s still usable detail and ISO 100000 looks better than 50000 on the M10-P.
Best of High ISO Settings
For this bonus set, I’ve combined the three cameras at the ISO values I felt displayed the greatest amount of detail before exhibiting noticeable noise. The M10-P isn’t too far behind the M246 at ISO 10000 versus ISO 12500. But the M10M shows its capability at ISO 32000. The M10M does show more noise in the background, but a bit more noise reduction in Lightroom could work very well here.
Basically, what we’re seeing is a 1.5 stop advantage of the M10M, but this is a bit of an oversimplification. The M10M maintains similar image quality across an even wider range of ISO values, almost plateauing once hitting ISO 10000.


Native Resolution Comparison: M10M vs M246
If you found flaws in my logic for downsampling the M10 Monochrom, or simply wanted to see the actual resolution increase over the M Monochrom (Typ 246), I’ve got you covered with this next comparison set. Just for the sake of slightly minimizing the amount of images in one post, I’ve limited these comparisons just to the central balsamic vinegar bottle and pasta.
Here, I decided to include the respective base ISO results from each of these two Monochrom cameras, ISO 320 for the M246 and ISO 160 for the M10M. Honestly, there is no visual difference from the earlier method.
Having already covered the basic analysis above, I’ll simply leave these here for you to draw your own conclusions. Suffice it to say, while both cameras resolve an incredible amount of detail and textural nuance, the M10M’s large pixel advantage serves it well here. You can easily see the added detail throughout the whole test range.
Base ISO (160 vs. 320)

ISO 400
ISO 800
ISO 1600

ISO 3200

ISO 6400

ISO 8000

ISO 10000

ISO 12500
ISO 16000 vs. 12500

ISO 20000 vs. 12500

ISO 25000

ISO 40000 vs. 25000
ISO 50000 vs. 25000
ISO 64000 vs. 25000

ISO 80000 vs. 25000

ISO 100000 vs. 25000

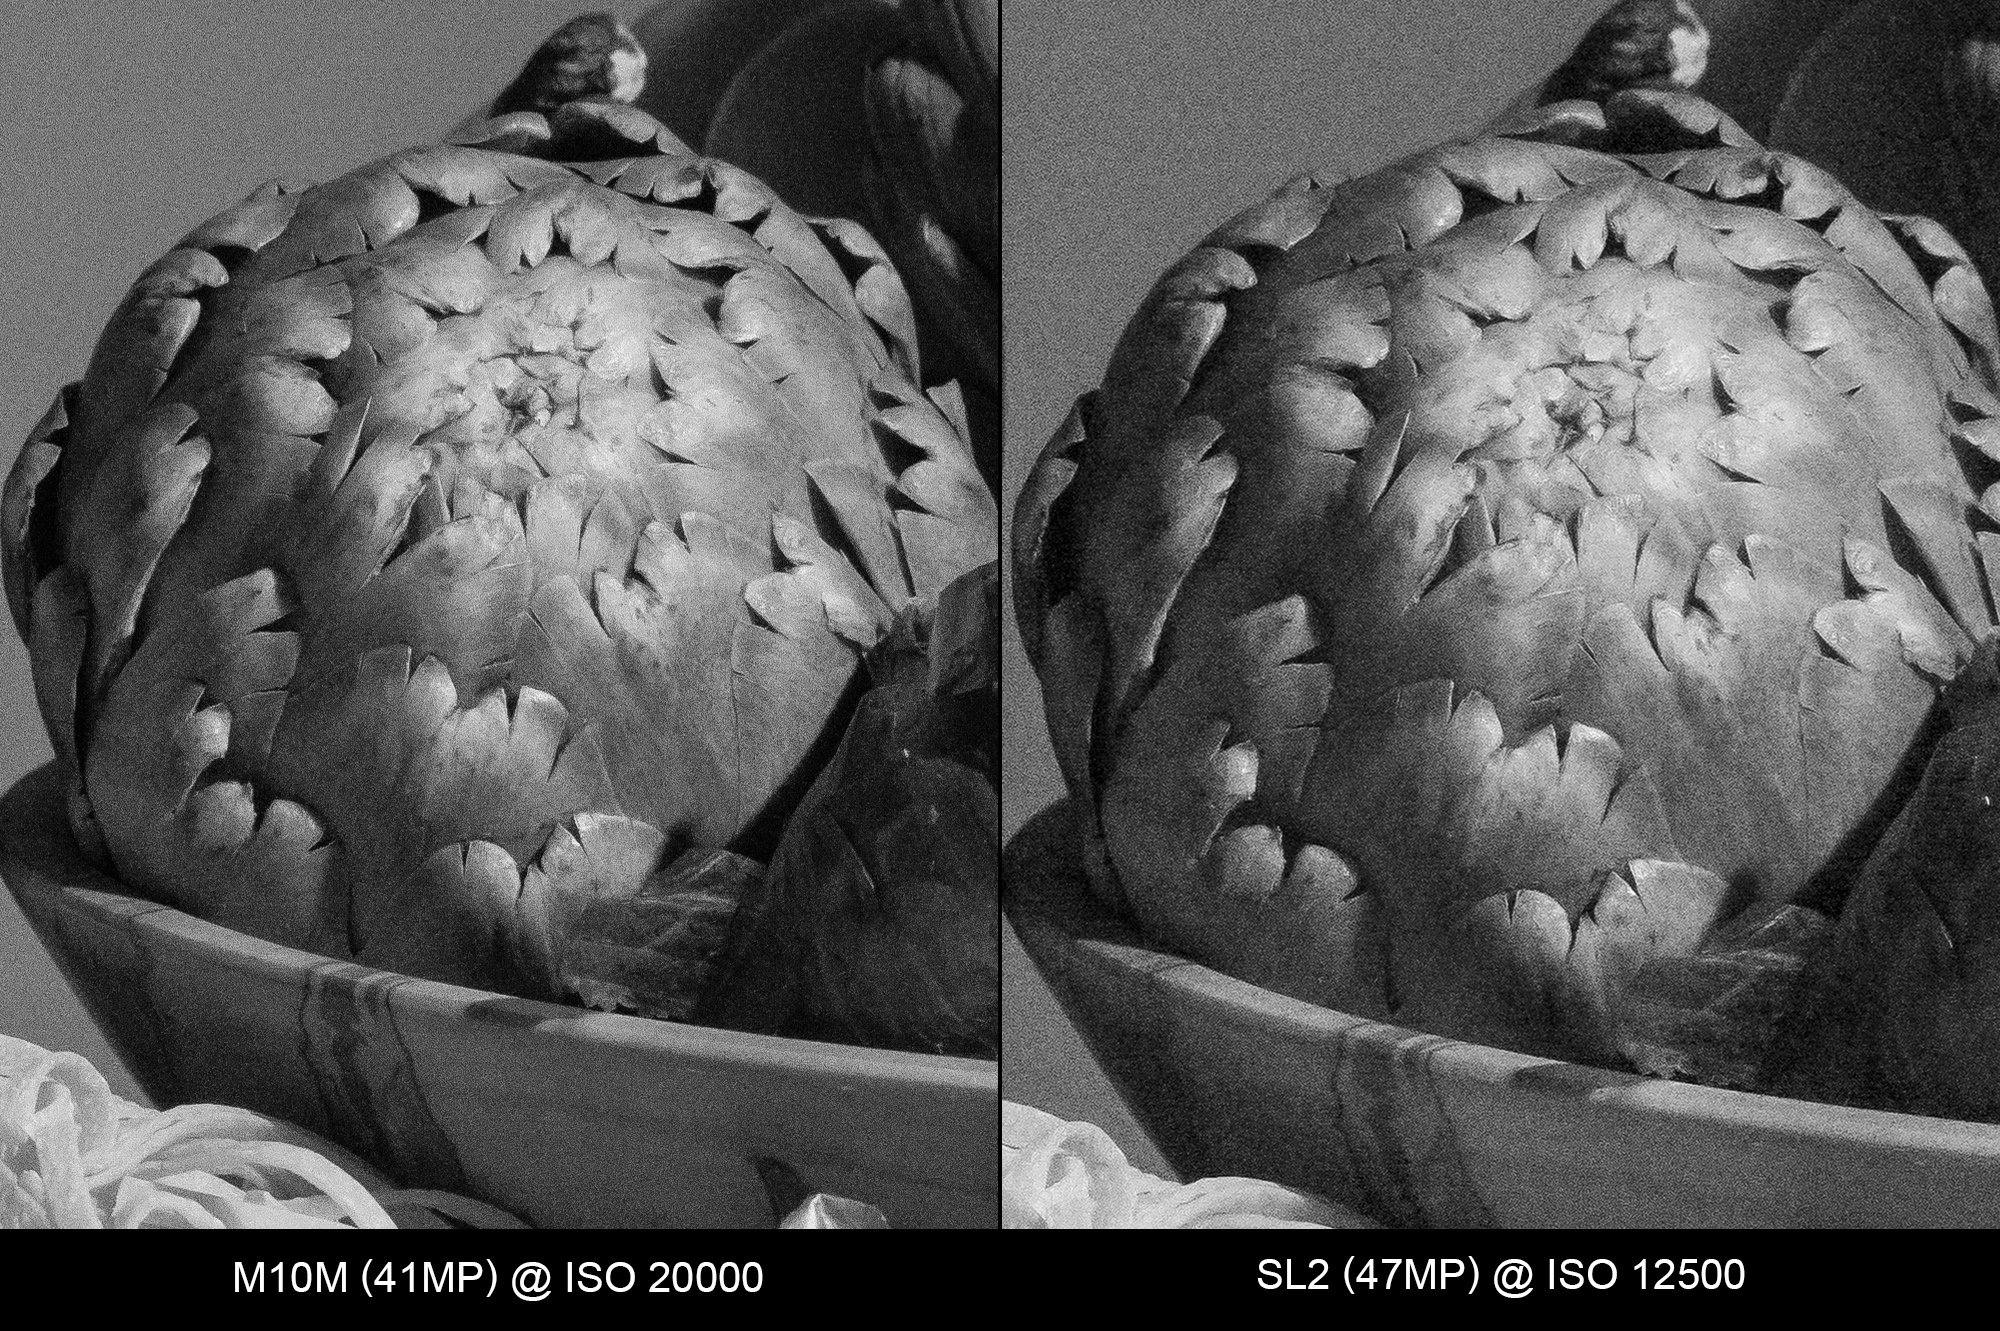
Native Resolution Comparison: M10M vs SL2

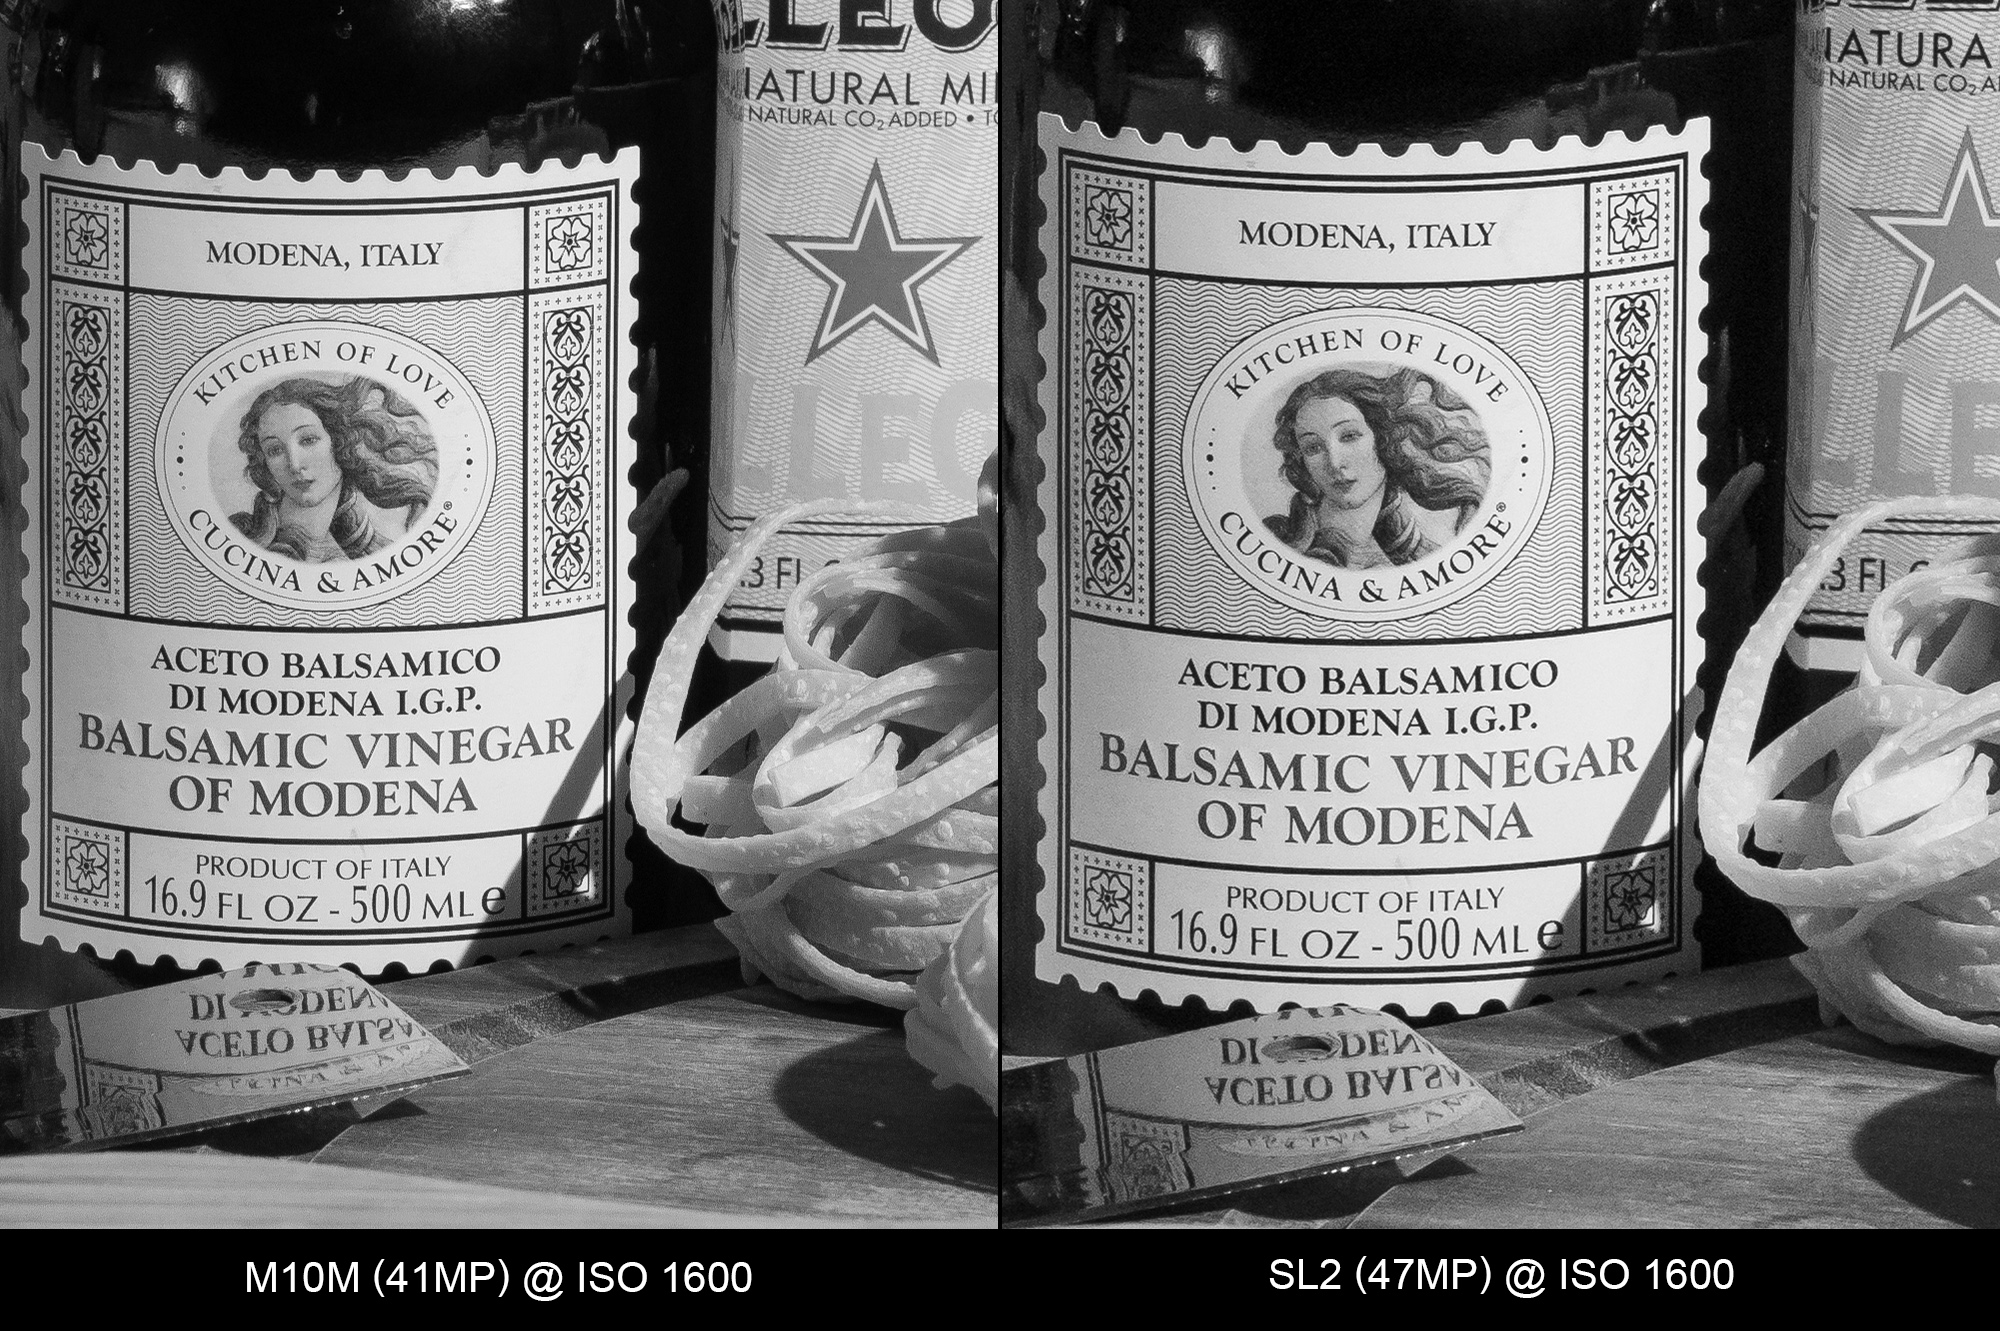
For our final comparison, I’ve matched up the 47 megapixel SL2 with the 41 megapixel M10 Monochrom. Both are displayed at their native resolution at 100%. As I outlined in the introduction, the SL2 images were converted to black and white using Lightroom’s default Adobe Monochrome profile, with minimal Basic Tone edits and small tweaks in the Black & White Mix palette to better approximate the tonal response of the M10M.
What surprises me the most here is just how much of an obvious resolution jump we see just with six additional megapixels. I would have figured the real-world difference to be less noticeable.
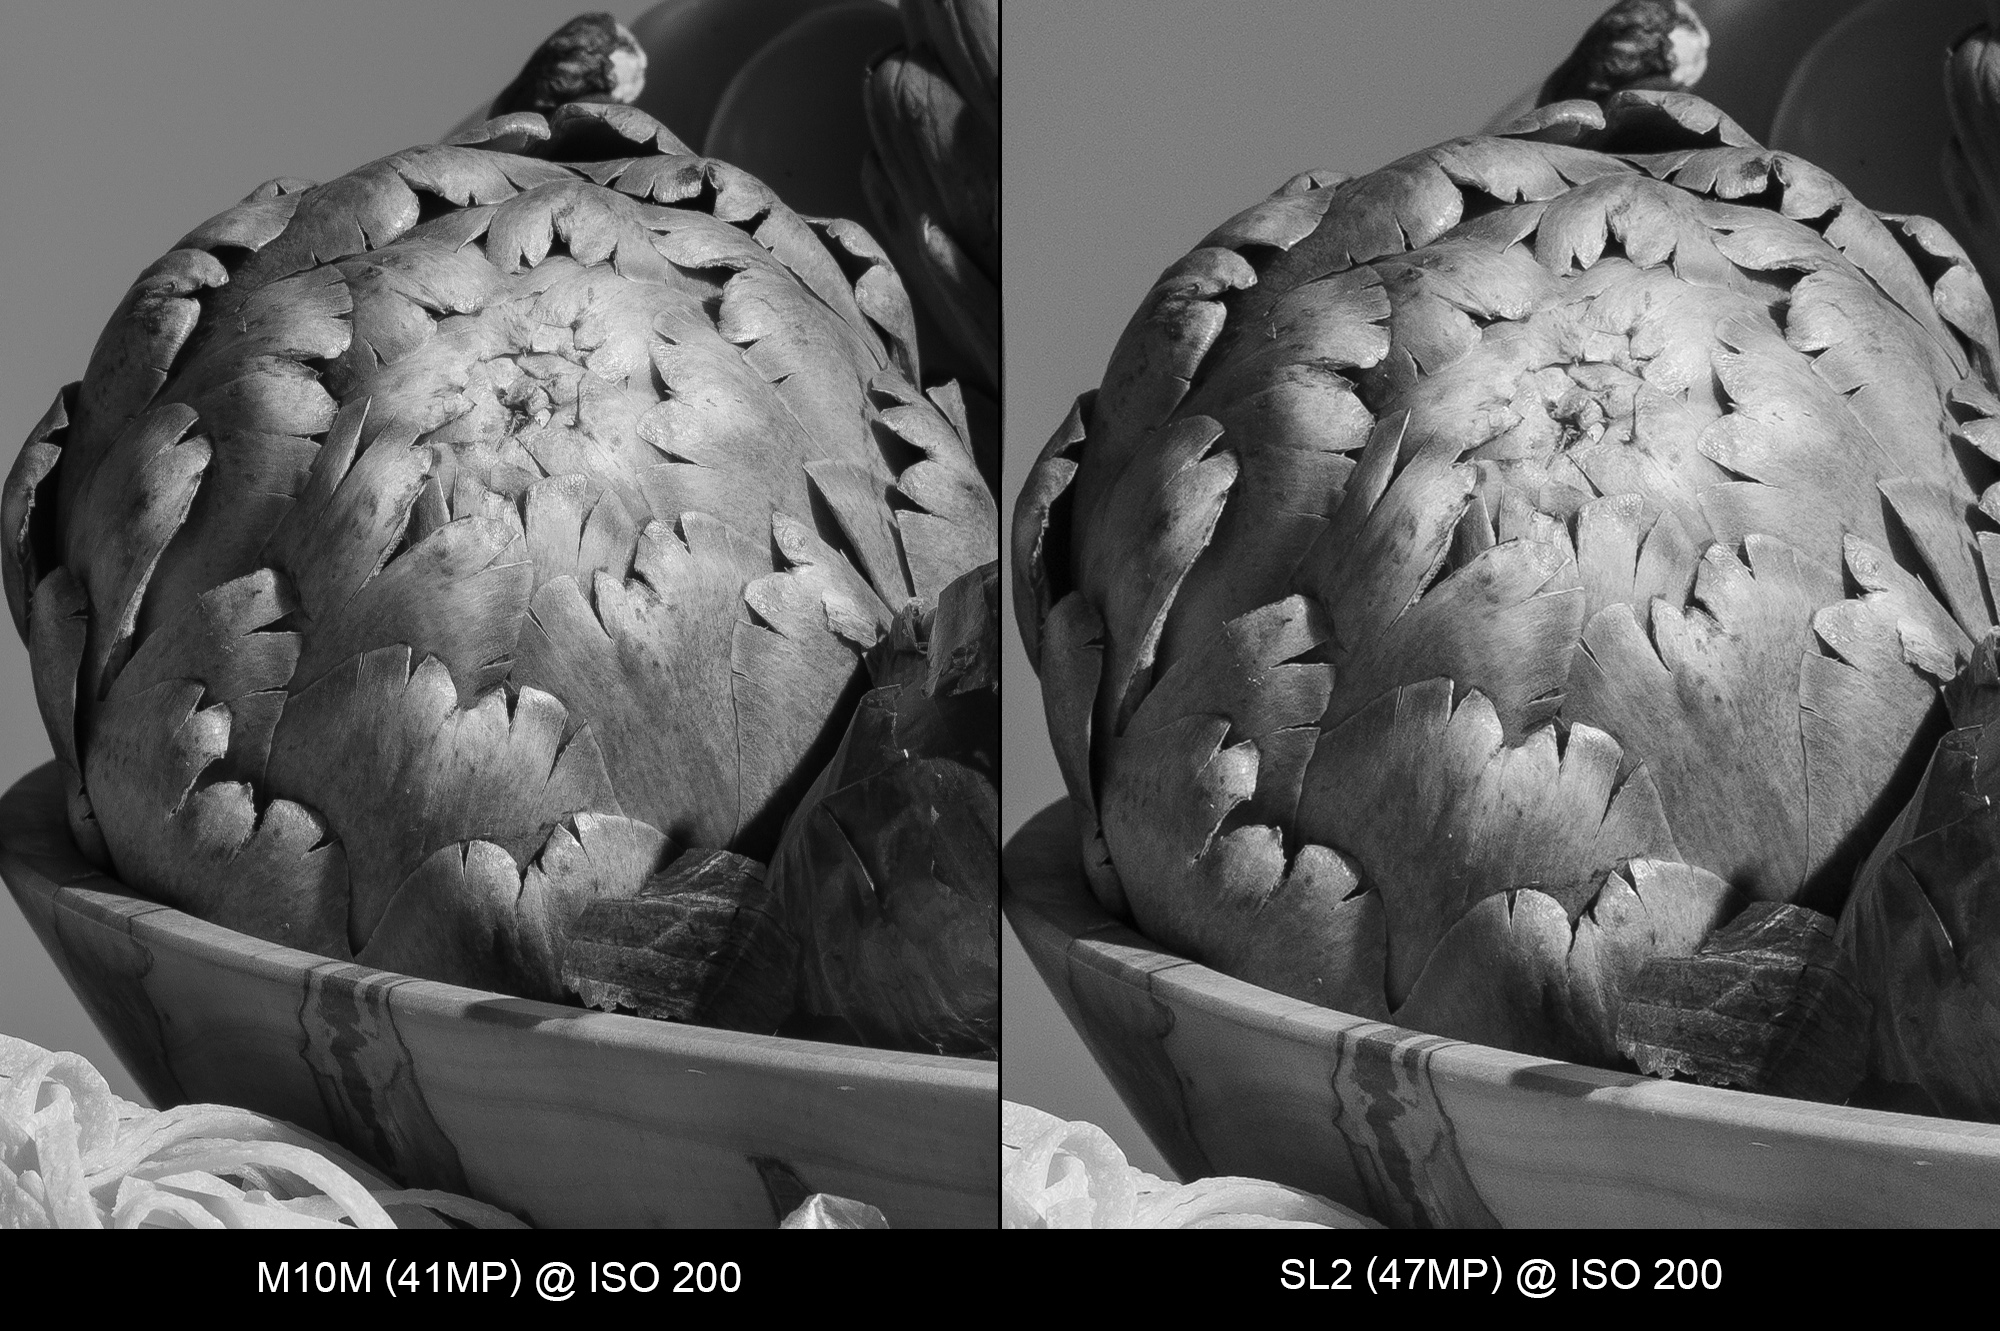
ISO 200
Both the M10 Monochrom and the SL2 offer up incredible resolution and textural detail at low ISO. For pure detail the SL2 has the edge here as we would expect given the pixel advantage.

ISO 400
As expected, not much changes at ISO 400. Interestingly, the M10M is completely noise-free, while the SL2 shows very tightly patterned noise. This takes away nothing from the image, and I suppose I could have used more aggressive noise reduction for the SL2, but shows the advantage of no per-channel gain for the M10 Monochrom.


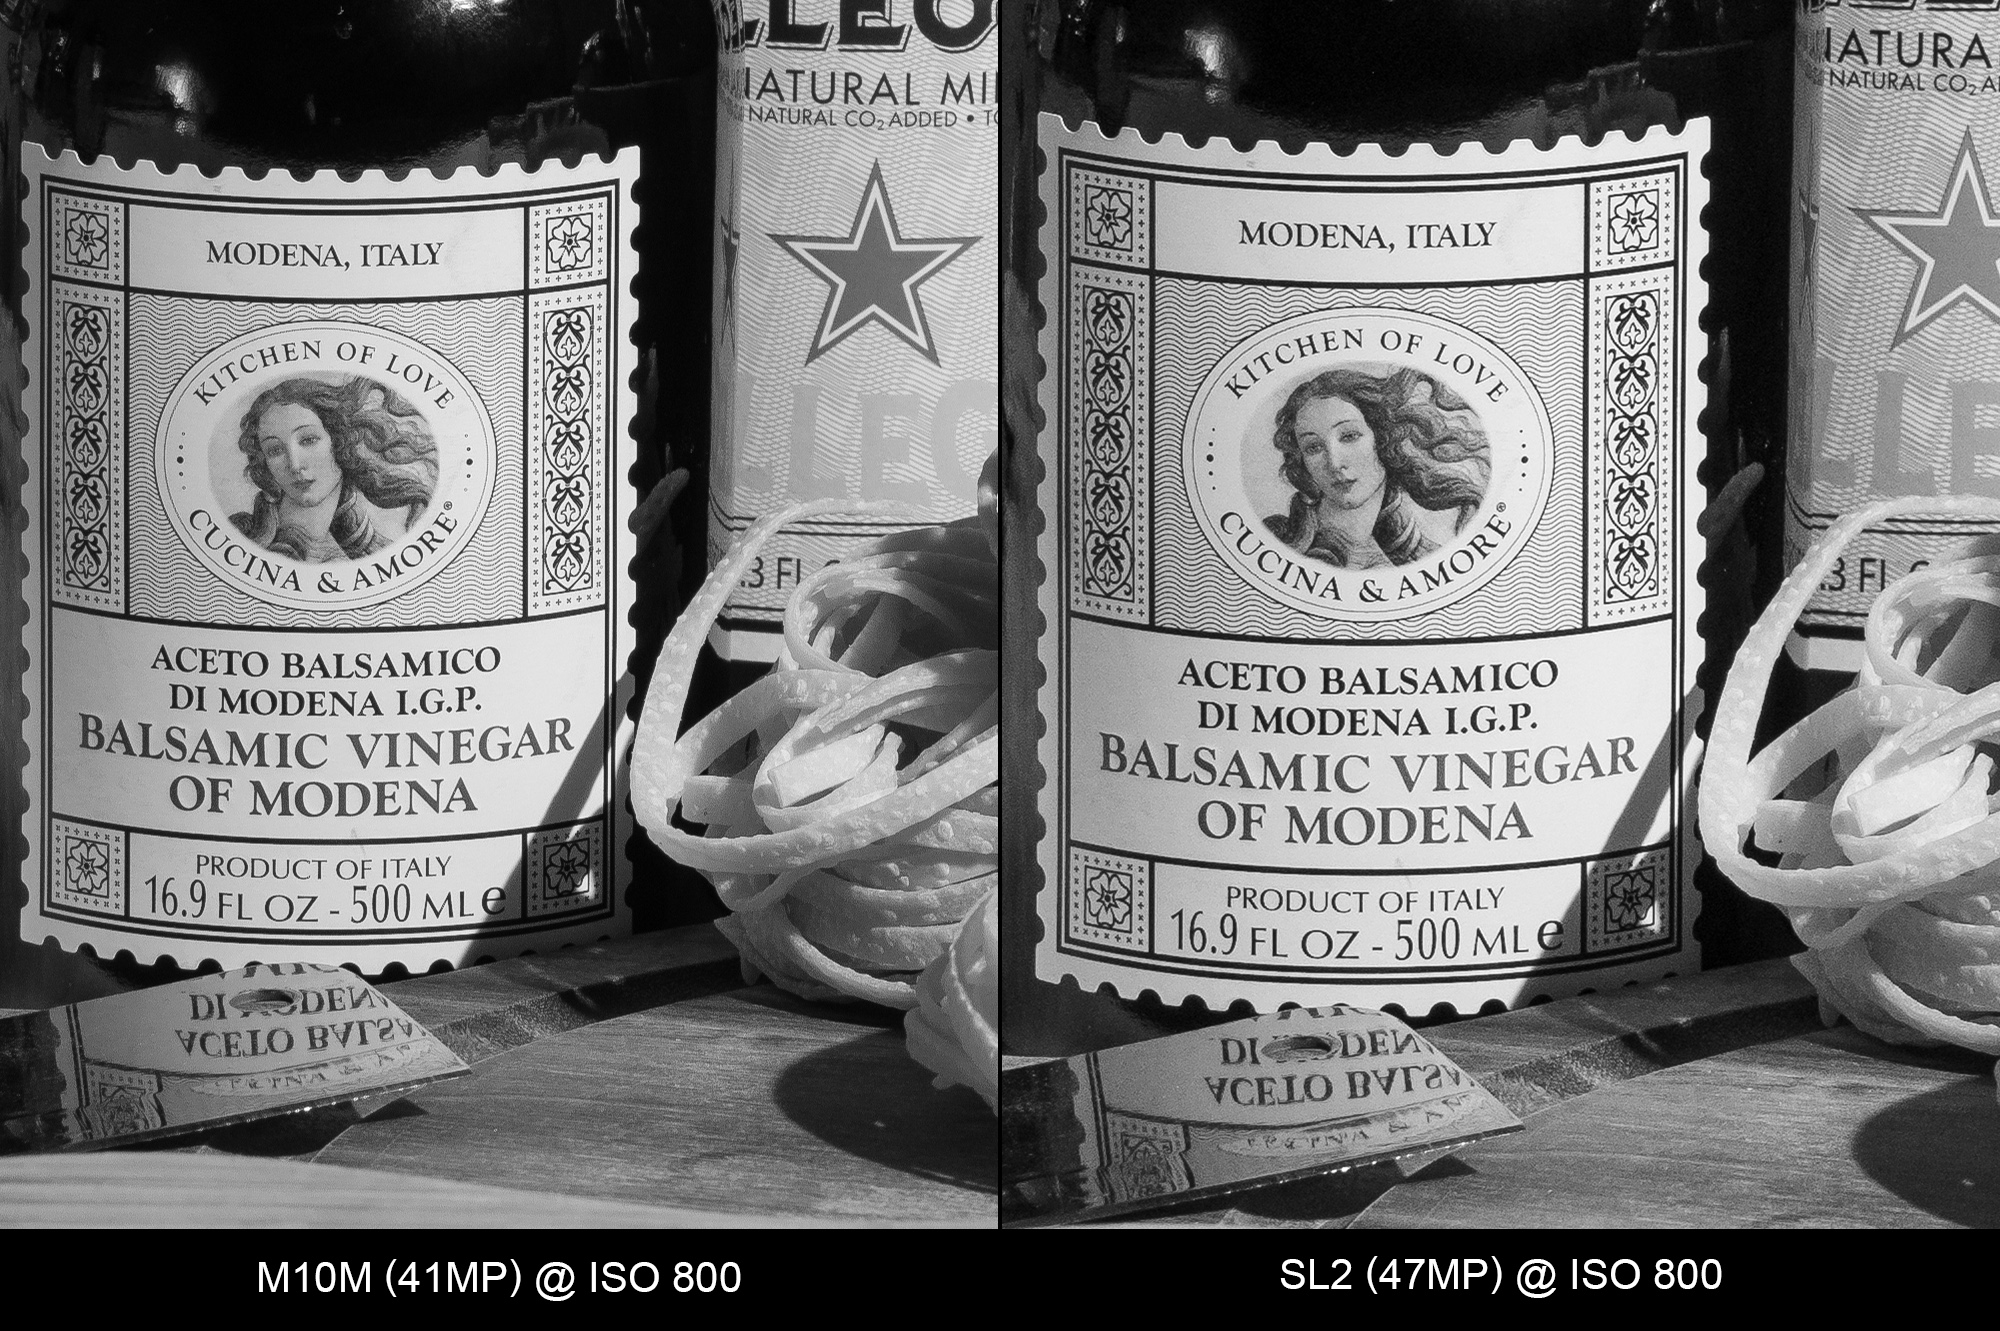
ISO 800
At ISO 800, we see very similar results to ISO 400. Both cameras continue to produce largely noise-free images with outstanding detail.

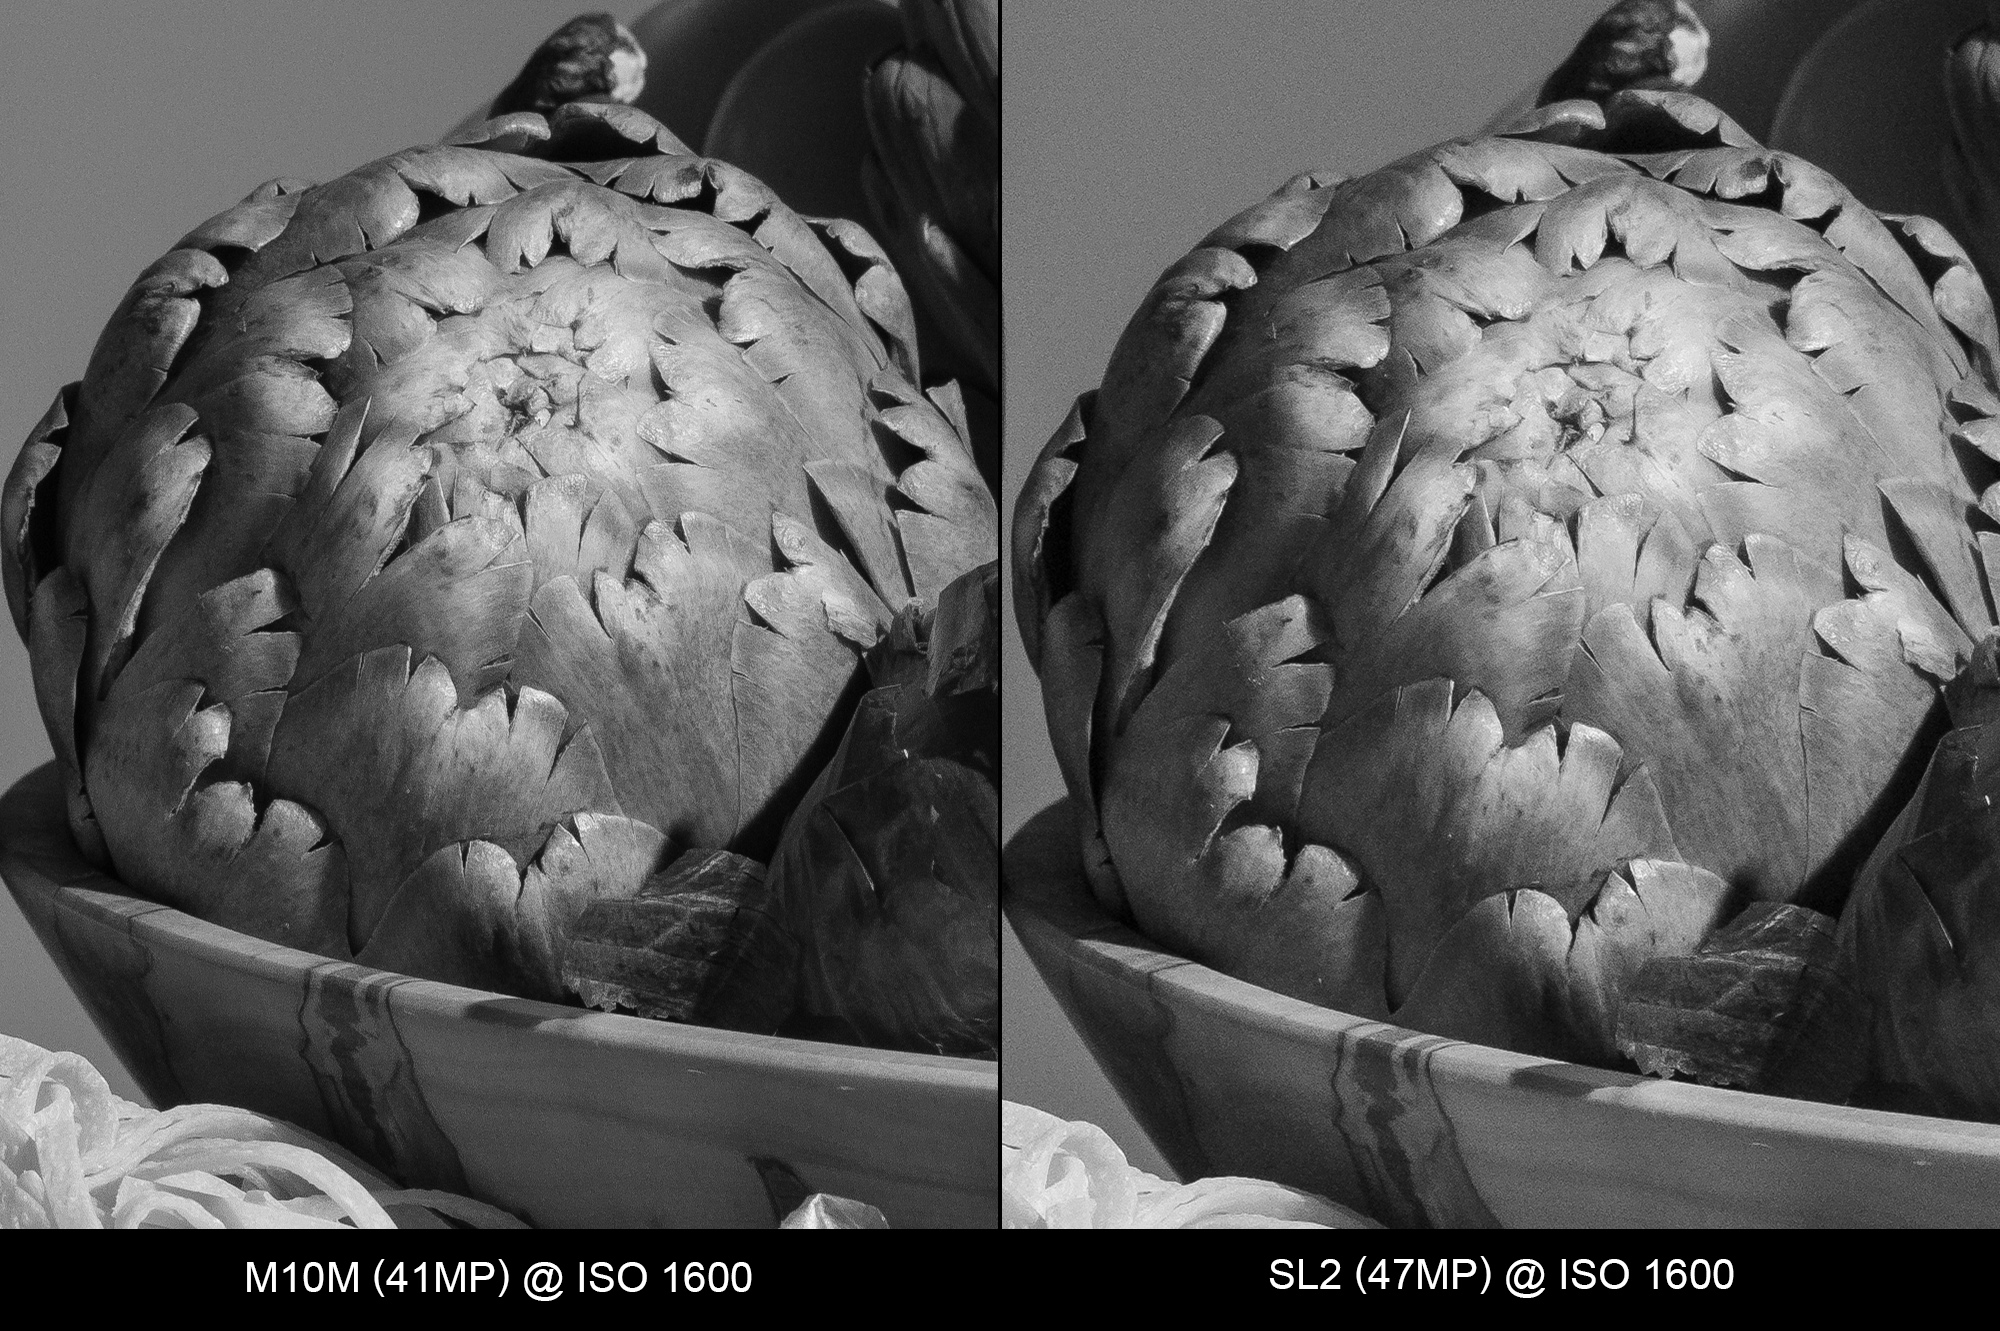
ISO 1600
At ISO 1600, the M10 continues to be perfect. The SL2 is starting to lose just a bit of fine detail. Also, of note is that the SL2 exposure seems to be getting darker and less contrasty. This trend will continue as the ISO increases. My guess is that the dynamic range is starting to suffer and this is the visible result. If I had chosen to adjust tone settings on a per-image basis rather than per-camera, some of this could have been compensated for.
ISO 3200
Performance at ISO 3200 is very similar to ISO 1600. Both cameras look excellent.


ISO 6400
While the M10M continues trucking along at ISO 6400, the SL2 is starting to show a slight decrease in overall image quality. A bit more noise, a little less detail and a small drop in dynamic range all contribute here. ISO 6400 is still completely usable on the SL2, just not as good as staying below ISO 3200.


ISO 8000 vs. 6400
Because the SL2 only has whole ISO steps, we’re going to lock it in at ISO 6400 while ticking up another third for theM10M. And no surprise here. The M10M looks better at ISO 8000 than the SL2 does at ISO 6400.


ISO 10000 vs. 6400
At ISO 10000 the M10M is producing equivalent image quality to the SL2 at ISO 6400. And as we’ll see after jumping to ISO 12500, this will be the best case for the SL2.


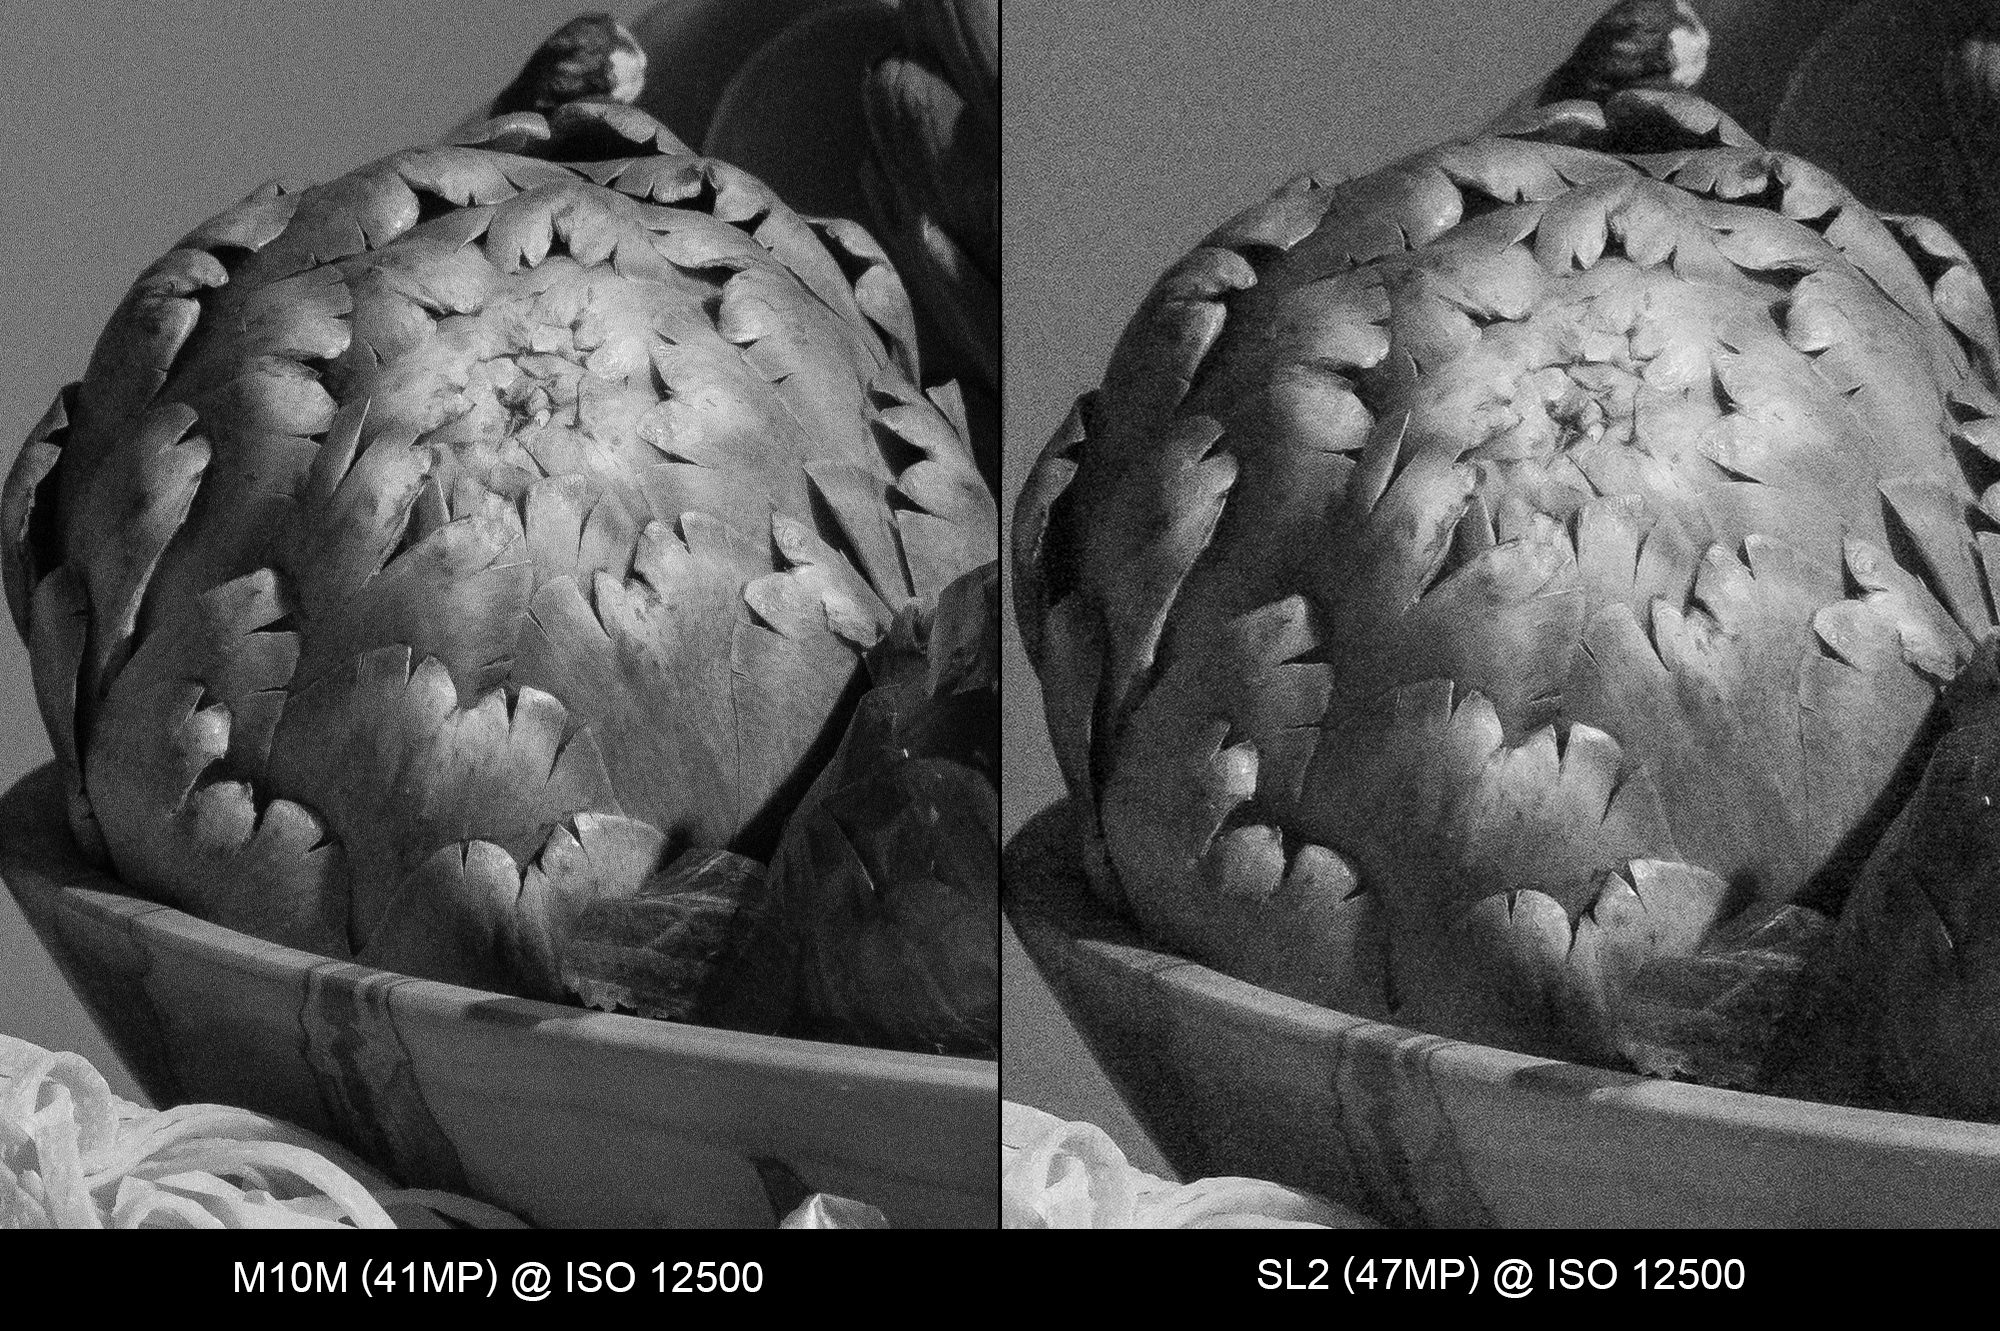
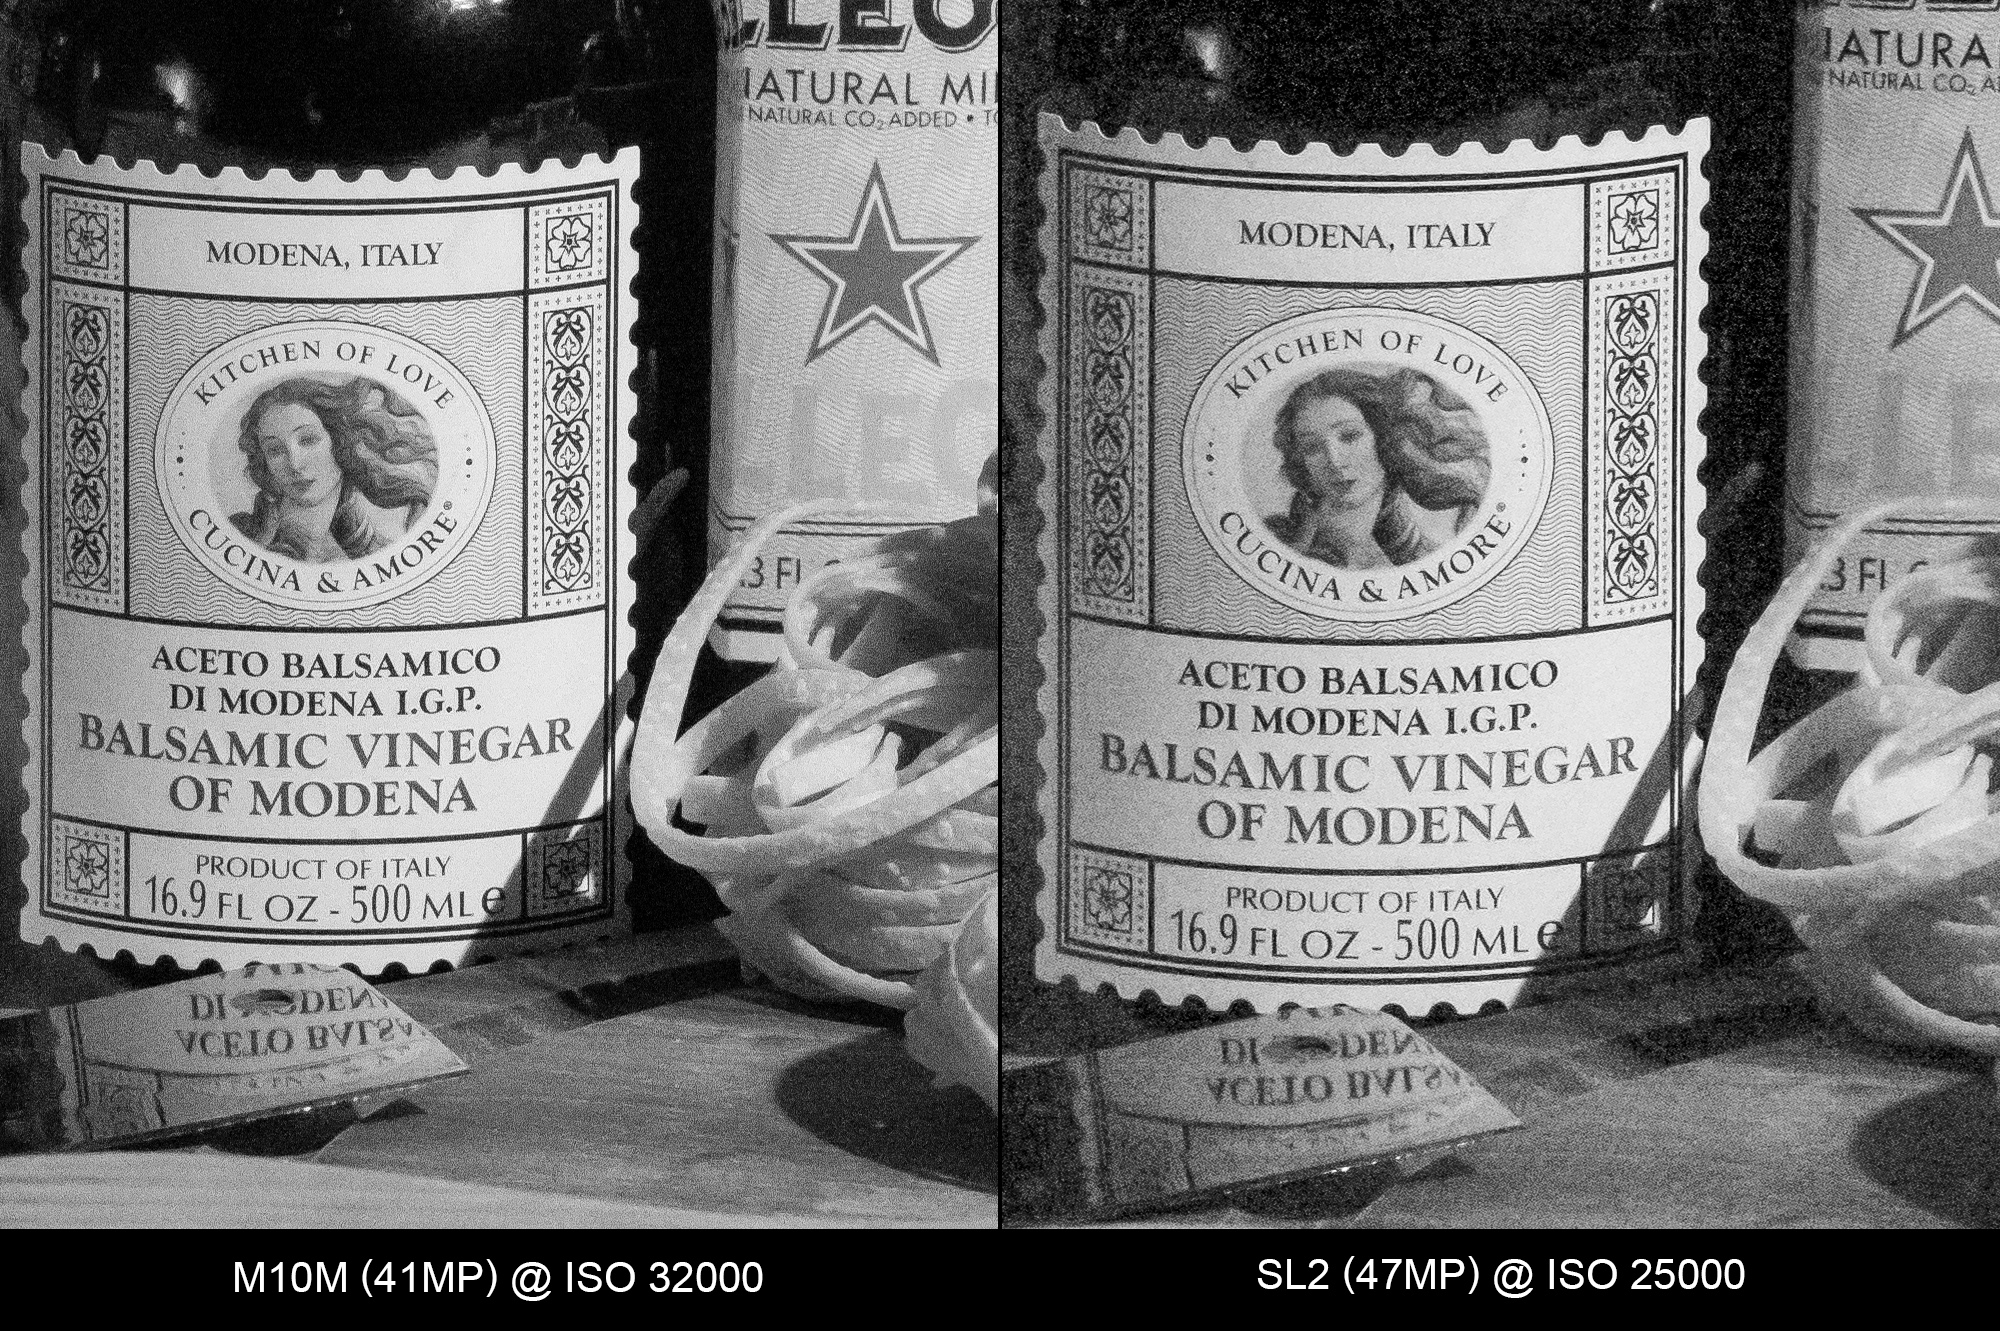
ISO 12500
Now, with the SL2 bumped up to ISO 12500, the M10M pulls ahead significantly. The M10 still looks roughly the same as ISO 10000, but the SL2 is showing noticeable degradation.

ISO 16000 vs. 12500
At ISO 16000 and 20000, the M10M is much better than the SL2 at ISO 12500.

ISO 20000 vs. 12500

ISO 25000
At one stop from its maximum ISO setting, the SL2 is no match for the M10M. The quality difference observed at ISO 12500 – 20000 is even more pronounced here. While I’d consider the results at 25000 to be borderline usable on the SL2, the M10M still looks great.


ISO 32000 vs. 25000

ISO 40000 vs. 25000


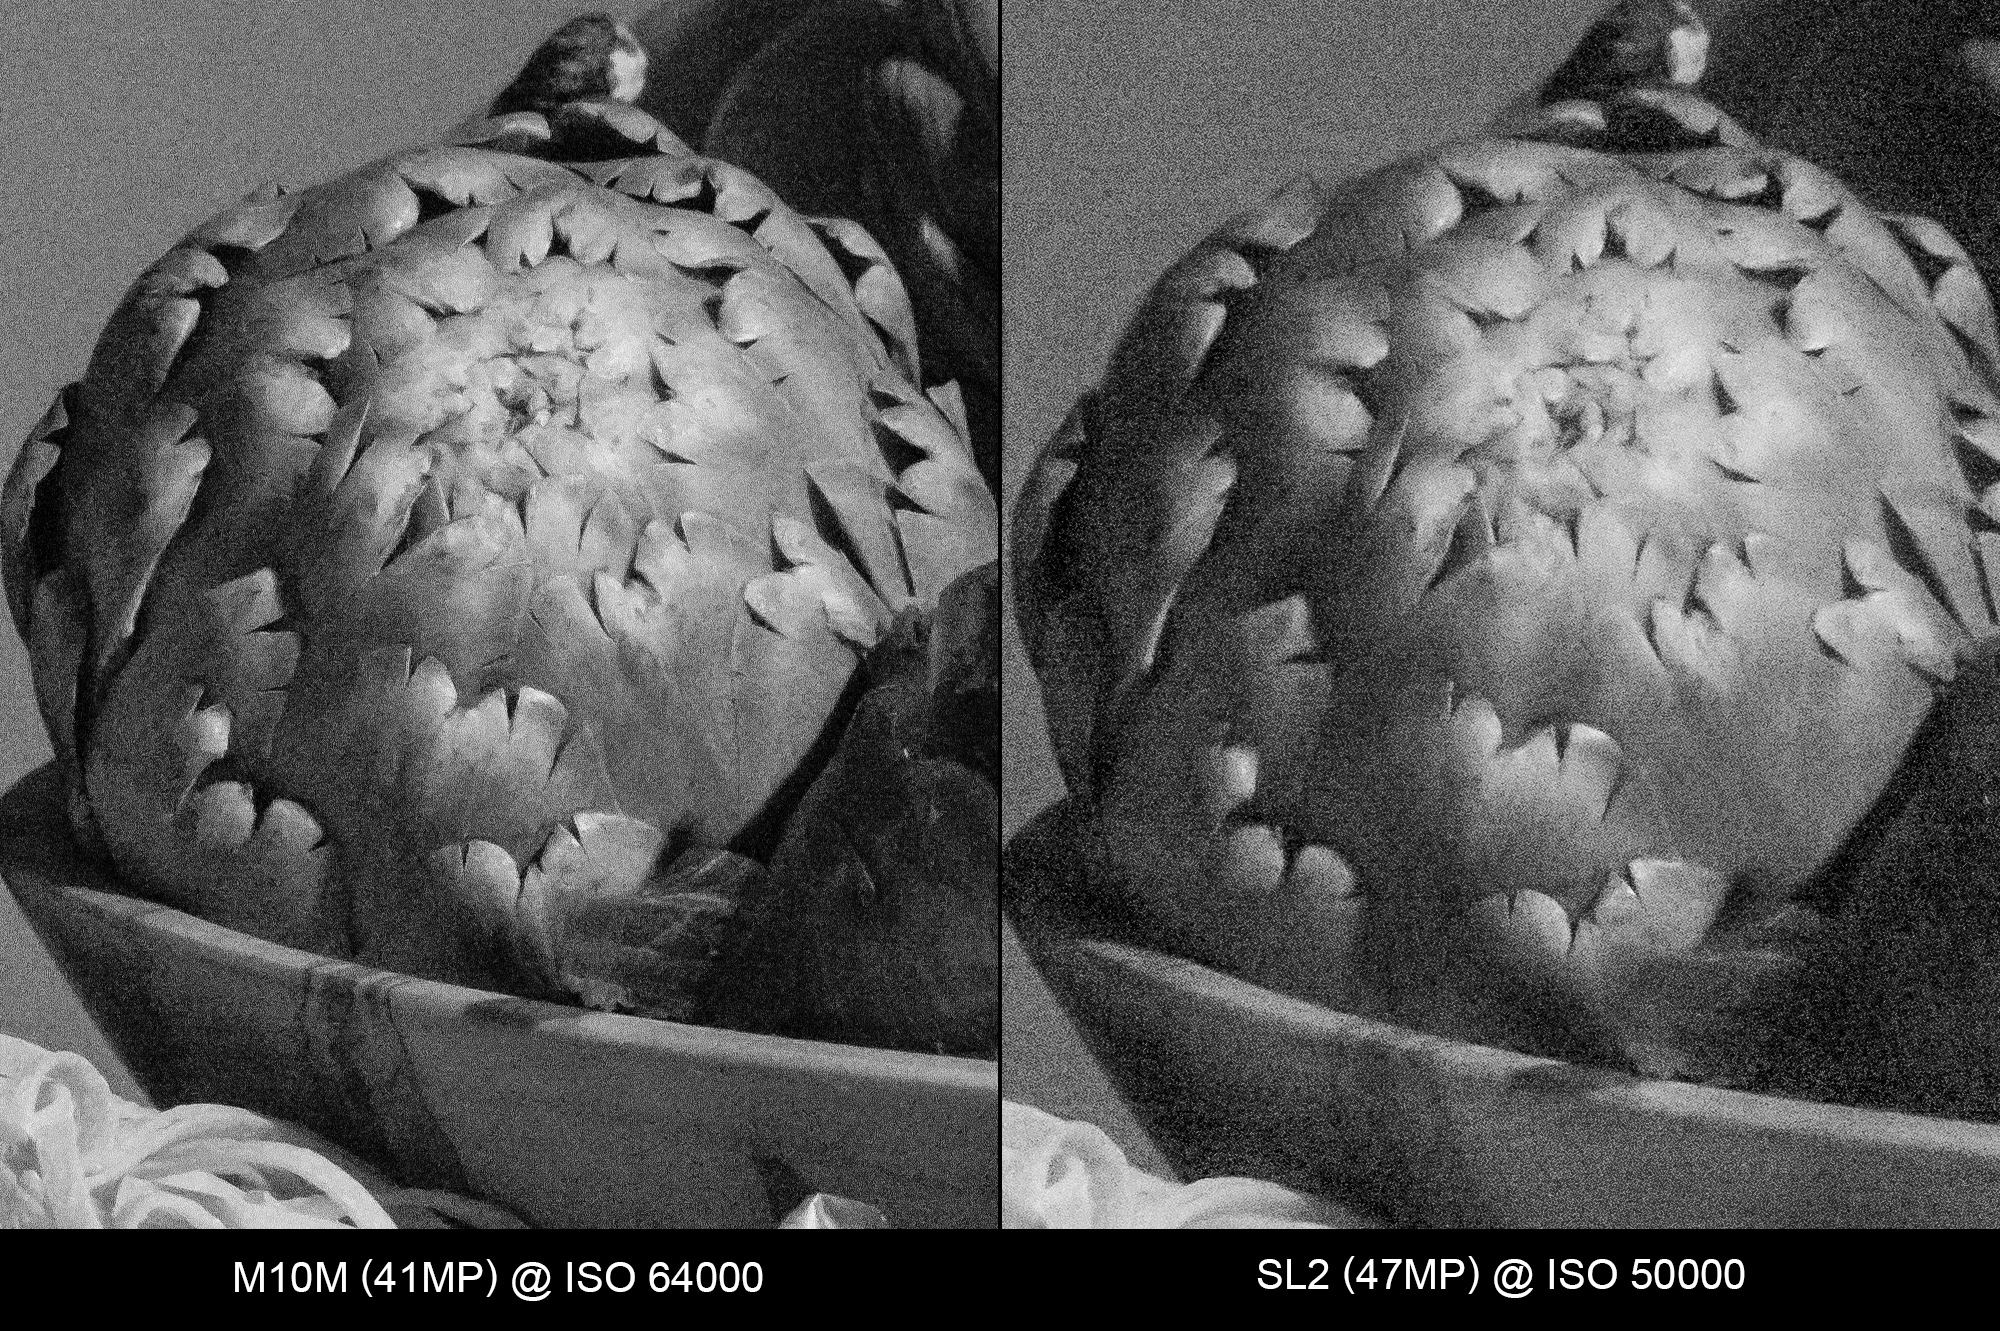
ISO 50000
Now at the upper limit of the the SL2, results at ISO 50,000 are fairly unusable. There is an overwhelming amount of noise, even with aggressive noise reduction. Detail is sacrificed both due to noise, noise reduction and lack of dynamic range. Meanwhile, the M10M continues to put up a decent image.


ISO 64000 vs. 50000

ISO 80000 vs. 50000


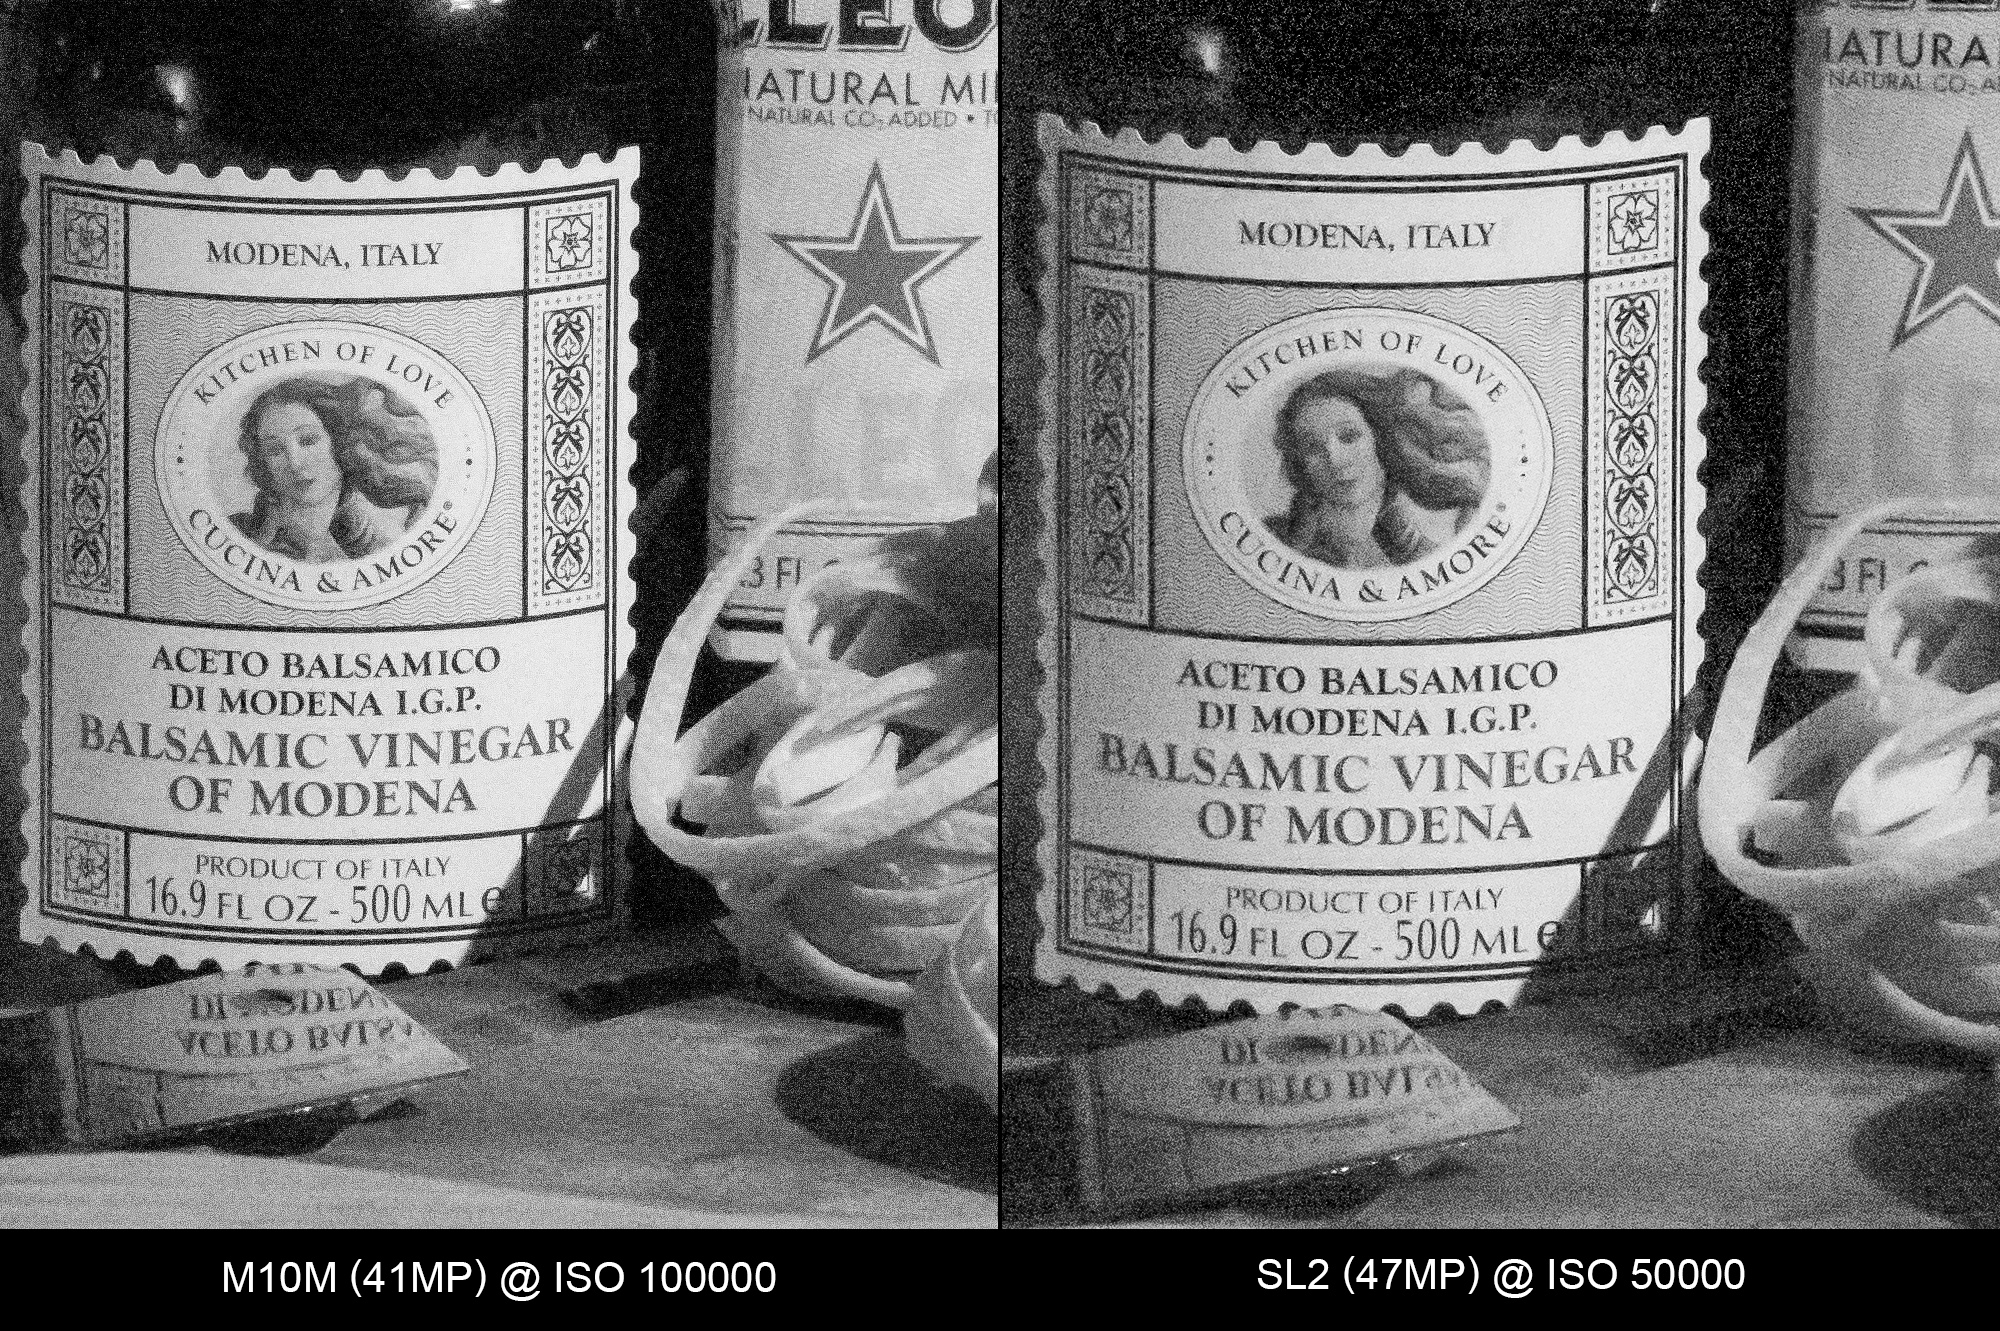
ISO 100000 vs. 50000
Even when maxed out at ISO 100000, the M10M still produces a better image than the SL2 does at ISO 50000.

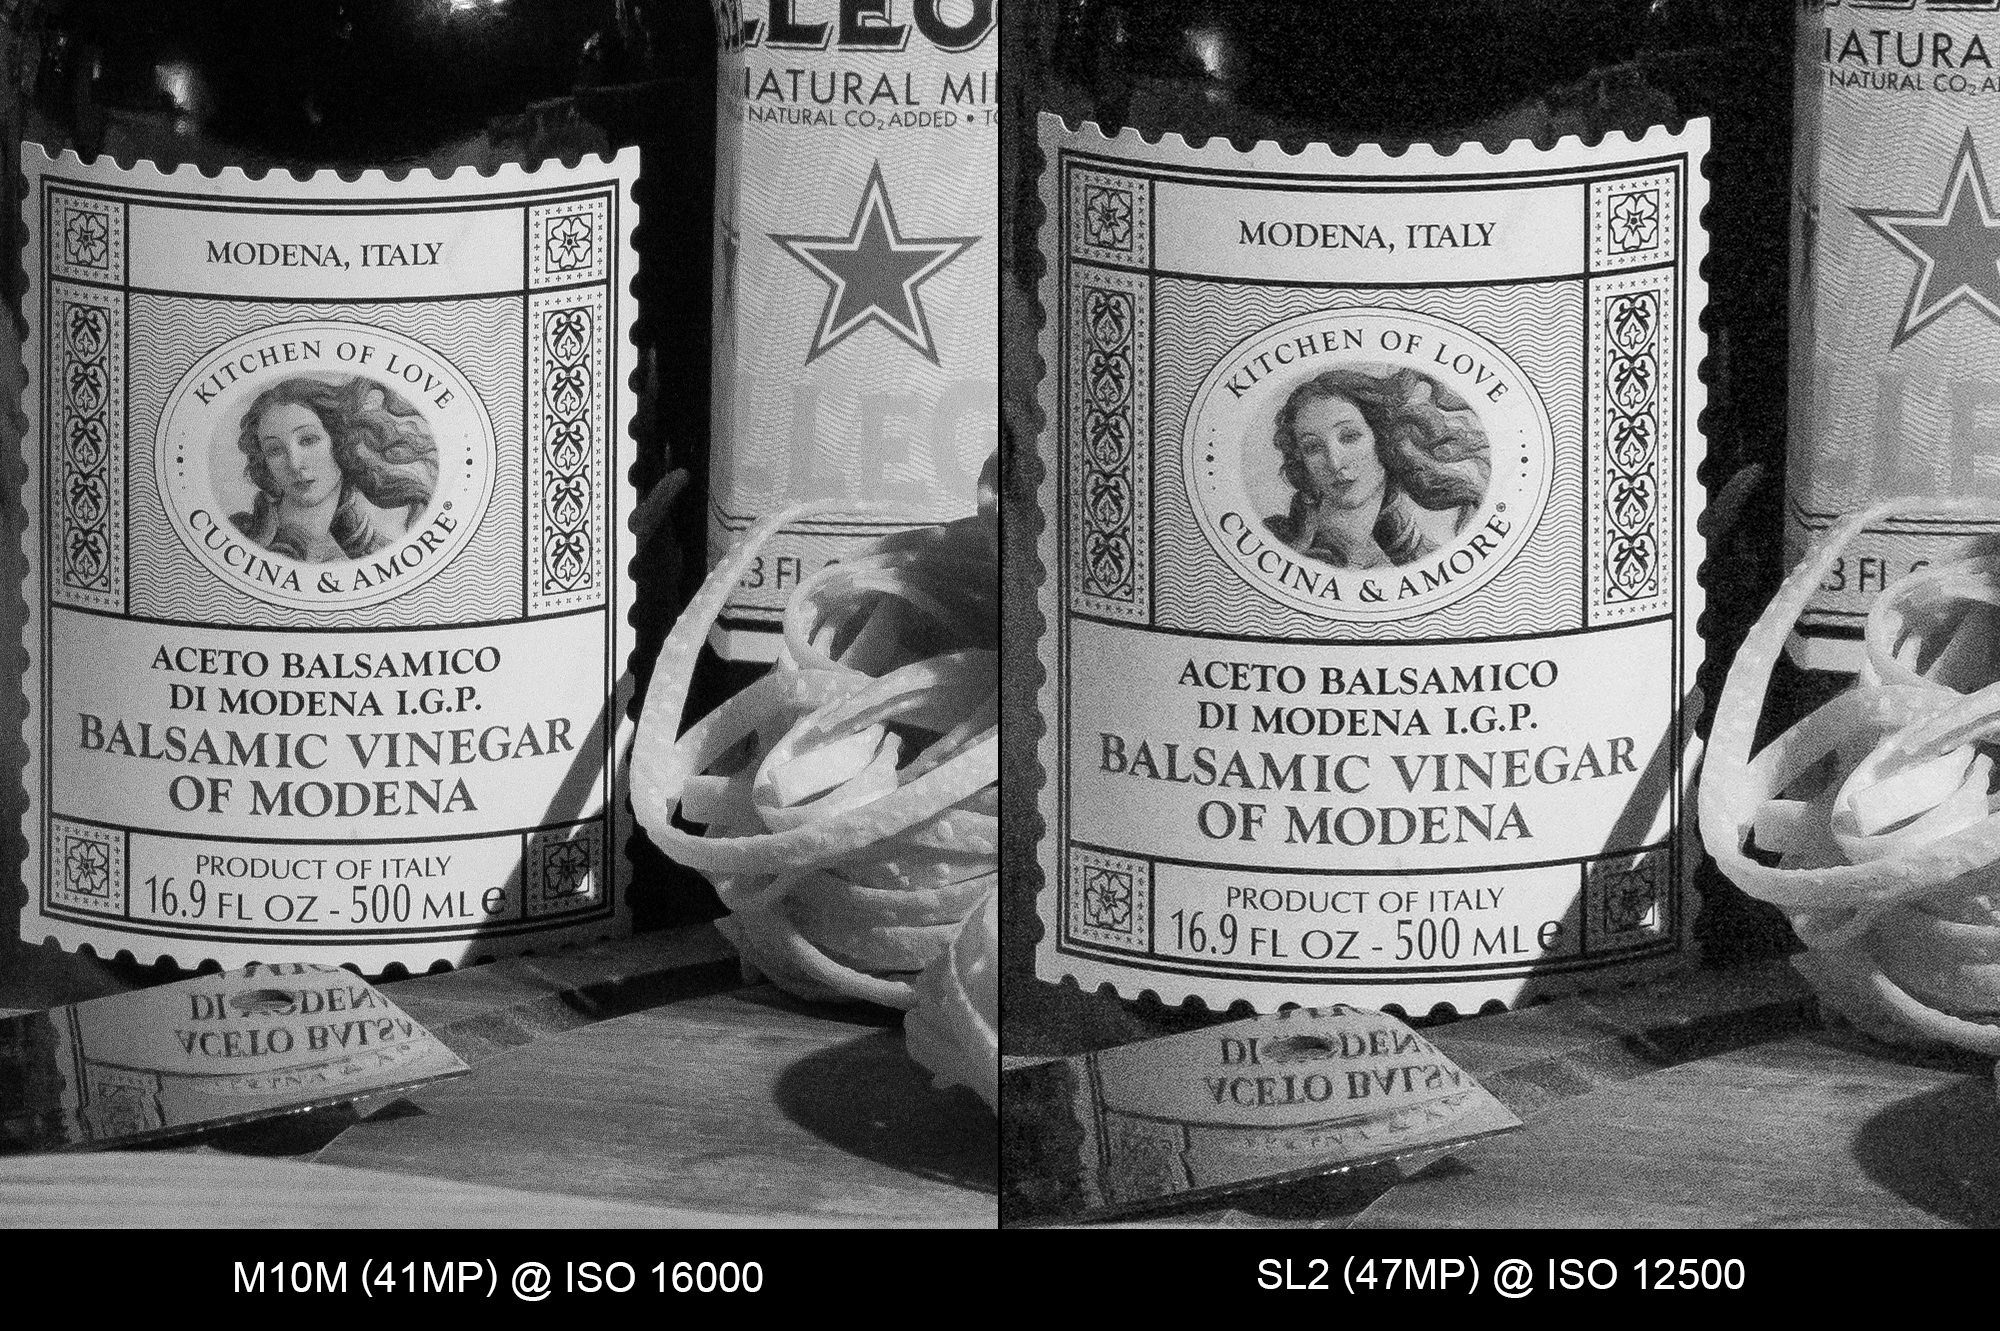
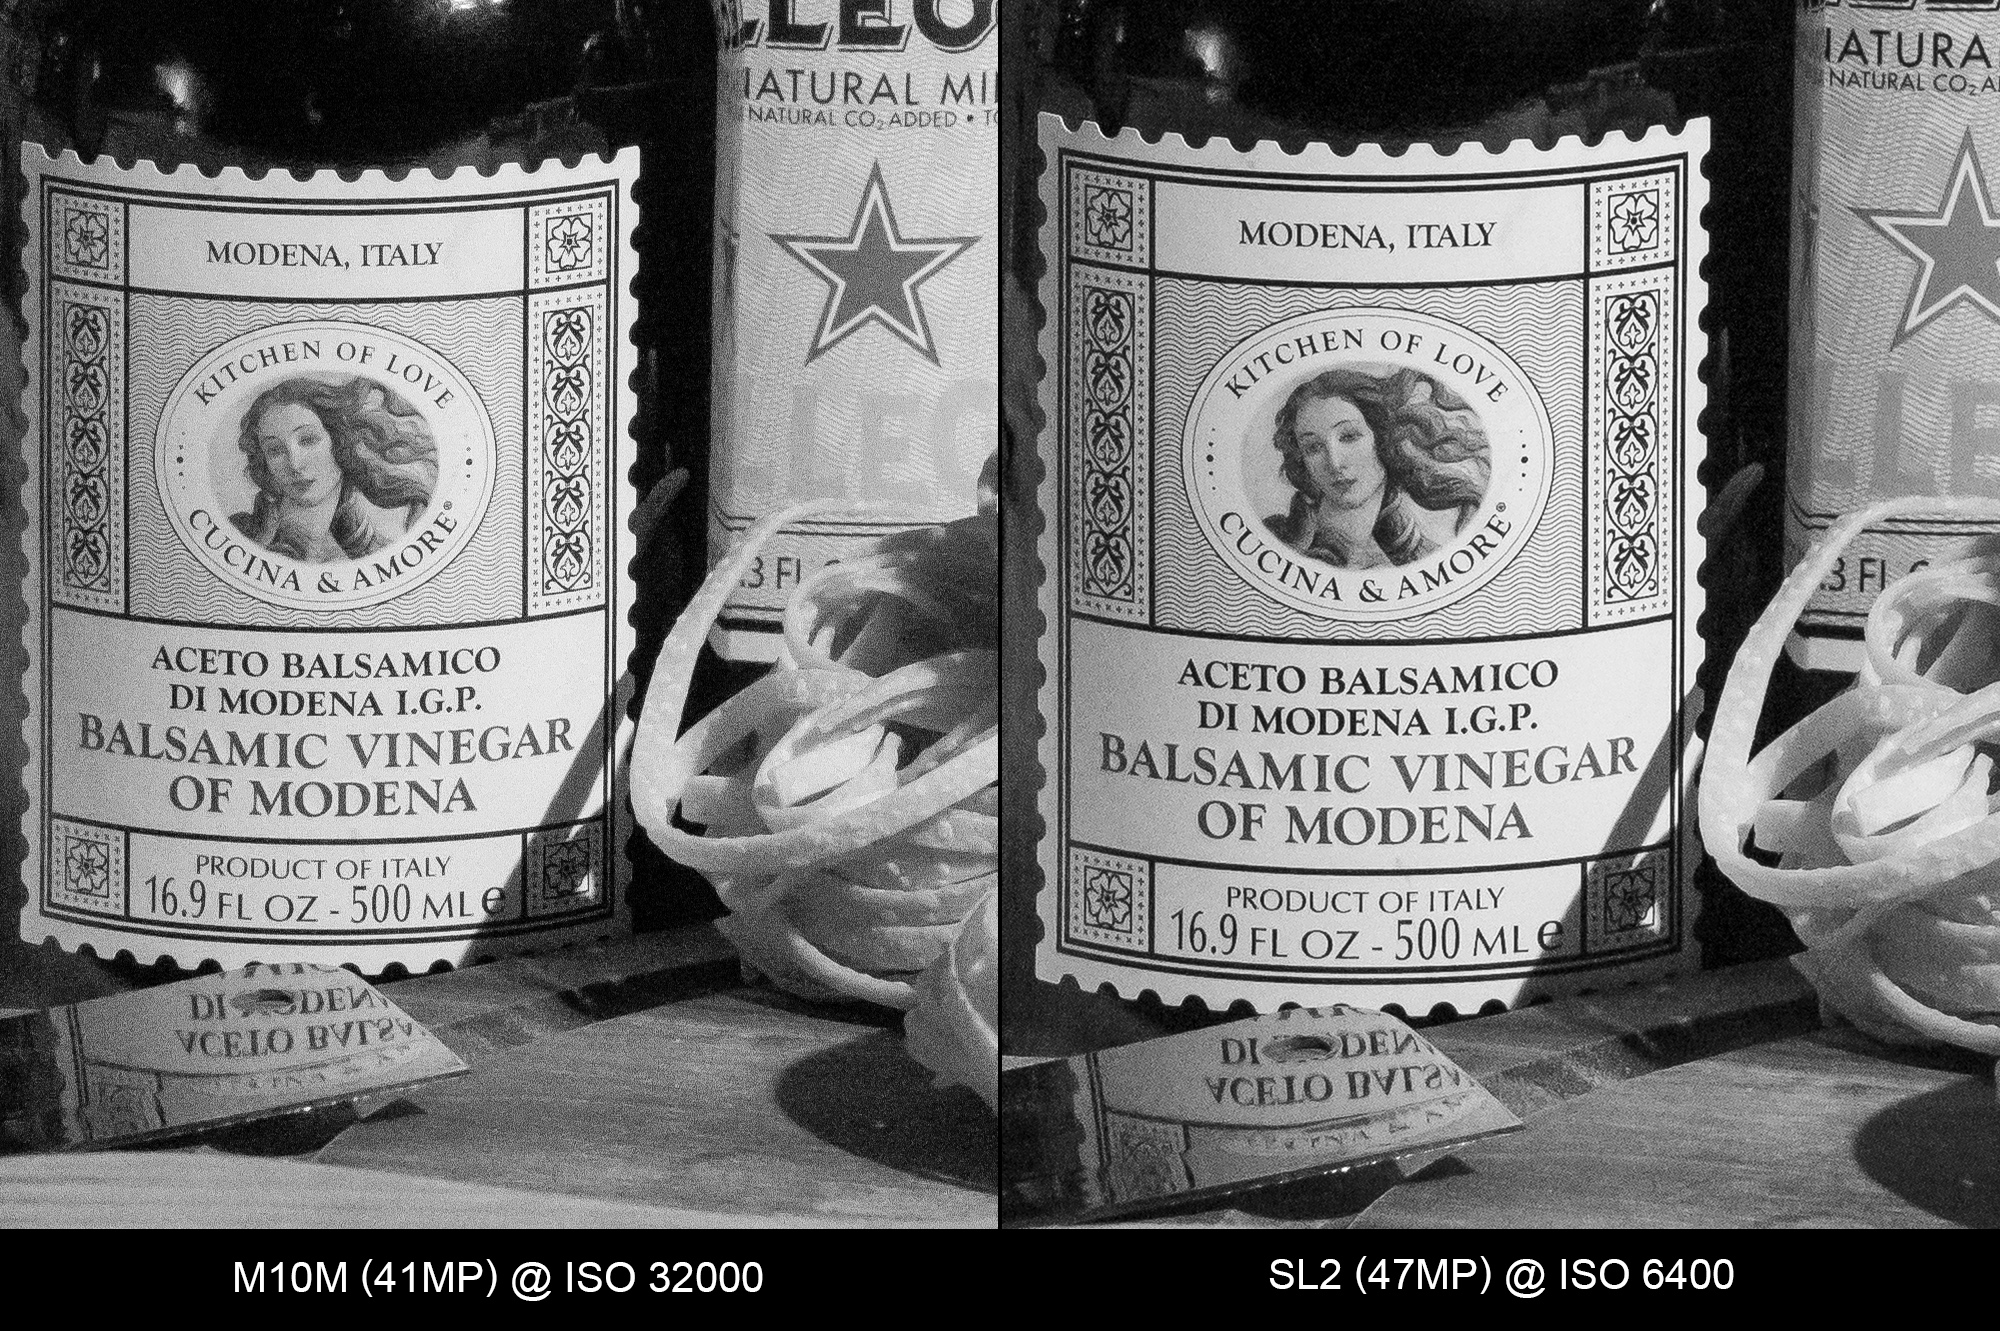
Best of High ISO Settings
For this last comparison, I’ve put what I consider the highest ISO setting from each camera that represents the best balance of light sensitivity, detail resolution and acceptable noise. For the M10M, as in the roundup of M cameras, ISO 32000 looks phenomenal and gives up very little regarding image quality. In order to visually match up to the M10M, the SL2 puts up a decent, if not super-impressive ISO 6400. With discrete 1/3 stop increments, we probably could have gotten more, but ISO 12500 was simply too much sacrifice for my tastes. The net result is a 2.3 stop advantage for the M10M over the color flagship.

Final Thoughts
My number one takeaway: The M10 Monochrom is absolutely incredible in its ability to balance detail resolution with noise suppression, offering low light capability unimaginable just a few years ago. With that out of the way, let’s take a quick look at how the M10 Monochrom matches up against the M contenders and the SL2.
Tackling the M lineup first, the M246 at five years old, puts up an admirable fight against the much newer M10-P and M10 Monochom. And if all you need is solid ISO 12500, the M246 still represents an amazing value in 2020. The M10-P, for its part, did even better than I imagined. Sure, really clean results top out around ISO 10000, but the camera can push past there in a pinch. As noise increases, sharpness and detail are largely maintained. Ultimately, the M10M posts around a 1.5 stop advantage over both the M Monochrom (Typ 246) and the M10-P at their best case settings, but can extend that lead to over 2 stops as ISO continues to increase.
The results from the SL2 were somewhat unexpected. As the current technology flagship for Leica, I was hoping for a little better showing from the SL2. With an optimal top end of ISO 6400, the SL2 can still claim the resolution and detail crown at the low-to-mid range of ISO values, but suffers from noise and reduced dynamic range at ISO 12500 and above. The net result is a 2.5 stop improvement in high ISO of the M10M over the SL2.
That being said, having used the SL2 extensively for the last several months, I never felt limited by its ISO range. And because of the effective sensor-based image stabilization, I rarely need to go past ISO 6400. Given that it offers double the resolution the of the M10, I’m willing to make that tradeoff in order to maximize image quality for my landscape photography and gain access to the exceptional SL lenses.
The M10 Monochrom, on the other hand, has allowed me to shoot at 1/500th of a second, under almost any lighting condition, taking a completely different approach to eliminating camera shake. With the M10 Monochrom, you simply don’t need to ever worry about ISO.
Hopefully, you found the results here helpful in understanding the black and white capabilities of all these excellent photographic tools. Ultimately, any of them will work extremely well for real-world photography. Whether you prioritize the unparalleled low light prowess of the M10 Monochrom, the value of the M Monochrom (Typ 246), the flexibility of a color M with the M10-P, or the technically advanced feature set and ultimate resolution of the SL2, will be up to you as a photographer and what works best for your photography.
For other articles on this blog please click on Blog Archive in the column to the right
For other articles on this blog please click on Blog Archive in the column to the right
To comment or to read comments please scroll past the ads below.
All ads present items of interest to Leica owners.
_______________________________________________________________________
To comment or to read comments please scroll past the ads below.
All ads present items of interest to Leica owners.
_______________________________________________________________________


 Buy vintage Leica cameras from America's premier Leica specialist
 http://www.tamarkin.com/leicagallery/upcoming-show

Buy vintage Leica cameras from
America's premier Leica specialist
http://www.tamarkin.com/leicagallery/upcoming-show
Click on image to enlar Order: info@gmpphoto.comPlease make payment via PayPal to GMP Photography
Click on image to enlarge Order: info@gmpphoto.com
 Order: info@gmpphoto.com
Click on image to enlar
Order: info@gmpphoto.com
Please make payment via PayPal to GMP Photography
Click on image to enlarge
Order: info@gmpphoto.com
Please make payment via PayPal to GMP Photography
Click on image to enlarge
Order: info@gmpphoto.com
Please make payment via PayPal to GMP Photography
No comments:
Post a Comment