
By Heinz Richter
With the advent of digital photography and computer manipulated photographs, we have come to expect the extraordinary, maybe even the seemingly impossible. Unfortunately, this has also caused some of the older, conventional photographic methods to become relics of the past, soon to be forgotten.
There is no doubt that modern, computer methods have made it substantially easier and more productive to manipulate photographs, to show the unusual. Yet we have seen similar things done, in the past, with just conventional photographic techniques. In a modern studio operation, digital techniques are definitely necessary to maintain a competitive edge. But for just plain, photographic fun, some of the old, conventional techniques have a lot to offer.
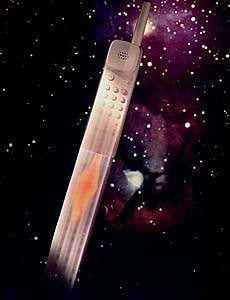
The photograph in this article has often been thought of as being computer generated or manipulated. Yet it was done by standard, photographic methods and a bit of ingenuity. It came about as an assignment for a local client. The basic idea of the shot was specified, and it was up to the photographer to execute the idea in the studio and to put it on film.
The photograph is the result of multiple exposures on the same sheet of film. Following is an account of how this was done…
As a camera, a 4x5 Sinar view camera was chosen, although any other camera could have been used used as well. Initially, the phone was hung up with very thin, micro filament line. It would be very difficult to hang the phone at an angle; instead, it was hung straight, with the antenna facing down. Two lines, in an angle were used to prevent the phone from swinging sideways. An additional two lines were fastened to the antenna to avoid the phone from swinging back and forth. With the phone hanging straight, it was also easier to record the flame as shown. To allow the phone to be recorded at an angle, the camera was tilted. The upside down image in a view camera actually made it easier to compose the set, because the upside down phone showed upright on the ground glass.
Lighting was done all with hot lights, using a strong cross light on the key pad, with a softer light source, with the same angle, as fill. A reflector was used to lighten the dark, opposite side. The camera was supported on a studio stand with a geared head. This allowed for an easy addition of the motion streaks. The initial position of the camera was marked with white board marker directly on the ground glass. With other cameras the position would need to be marked on the tripod. Then the camera was tilted down for the position of the end of the motion streaks. With the shutter open, the camera was slowly tilted upward, until it reached the initial position as marked on the ground glass. This gave the phone an exact, fixed position for the next exposures, the first of which was the phone by itself, against a black background with the above described lighting.
The flame had to be done carefully, in order not to hurt the phone or set it on fire. Clients really don’t like it if you burn their products. A light stand was positioned right behind the phone. Wrapped in a black cloth, the parts below the phone did not show against the black background. On top of the light stand a small piece of sponge material was fastened. The height of the light stand was carefully adjusted such that the sponge was just hidden behind the edge of the phone. The sponge was soaked with lighter fluid, which burns with a bright, orange flame. Thus, the exposure of the flame was no problem at all. Of course, the lighting for the phone was shut off for this exposure.
The fourth and final exposure was for the background. To allow for the space scene, rear projection was chosen. A standard, 35mm slide of the scene was projected onto a rear projection screen. This is a bit trickier, since the product, in this case the phone, must not be allowed to move at all. The subject lighting must be off for this exposure to avoid any light from spilling onto the rear projection screen. For the previous three exposures the screen was not in place. The screen must be carefully put in place, as close as possible to the subject, to avoid any depth of field problems. Neither a change of aperture or refocusing can be done since both will alter the size of the product in front of the screen. The product is, what is called, self-masking. With other words, it blocks out the areas of the background covered by the product. It is also important to filter the projector lens. Most projectors use a heat absorbing glass which is slightly green in color. Without filtration, the rear projection image would have a green cast. A gel filter of CC10M (10 Color Correction values of Magenta) in front of the projector lens assured the correct color balance. Thus, the fourth exposure made the phone move through space.
Exposure readings were taken in the following manner: For the exposure of the phone, the initial reading was an incident reading, facing toward the light source. To make sure that the bright spot on the phone key pad would not be washed out, an additional spot reading of that area was taken to make sure that it was not over exposed by more than 2 ½ stops. A three stop over exposure would have rendered the area white without detail.
Experience has shown that the motion streaks will show just fine with the same lighting and a slow tilting of the camera, lasting about two to three seconds. This is really not that critical, since it doesn’t matter if the motion streaks are a bit lighter or darker, as long as they show up well. Please note: The exposure reading for the phone also determined the exposure settings for the motion streaks. Moving the camera for the motion streaks was the first exposure.
For the flame, a spot reading of the flame, adjusted to a 1 stop over exposure assured that the reddish color of the flame would be maintained without being too dim.
The rear projection exposure was determined with a spot reading also. Incident readings cannot be applied here at all. Of the star field, an area with neutral brightness was chosen for the spot reading. The resulting exposure time then rendered the correct exposure.
It is important to note, that for all four of the exposures the same aperture had to be used. As mentioned already, a change in aperture will slightly change the size of the subject on film.
Since all four exposures show the same subject, this must be avoided. To select an aperture which gave enough depth of field to cover the subject and the rear projection image, the screen was put in place initially, but then was removed for the first three exposures.
I have found that many such photographs have more than just one solution. I would be very much interested in hearing about some other ideas how this photograph could have been made. Such a photograph is obviously beyond everyday shooting. If anyone has any questions regarding how this was done or to clarify any of the techniques described, please let me know and I will gladly get back to you with an answer.
For other articles on this blog please click on Blog Archive in the column to the right
To comment or to read comments please scroll past the ads below.
All ads present items of interest to Leica owners.
_______________________________________________________________________
To comment or to read comments please scroll past the ads below.
All ads present items of interest to Leica owners.
_______________________________________________________________________


 Buy vintage Leica cameras from America's premier Leica specialist
 http://www.tamarkin.com/leicagallery/upcoming-show

Buy vintage Leica cameras from
America's premier Leica specialist
http://www.tamarkin.com/leicagallery/upcoming-show
Click on image to enlar Order: info@gmpphoto.comPlease make payment via PayPal to GMP Photography
Click on image to enlarge Order: info@gmpphoto.com
 Order: info@gmpphoto.com
Click on image to enlar
Order: info@gmpphoto.com
Please make payment via PayPal to GMP Photography
Click on image to enlarge
Order: info@gmpphoto.com
Please make payment via PayPal to GMP Photography
Click on image to enlarge
Order: info@gmpphoto.com
Please make payment via PayPal to GMP Photography
Why are you writing about a picture taken with a Sinar camera on a Leica blog?
ReplyDeleteLeica owners as well as Leica Camera AG do not operate in a vacuum. As such, we should be willing to look beyond our immediate sphere. Obviously, Leica Camera AG thought so too when they bought out Sinar and made it part of the Leica family. In addition, I specifically mentioned that this photograph could have been taken with any camera. Subsequently, what this article is about is a technique which is probably unknown to the majority of photographers today.
DeleteI am not aware of any digital camera that offers multiple exposure. How would one do this with such a camera?
ReplyDeleteYou would have to take four separate exposures, as described and then combine them in Photoshop, Lightroom or other, similar software. Of course the background image would not have to be a rear projection, any image like it could be used.
DeleteModern automatic conveniences allow individuals to succeed in photography with a lost less knowledge than what used to be necessary in the past. The photograph in the article is a good example.
ReplyDeleteI agree. This is okay as long as one does not get into a situation where it is necessary to go beyond modern, automatic conveniences. Even trial and error might not offer a road to success here.
DeletePardon my ignorance, but what is rear projection?
ReplyDeleteThis was a technique used in the days before digital photography and Photoshop. It required a slide of the appropriate background and a translucent screen. Rather than projecting the slide from the front of the screen, the projector was placed behind it. Since this reverses the image from right to left, it was necessary to insert the slide reversed to compensate for that.
Delete