
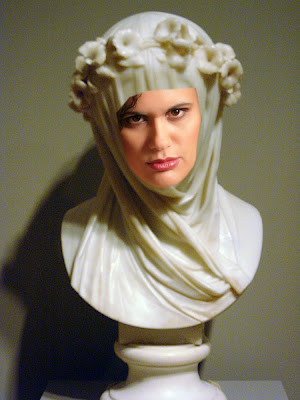
The Minneapolis Institute of Arts (MIA) has a sculpture that has fascinated me ever since I saw it for the first time many years ago. It is a marble statue of a veiled lady. The fascination lies in the fact that the artist was able to use a solid matter, marble, and create a statue that shows the transparency of a veil in total detail.

I have photographed it on several occasions and recently thought if it would be possible to replace the face of the woman in the statue with that of another individual, especially one that makes eye contact with the viewer. This is not an attempt to improve the original, that would be preposterous, but strictly an exercise in the application of Photoshop skills.
Photoshop offers so many possibilities, I am reasonably sure that there are more than one way to accomplish this. I am certainly not saying that my way is the only way, but this is what I did.
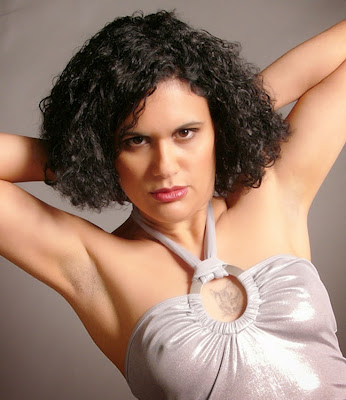
The first task was to find an image in my files for a face to replace the original. For this I selected a picture from a model shoot that I did in the past.

Next there was the necessity of rotating the image to the same angle and to match the size of the model’s face to that of the original. This is a trial and error approach because of the different sizes of the face. I found it easiest to use the “lasso tool” to mark off the rough area to be superimposed onto the original. After arriving at the correct amount of rotation and the correct size, I removed the layer of the superimposed face from the original and then carefully outlined the area of the model’s face that I wanted to transfer onto the original.
The next step was to change the colored image of the face to black and white and then using color correction to match the color of the superimposed model’s face to that of the sculpture. Working with the two layers makes this a relatively simple task.
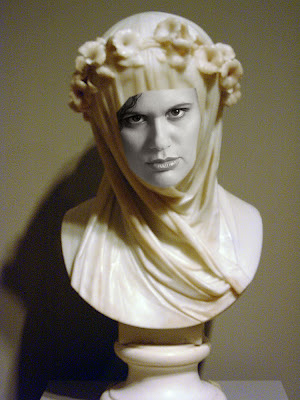

The next step was to merge the superimposed layer with that of the original. After that I used the “spot healing brush” in the “content aware” mode to blend the harsh outline of the model’s face with the rest of the image.

The final step was to use the original image side by side with the new one and then use the “clone stamp tool” with only 10 percent opacity to carefully paint the detail of the veil onto the new image.


You be the judge of how successful this has been.
Please don't hesitate to ask if you need a more in-depth explanation of the Photoshop procedure.
All Photographs taken with Leica equipment
All Photographs taken with Leica equipment
To comment or to read comments please scroll past the ads below.
All ads present items of interest to Leica owners.
___________________________________________________________________________
To comment or to read comments please scroll past the ads below.
All ads present items of interest to Leica owners.
___________________________________________________________________________


 Buy vintage Leica cameras from
America's premier Leica specialist
Buy vintage Leica cameras from
America's premier Leica specialist


Buy vintage Leica cameras from
America's premier Leica specialist


Click on image to enlarge

Order: info@gmpphoto.com
Please make payment via PayPal to GMP Photography
Click on image to enlarge
 Order: info@gmpphoto.com
Click on image to enlarge
 Order: info@gmpphoto.com
Click on image to enlarge

Order: info@gmpphoto.com
Please make payment via PayPal to GMP Photography
Click on image to enlarge

Order: info@gmpphoto.com
Please make payment via PayPal to GMP Photography
Click on image to enlarge

Order: info@gmpphoto.com
Please make payment via PayPal to GMP Photography
Amazing work. I do like your version better than the original.
ReplyDeleteCouldn't this be done just as easily in Lightroom?
ReplyDeleteI don't see any reason why not. I did not mean to imply that this work required Photoshop. For myself, I have never used Lightroom for the simple reason that I started using Photoshop from the very beginning some 30 years ago and I have never had any reason to switch to anything else.
DeleteBeen looking at the Veiled Lady for years and still marvel at the work done. Let's just say your's is nice and call it a work in process. Once a long time ago the question was asked, " how do you do a double exposure with a Leica, B.D. ? " and the answer came down to, " you hold the rewind clutch lever 'R' while making your next exposure. And now your Leica will shoot 'Doubles' all day long "
ReplyDeleteTo expand on the double exposure: Once the first exposure is made, set the rewind lever to "R" and rewind the film slowly. While doing so, watch the turning release knob, and rewind the film more than one full revolution. Then set the rewind back to "A" and wind the advance knob until it stops. This will allow for perfect registration for a double exposure. This method has the advantage that you can also recall any previous expose for a double exposure. If, for instance, you want to make a double exposure 12 frames back, rewind 12 revolutions and some more, then go back to advance and turn the advance until it stops, again, perfect registration. To continue shooting with the unexposed part of the film, cover the lens, advance for 12 shots and continue shooting as usual. This method also works with the Nikon rangefinder cameras as well as the original Nikon F SLR cameras since they copied the Leica shutter with those cameras. With your described method there is a slight chance that the tension of the take up spool will slightly move the film.
Delete